Code Review of https://github.com/DefectDojo/django-DefectDojo
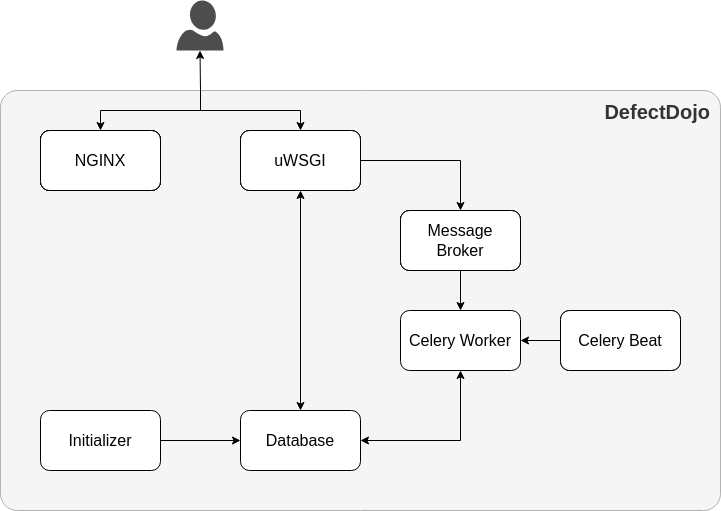
The webserver NGINX delivers all static content, e.g. images, JavaScript files or CSS files.
Nginx (pronounced as “engine-x”) is a powerful and versatile web server software that is used in various scenarios. Here are some common use cases for Nginx:
-
Web Server: Nginx is widely used as a web server to host websites. It is known for its high performance, stability, rich feature set, simple configuration, and low resource consumption.
-
Reverse Proxy: Nginx is often used as a reverse proxy to distribute incoming network traffic across multiple servers, improving the speed and efficiency of web applications.
-
Load Balancer: It can perform load balancing to evenly distribute client requests across multiple backend servers, which helps in handling high traffic loads and increasing redundancy.
-
Content Cache: Nginx can cache content from a web server and serve it directly to clients, reducing the load on the web server and improving response times for subsequent requests for the same content.
-
Media Streaming: Nginx can be configured to stream audio and video content efficiently. It supports various streaming protocols, including HTTP Live Streaming (HLS).
-
API Gateway: It can act as an API gateway, managing, and controlling access to backend APIs, and providing features like rate limiting, authentication, and SSL/TLS termination.
-
Security: Nginx can enhance the security of a web application by implementing features like SSL/TLS termination, HTTP/2, secure link module, and more.
-
Microservices Architecture: In a microservices architecture, Nginx can act as a front-end proxy server to route requests to various microservices based on URL paths or other criteria.
-
Static Content Serving: It efficiently serves static content (like images, CSS, JavaScript) due to its ability to handle a large number of simultaneous connections with minimal resources.
-
Email Proxy: Nginx can also be used as a mail proxy server for IMAP, POP3, and SMTP protocols.
These use cases illustrate the flexibility and power of Nginx as a web server and its utility in modern web architectures. Its performance and scalability make it a popular choice for small projects as well as large-scale enterprise applications.
uWSGI is a software application that acts as a communication interface between a web server and a web application, particularly for Python-based applications. It implements the WSGI (Web Server Gateway Interface) specification, which defines a simple and universal interface between web servers and web applications or frameworks written in Python. Here are some common use cases for uWSGI:
-
Application Deployment: uWSGI is primarily used to deploy Python web applications. It serves as a container for running Python-based web applications and frameworks like Flask, Django, Pyramid, etc.
-
Efficient Application Server: As an application server, uWSGI efficiently manages and runs multiple Python applications, handling the communication between the web server (like Nginx or Apache) and the Python application.
-
Load Balancing: uWSGI can manage multiple worker processes or threads to handle incoming requests, providing load balancing capabilities and improving the handling of concurrent requests.
-
Reverse Proxy Integration: uWSGI works well with reverse proxies like Nginx or Apache. This setup enhances performance and security, as the reverse proxy can handle static content and SSL/TLS termination, while uWSGI focuses on dynamic content.
-
Process Management: uWSGI includes a master process that manages worker processes or threads, ensuring efficient use of system resources and high availability of the application.
-
Scalability: It allows for easy scaling of web applications, both vertically (by increasing resources on a single server) and horizontally (by adding more servers).
-
Multiple Language Support: While uWSGI is primarily used with Python applications, it also supports other languages like Ruby, Perl, and PHP, making it a versatile choice for web application deployment.
-
Monitoring and Logging: uWSGI provides detailed logging and monitoring features, which are crucial for debugging, performance optimization, and maintaining the reliability of web applications.
-
Graceful Reloads and Upgrades: It supports graceful reloading of applications and configuration changes without dropping client connections, which is essential for high-availability environments.
-
Plugin Architecture: uWSGI has a pluggable architecture, allowing for customization and extension of its core functionality with various plugins.
uWSGI’s combination of efficiency, flexibility, and compatibility with various programming languages and web servers makes it a popular choice for deploying and managing Python web applications in diverse environments.
from split_settings.tools import optional, include


# See https://documentation.defectdojo.com/getting_started/configuration/ for options

# how to tune the configuration to your needs.


include(

'settings.dist.py',

optional('local_settings.py')

)
The selected code is from a Python file named settings.py. This file is typically used in Python applications to store configuration settings. The specific settings that are stored can vary widely depending on the needs of the application.
In the provided code, there are two import statements at the top. The split_settings.tools module is being imported, and specifically the optional and include functions from it. The split_settings package is a utility for managing Django settings, allowing you to split your settings into multiple files for better organization. The optional function is used to include settings files that may or may not exist, while the include function is used to include settings files that must exist.
Following the import statements, there is a comment that provides a URL to the documentation for DefectDojo. DefectDojo is an open-source application vulnerability correlation and security orchestration tool. The comment suggests that this URL provides information on how to configure the application to your needs. However, without more context or code, it’s hard to say exactly what settings are being configured.
The cursor is currently on line 6, which is an empty line. In Python, empty lines are often used to separate logical sections of code for better readability. However, without more code, it’s hard to say what should come next. It could be more import statements, or it could be actual settings for the application.
https://github.com/DefectDojo/django-DefectDojo/blob/master/readme-docs/DOCKER.md
# Read .env file as default or from the command line, DD_ENV_PATH

if os.path.isfile(root('dojo/settings/.env.prod')) or 'DD_ENV_PATH' in os.environ:

env.read_env(root('dojo/settings/' + env.str('DD_ENV_PATH', '.env.prod')))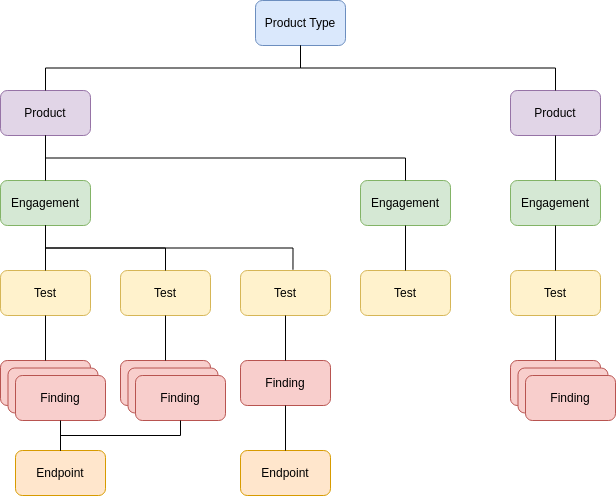
Explain: https://documentation.defectdojo.com/usage/models/
https://documentation.defectdojo.com/usage/features/
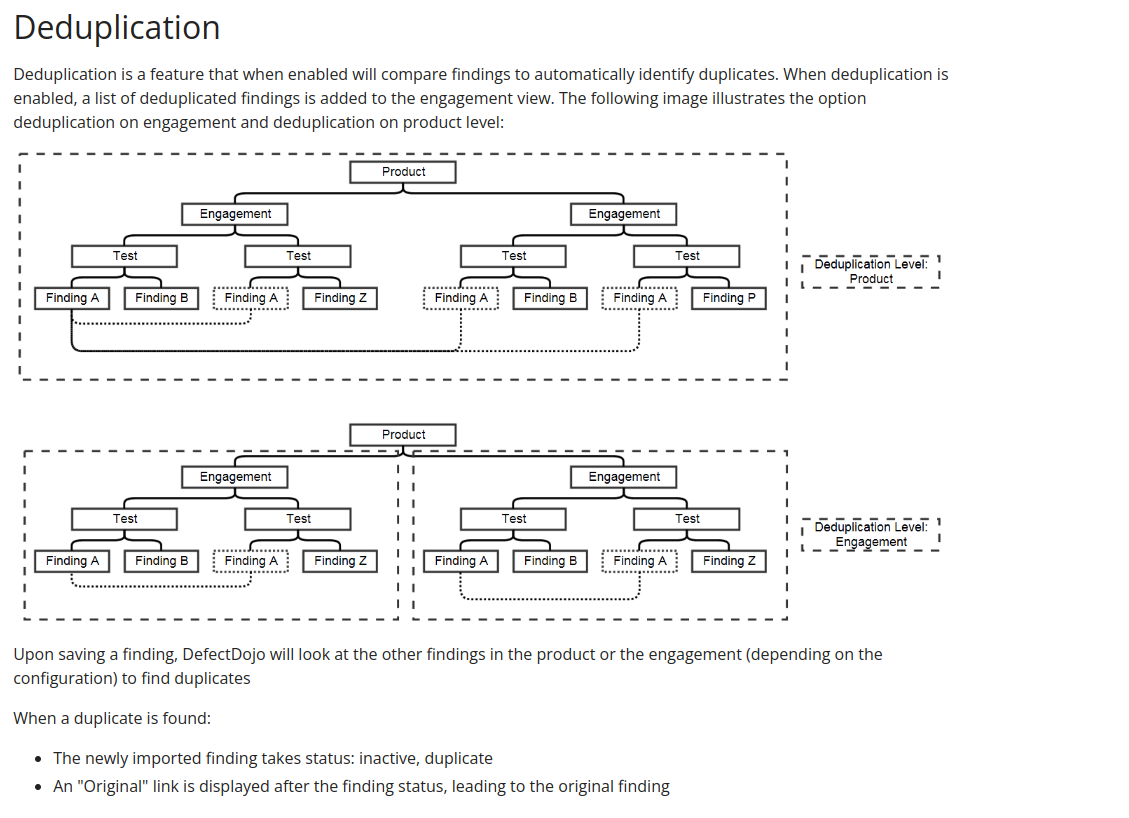
There are two ways to use the deduplication:
Deduplicate vulnerabilities in the same build/release. The vulnerabilities may be found by the same scanner (same scanner deduplication) or by different scanners (cross-scanner deduplication).
this helps analysis and assessment of the technical debt, especially if using many different scanners; although detecting duplicates across scanners is not trivial as it requires a certain standardization.
Track unique vulnerabilities across builds/releases so that DefectDojo knows when it finds a vulnerability that has seen it before.
this allows you keep information attached to a given finding in a unique place: all further duplicate findings will point to the original one.
Which algo we need to use ??
https://documentation.defectdojo.com/usage/features/#engagement-configuration
In Django, creating custom management commands is a powerful feature that allows you to add your own commands to the manage.py utility. These commands can perform various tasks, such as database maintenance, custom data processing, or automation of certain operations. Here’s a step-by-step guide to creating a custom management command:
-
Create Command Directory:
- Go to your Django application directory (not the project directory). This is the directory where
models.py,views.py, etc., are located. - Inside this directory, create a new directory named
management/. - Inside the
management/directory, create another directory namedcommands/.
Your directory structure should look like this:
your_app/ ├── __init__.py ├── management/ │ ├── __init__.py │ └── commands/ │ └── __init__.py ├── models.py ├── views.py ... (other files) - Go to your Django application directory (not the project directory). This is the directory where
-
Create the Command File:
- Inside the
commands/directory, create a Python file for your command. The name of this file will be the name of your command. For example,custom.pyfor a command namedcustom.
- Inside the
-
Implement the Command:
- In your command file (
custom.py), importBaseCommandfromdjango.core.management.base. - Create a class that extends
BaseCommand. - Implement the
add_argumentsmethod to add custom command-line arguments (optional). - Implement the
handlemethod, where you will write the logic of your command. - The
handlemethod is where your command’s functionality will be executed.
- In your command file (
-
Example Command Implementation: Here’s an example of what the
custom.pymight look like:from django.core.management.base import BaseCommand, CommandError class Command(BaseCommand): help = 'Description of your custom command' def add_arguments(self, parser): # Optional: add command-line arguments here parser.add_argument('sample_arg', type=int) def handle(self, *args, **options): # Your command logic goes here sample_arg = options['sample_arg'] self.stdout.write(self.style.SUCCESS('Successfully executed command with argument: %s' % sample_arg)) -
Run the Command:
- You can now run your custom command with
manage.py. For example:python manage.py custom 123 - This will execute your custom command with the argument
123.
- You can now run your custom command with
Remember to follow Django’s best practices and ensure that your command is idempotent (safe to run multiple times without causing unintended side effects) and handles errors appropriately. Custom commands can be very powerful tools for automating and simplifying complex tasks in your Django projects.
The code snippet you provided is a Django custom management command that computes and notifies about Service Level Agreement (SLA) breaches for findings. The _notify function is defined within the sla_compute_and_notify function to provide a clear, organized structure and to encapsulate functionality that is specific to the SLA computation and notification process. Here are a few reasons why _notify is implemented as an inner function:
-
Scope Limitation: The
_notifyfunction is specific to thesla_compute_and_notifycommand and is not intended to be used elsewhere. Defining it as an inner function limits its scope to the outer function, making the code more modular and easier to understand. -
Access to Outer Function’s Variables: The inner function
_notifyhas access to the variables and arguments of the outer functionsla_compute_and_notify. This means it can directly use and modify these variables without needing to pass them as arguments, simplifying the function signature and usage. -
Code Organization: By defining
_notifywithinsla_compute_and_notify, the code related to SLA notification is kept together. This improves readability and maintainability, as all the logic related to this specific task is in one place. -
Encapsulation: Inner functions provide a way to encapsulate functionality, hiding implementation details from the outer scope. This can make the outer function’s code more readable and focused on its primary purpose.
-
Logical Grouping: The
_notifyfunction is logically part of the SLA computation and notification process. Keeping it inside thesla_compute_and_notifyfunction groups related logic together, making it easier for developers to understand how different parts of the code interact.
In summary, defining _notify as an inner function in sla_compute_and_notify is a design choice that enhances code organization, scope management, and readability, while keeping related functionalities together.
Creating decorators in Django is similar to creating decorators in Python, as Django is a web framework built on Python. Decorators are a powerful feature in Python that allows you to modify or enhance the behavior of functions or methods. In the context of Django, decorators are often used for things like checking user permissions, modifying HTTP responses, or tracking usage.
Here’s a step-by-step guide to creating a simple decorator in Django:
-
Define the Decorator Function: A decorator is a function that takes another function as an argument and returns a new function. Let’s create a basic example of a decorator that prints a message before and after a view function is called.
def my_decorator(view_func):
    def _wrapped_view(request, *args, **kwargs):
        print("Before the view function is called.")
        response = view_func(request, *args, **kwargs)
        print("After the view function is called.")
        return response
    return _wrapped_view
In this example,
my_decoratoris the decorator function, and_wrapped_viewis the new function that wraps the original view function (view_func). The_wrapped_viewfunction adds additional behavior (printing messages) before and after calling the original view function. -
Use the Decorator in Your Views: Decorators can be applied to Django view functions to modify their behavior. Here’s how you can use the
my_decoratorwith a Django view:from django.http import HttpResponse @my_decorator def my_view(request): return HttpResponse("Hello, world!") # The view will now print messages before and after sending the response. -
Creating Decorators with Arguments: Sometimes, you might want to create decorators that accept arguments. This requires an additional level of function nesting. Here’s an example of a decorator that takes an argument:
def decorator_with_args(arg):
    def _decorator(view_func):
        def _wrapped_view(request, *args, **kwargs):
            print(f"Decorator argument: {arg}")
            return view_func(request, *args, **kwargs)
        return _wrapped_view
    return _decorator

@decorator_with_args("custom argument")
def another_view(request):
    return HttpResponse("Another view.")
In this case,
decorator_with_argsis a function that takes an argument and returns the actual decorator (_decorator). The_decoratorfunction then takes the view function and returns_wrapped_view, which includes the additional behavior. -
Django-specific Decorators: Django provides several built-in decorators for common tasks, such as
login_required,permission_required, andcsrf_exempt. You can also create Django-specific decorators, such as those for checking user permissions, modifying HTTP requests or responses, or interacting with Django’s models and views.
Remember, when creating decorators, it’s important to preserve the signature of the original function. This includes passing the correct arguments to the function and returning the expected response. Decorators are a powerful tool in Django and can greatly simplify your code, enforce DRY principles, and add reusable functionality across multiple views.