Source Code of Book url
Data pipelines with apache airflow book name
Chapter 1
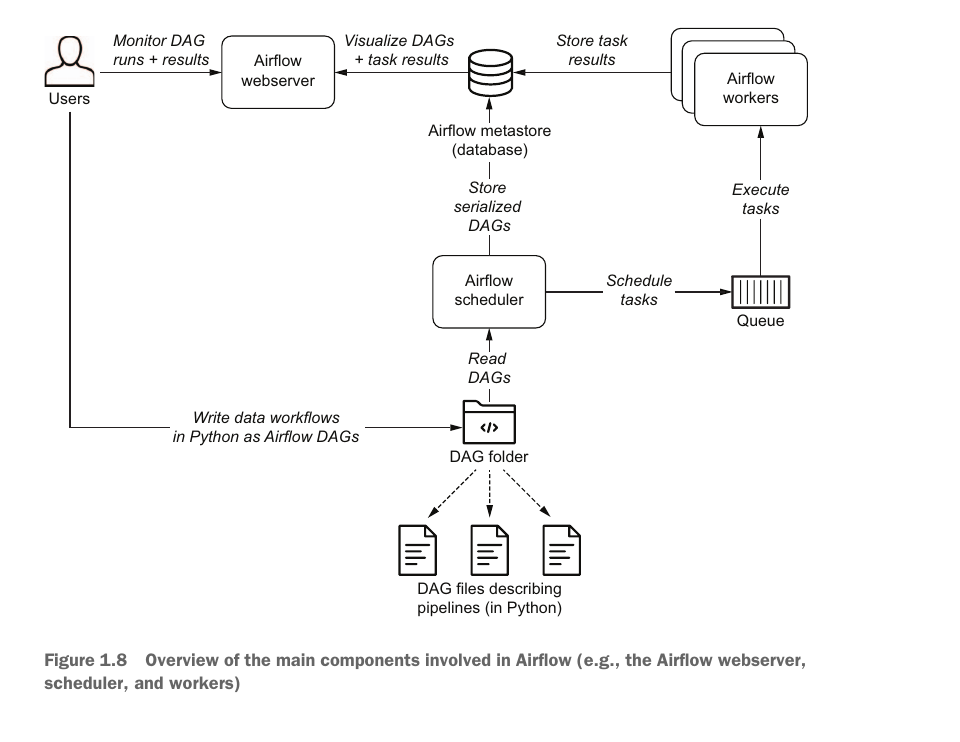
Airflow’s key feature is that it enables you to easily build scheduled data pipelines using a flexible Python framework, while also providing many building blocks that allow you to stitch together the many different technologies encountered in modern technological landscapes.
Airflow is not a data processing tool in itself but orchestrates the different com- ponents responsible for processing your data in data pipelines.

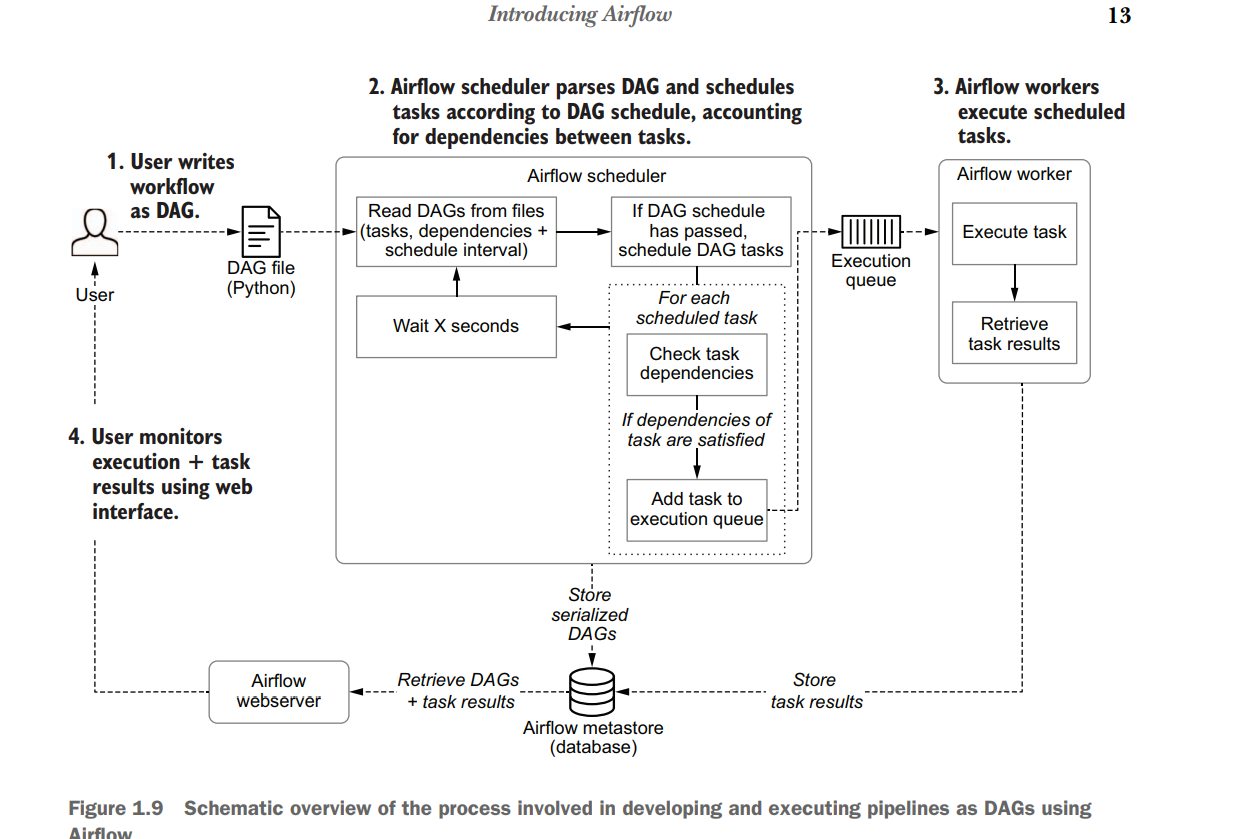
The Airflow scheduler —Parses DAGs, checks their schedule interval, and (if the DAGs’ schedule has passed) starts scheduling the DAGs’ tasks for execution by passing them to the Airflow workers.
The Airflow workers—Pick up tasks that are scheduled for execution and execute them. As such, the workers are responsible for actually “doing the work.”
The Airflow webserver —Visualizes the DAGs parsed by the scheduler and provides the main interface for users to monitor DAG runs and their results.
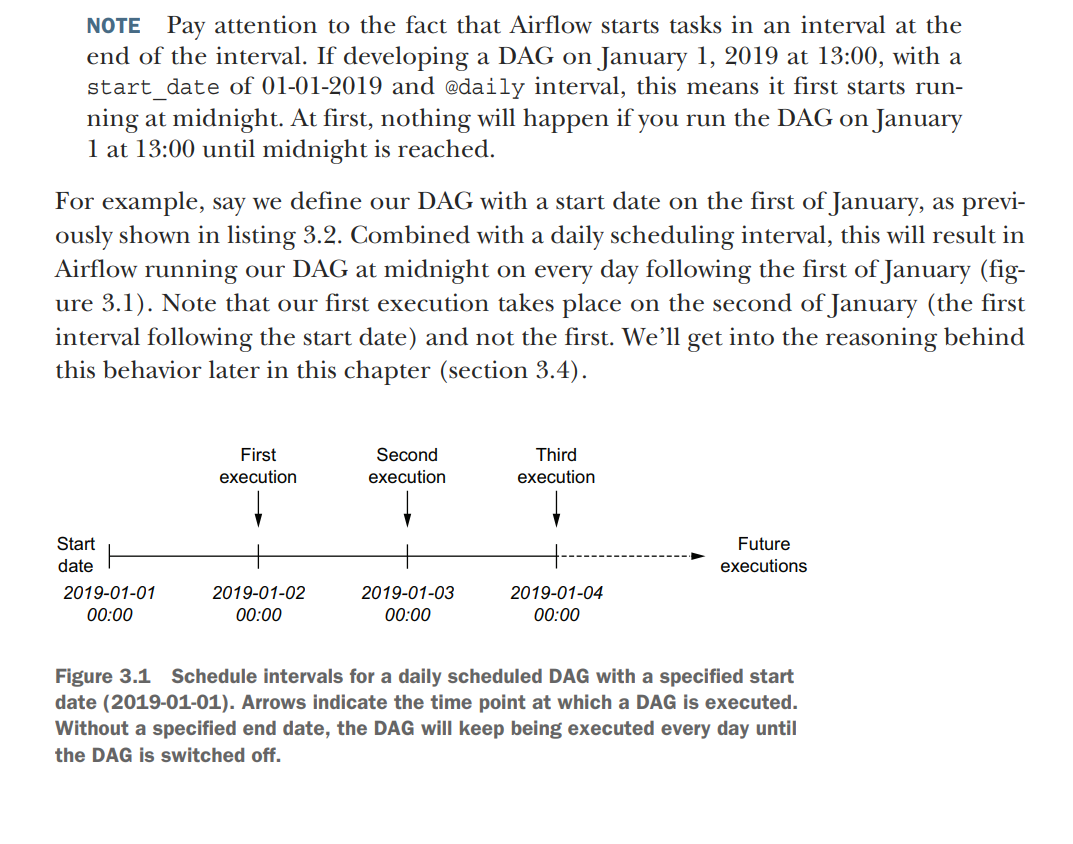
This property of Airflow’s schedule intervals is invaluable for implementing efficient data pipelines, as it allows you to build incremental data pipelines. In these incremental pipelines, each DAG run processes only data for the corresponding time slot (the data’s delta) instead of having to reprocess the entire data set every time. Especially for larger data sets, this can provide significant time and cost benefits by avoiding expensive recomputation of existing results. Schedule intervals become even more powerful when combined with the concept of backfillingAirflow, which allows you to execute a new DAG for historical schedule intervals that occurred in the past. This feature allows you to easily create (or backfill) new data sets with historical data simply by running your DAG for these past schedule intervals. Moreover, by clearing the results of past runs, you can also use this Airflow feature to easily rerun any historical tasks if you make changes to your task code, allowing you to easily reprocess an entire data set when needed.
Chapter 2
Anatomy of an Airflow DAG
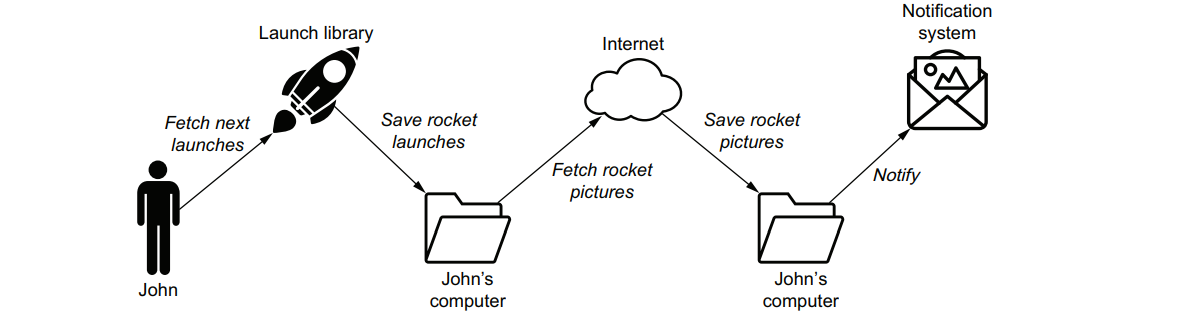
Download_launches >> get_pictures >>notify is our pipeline. DAGS for Downloading and proceeding rocket launch data
import json
import pathlib
import airflow.utils.dates
import requests
import requests.exceptions as requests_exceptions
from airflow import DAG
from airflow.operators.bash import BashOperator
from airflow.operators.python import PythonOperator
dag = DAG(
dag_id="download_rocket_launches",
description="Download rocket pictures of recently launched rockets.",
start_date=airflow.utils.dates.days_ago(14),
schedule_interval="@daily",
)
download_launches = BashOperator(
task_id="download_launches",
bash_command="curl -o /tmp/launches.json -L 'https://ll.thespacedevs.com/2.0.0/launch/upcoming'", # noqa: E501
dag=dag,
)
def _get_pictures():
# Ensure directory exists
pathlib.Path("/tmp/images").mkdir(parents=True, exist_ok=True)
# Download all pictures in launches.json
with open("/tmp/launches.json") as f:
launches = json.load(f)
image_urls = [launch["image"] for launch in launches["results"]]
for image_url in image_urls:
try:
response = requests.get(image_url)
image_filename = image_url.split("/")[-1]
target_file = f"/tmp/images/{image_filename}"
with open(target_file, "wb") as f:
f.write(response.content)
print(f"Downloaded {image_url} to {target_file}")
except requests_exceptions.MissingSchema:
print(f"{image_url} appears to be an invalid URL.")
except requests_exceptions.ConnectionError:
print(f"Could not connect to {image_url}.")
get_pictures = PythonOperator(
task_id="get_pictures", python_callable=_get_pictures, dag=dag
)
notify = BashOperator(
task_id="notify",
bash_command='echo "There are now $(ls /tmp/images/ | wc -l) images."',
dag=dag,
)
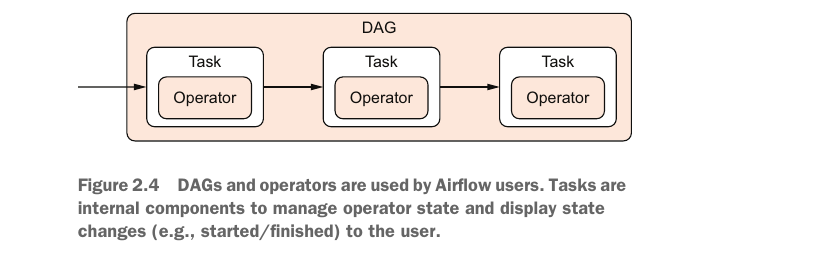
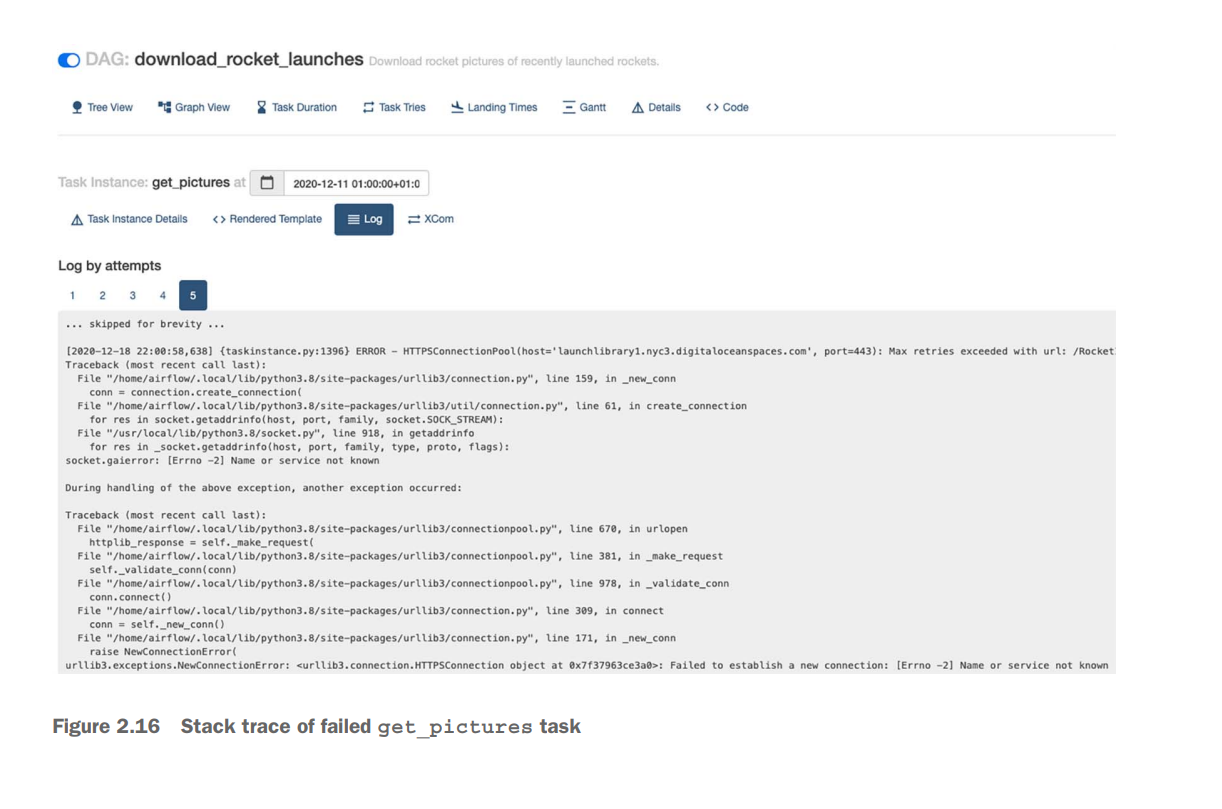
download_launches >> get_pictures >> notifyEach operator performs a single unit of work, and multiple operators together form a workflow or DAG in Airflow. Operators run independently of each other, although you can define the order of execution, which we call dependencies in Airflow: download_launches >> get_pictures >> notify
Tasks vs. operators In this context and throughout the Airflow documentation, we see the terms operator and task used interchangeably. From a user’s perspective, they refer to the same thing, and the two often substitute each other in discussions. Operators provide the implementation of a piece of work. Airflow has a class called BaseOperator and many subclasses inheriting from the BaseOperator, such as PythonOperator, EmailOperator, and OracleOperator.
NOTE It is unnecessary to restart the entire workflow. A nice feature of Airflow is that you can restart from the point of failure and onward, without having to restart any previously succeeded tasks.
Scheduling in Airflow
from datetime import datetime

from pathlib import Path


import pandas as pd

from airflow import DAG

from airflow.operators.bash import BashOperator

from airflow.operators.python import PythonOperator


dag = DAG(

dag_id="01_unscheduled", start_date=datetime(2019, 1, 1), schedule_interval=None

)


fetch_events = BashOperator(

task_id="fetch_events",

bash_command=(

"mkdir -p /data/events && "

"curl -o /data/events.json http://events_api:5000/events"

),

dag=dag,

)


def _calculate_stats(input_path, output_path):

"""Calculates event statistics."""


Path(output_path).parent.mkdir(exist_ok=True)


events = pd.read_json(input_path)

stats = events.groupby(["date", "user"]).size().reset_index()


stats.to_csv(output_path, index=False)


calculate_stats = PythonOperator(

task_id="calculate_stats",

python_callable=_calculate_stats,

op_kwargs={"input_path": "/data/events.json", "output_path": "/data/stats.csv"},

dag=dag,

)


fetch_events >> calculate_stats
#schedule intervals for every 3 days
"""
This would result in our DAG being run every three days following the start date (on the 4th, 7th, 10th, and so on of January 2019). Of course, you can also use this approach to run your DAG every 10 minutes (using timedelta(minutes=10)) or every two hours (using timedelta(hours=2))
"""
dag = DAG( dag_id="04_time_delta", schedule_interval=dt.timedelta(days=3), start_date=dt.datetime(year=2019, month=1, day=1), end_date=dt.datetime(year=2019, month=1, day=5), )
In Airflow, we can use these execution dates by referencing them in our operators. For example, in the BashOperator, we can use Airflow’s templating functionality to include the execution dates dynamically in our Bash command. Templating is covered in detail in chapter 4.
import datetime as dt

from pathlib import Path


import pandas as pd


from airflow import DAG

from airflow.operators.bash import BashOperator

from airflow.operators.python import PythonOperator


dag = DAG(

dag_id="06_templated_query",

schedule_interval="@daily",

start_date=dt.datetime(year=2019, month=1, day=1),

end_date=dt.datetime(year=2019, month=1, day=5),

)


fetch_events = BashOperator(

task_id="fetch_events",
# THIS ONE IS IMPORTANT
bash_command=(

"mkdir -p /data/events && "

"curl -o /data/events.json "

"http://events_api:5000/events?"

"start_date={{execution_date.strftime('%Y-%m-%d')}}&"

"end_date={{next_execution_date.strftime('%Y-%m-%d')}}"

),

dag=dag,

)


def _calculate_stats(input_path, output_path):

"""Calculates event statistics."""


events = pd.read_json(input_path)

stats = events.groupby(["date", "user"]).size().reset_index()


Path(output_path).parent.mkdir(exist_ok=True)

stats.to_csv(output_path, index=False)


calculate_stats = PythonOperator(

task_id="calculate_stats",

python_callable=_calculate_stats,

op_kwargs={"input_path": "/data/events.json", "output_path": "/data/stats.csv"},

dag=dag,

)


fetch_events >> calculate_stats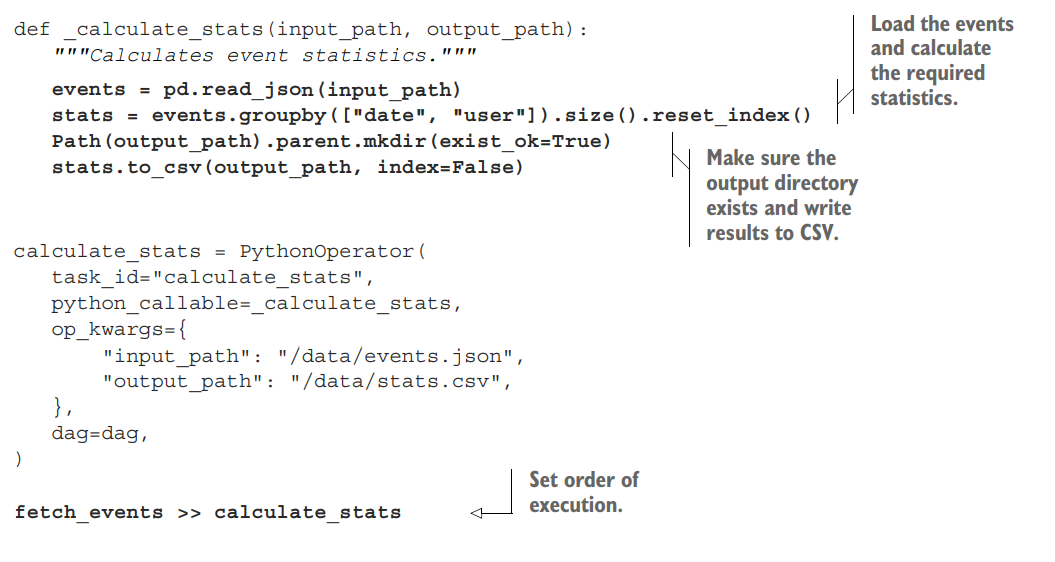
Without an end date, Airflow will (in principle) keep executing our DAG on this daily schedule until the end of time. However, if we already know that our project has a fixed duration, we can tell Airflow to stop running our DAG after a certain date using the end_date parameter.
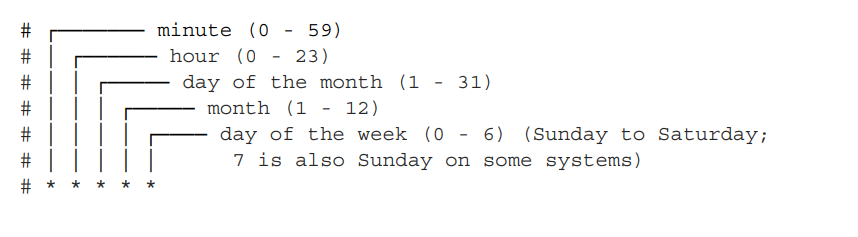
AIRFLOW schedule_interval paramater uses linux cron jobs syntax
dag = DAG( dag_id="04_time_delta", schedule_interval=dt.timedelta(days=3), start_date=dt.datetime(year=2019, month=1, day=1), end_date=dt.datetime(year=2019, month=1, day=5), )
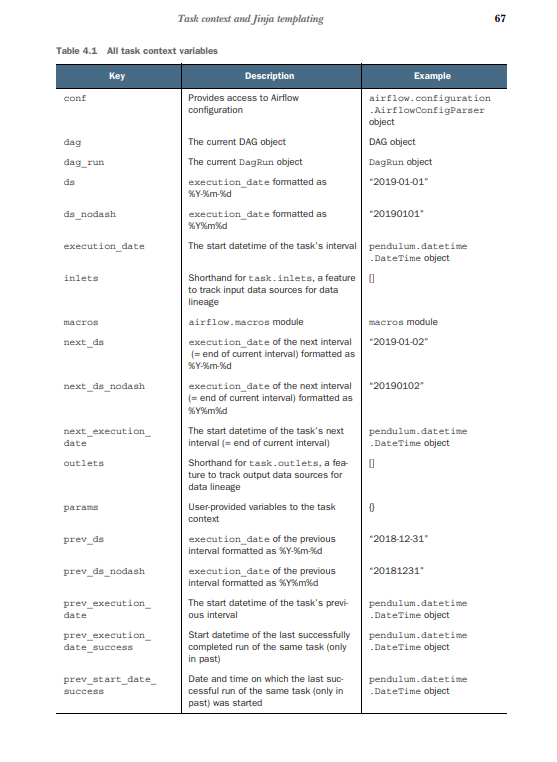
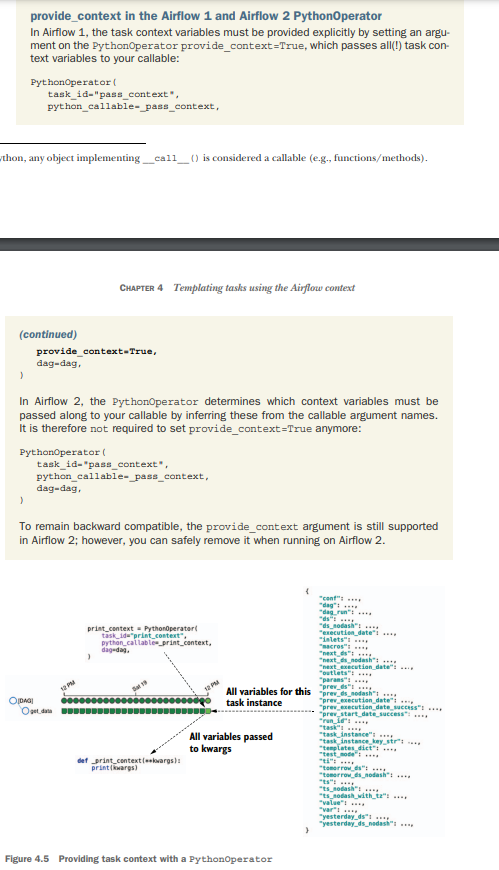
Templating tasks using the Airflow context
In Airflow, you have a number of variables available at runtime from the task context. One of these variables is execution_date. Airflow uses the Pendulum (https:// pendulum.eustace.io) library for datetimes, and execution_date is such a Pendulum datetime object. It is a drop-in replacement for native Python datetime, so all methods that can be applied to Python can also be applied to Pendulum. Just like you can do datetime.now().year, you get the same result with pendulum.now().year.
Bash Operator templating
import airflow
from airflow import DAG
from airflow.operators.bash import BashOperator

dag = DAG(
    dag_id="listing_4_01",
    start_date=airflow.utils.dates.days_ago(3),
    schedule_interval="@hourly",
)

get_data = BashOperator(
    task_id="get_data",
    bash_command=(
        "curl -o /tmp/wikipageviews.gz "
        "https://dumps.wikimedia.org/other/pageviews/"
        "{{ execution_date.year }}/"
        "{{ execution_date.year }}-{{ '{:02}'.format(execution_date.month) }}/"
        "pageviews-{{ execution_date.year }}"
        "{{ '{:02}'.format(execution_date.month) }}"
        "{{ '{:02}'.format(execution_date.day) }}-"
        "{{ '{:02}'.format(execution_date.hour) }}0000.gz"
    ),
    dag=dag,
)
Python operator templating
from urllib import request

import airflow.utils.dates
from airflow import DAG
from airflow.operators.python import PythonOperator

dag = DAG(
    dag_id="listing_4_05",
    start_date=airflow.utils.dates.days_ago(1),
    schedule_interval="@hourly",
)


def _get_data(execution_date):
    year, month, day, hour, *_ = execution_date.timetuple()
    url = (
        "https://dumps.wikimedia.org/other/pageviews/"
        f"{year}/{year}-{month:0>2}/pageviews-{year}{month:0>2}{day:0>2}-{hour:0>2}0000.gz"
    )
    output_path = "/tmp/wikipageviews.gz"
    request.urlretrieve(url, output_path)


get_data = PythonOperator(task_id="get_data", python_callable=_get_data, dag=dag)
In Apache Airflow, op_args and op_kwargs are both used to pass arguments to a PythonOperator. However, there is a key difference between the two: op_args is a list of positional arguments, while op_kwargs is a dictionary of keyword arguments.
- op_args
op_args is a list of positional arguments that will be unpacked when calling the callable. For example, if you have a Python function that takes two arguments, you can pass them to the PythonOperator using the op_args argument:
Code snippet
from airflow.operators.python import PythonOperator

def my_function(arg1, arg2):
  print(arg1, arg2)

operator = PythonOperator(
  task_id="my_task",
  python_callable=my_function,
  op_args=["arg1", "arg2"],
)
When the operator is run, the my_function function will be called with the arguments arg1 and arg2.
- op_kwargs
op_kwargs is a dictionary of keyword arguments that will get unpacked in your function. For example, if you have a Python function that takes two keyword arguments, you can pass them to the PythonOperator using the op_kwargs argument:
Code snippet
from airflow.operators.python import PythonOperator

def my_function(arg1, arg2):
  print(arg1, arg2)

operator = PythonOperator(
  task_id="my_task",
  python_callable=my_function,
  op_kwargs={"arg1": "arg1_value", "arg2": "arg2_value"},
)
When the operator is run, the my_function function will be called with the arguments arg1="arg1_value" and arg2="arg2_value".
- Which one should you use?
In general, you should use op_kwargs if you need to pass keyword arguments to your Python function. However, if you only need to pass positional arguments, you can use op_args.
Here is a table that summarizes the differences between op_args and op_kwargs:
Argument
Description
op_args
A list of positional arguments that will be unpacked when calling the callable.
op_kwargs
A dictionary of keyword arguments that will get unpacked in your function.
This code currently prints the found pageview count, and now we want to connect the dots by writing those results to the Postgres table. The PythonOperator currently prints the results but does not write to the database, so we’ll need a second task to write the results. In Airflow, there are two ways of passing data between tasks: By using the Airflow metastore to write and read results between tasks. This is called XCom and covered in chapter 5. By writing results to and from a persistent location (e.g., disk or database) between tasks. Airflow tasks run independently of each other, possibly on different physical machines depending on your setup, and therefore cannot share objects in memory. Data between tasks must therefore be persisted elsewhere, where it resides after a task finishes and can be read by another task.
Airflow provides one mechanism out of the box called XCom, which allows storing and later reading any picklable object in the Airflow metastore. Pickle is Python’s serialization protocol, and serialization means converting an object in memory to a format that can be stored on disk to be read again later, possibly by another process. By default, all objects built from basic Python types (e.g., string, int, dict, list) can be pickled.
By default, Airflow will schedule and run any past schedule intervals that have not been run. As such, specifying a past start date and activating the corresponding DAG will result in all intervals that have passed before the current time being executed. This behavior is controlled by the DAG catchup parameter and can be disabled by setting catchup to false
Code for no catchup
import datetime as dt

from pathlib import Path


import pandas as pd


from airflow import DAG

from airflow.operators.bash import BashOperator

from airflow.operators.python import PythonOperator


dag = DAG(

dag_id="09_no_catchup",

schedule_interval="@daily",

start_date=dt.datetime(year=2019, month=1, day=1),

end_date=dt.datetime(year=2019, month=1, day=5),

catchup=False,

)
Best practices for designing tasks
Airflow tasks: atomicity and idempotency.
Atomicity
The term atomicity is frequently used in database systems, where an atomic transaction is considered an indivisible and irreducible series of database operations such that either all occur or nothing occurs. Similarly, in Airflow, tasks should be defined so that Start date Now Start date Now Catchup = false Airflow starts processing, including past intervals (= backfilling). Catchup = true (default) Current interval Current interval Airflow starts processing from the current interval. Figure 3.8 Backfilling in Airflow. By default, Airflow will run tasks for all past intervals up to the current time. This behavior can be disabled by setting the catchup parameter of a DAG to false, in which case Airflow will only start executing tasks from the current interval. Scheduling in Airflow they either succeed and produce some proper result or fail in a manner that does not affect the state of the system
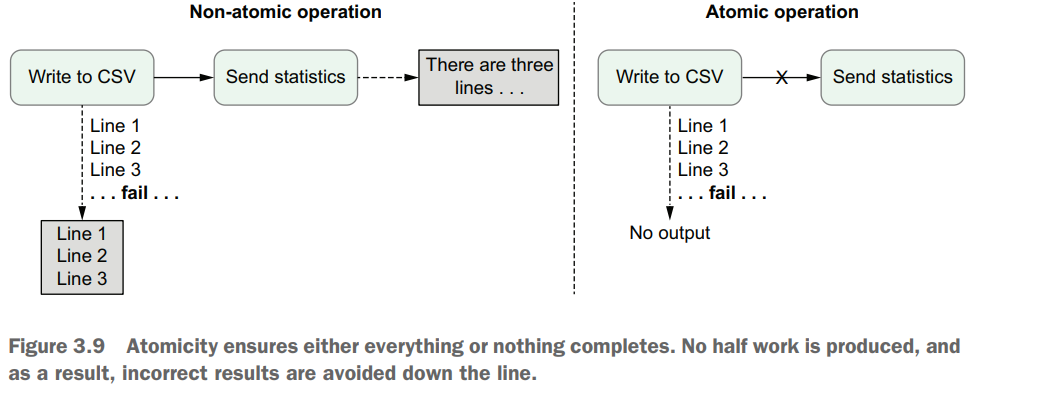
Example: Sending an email after writing to CSV creates two pieces of work in a single function, which breaks the atomicity of the task.To implement this functionality in an atomic fashion, we could simply split the email functionality into a separate task.
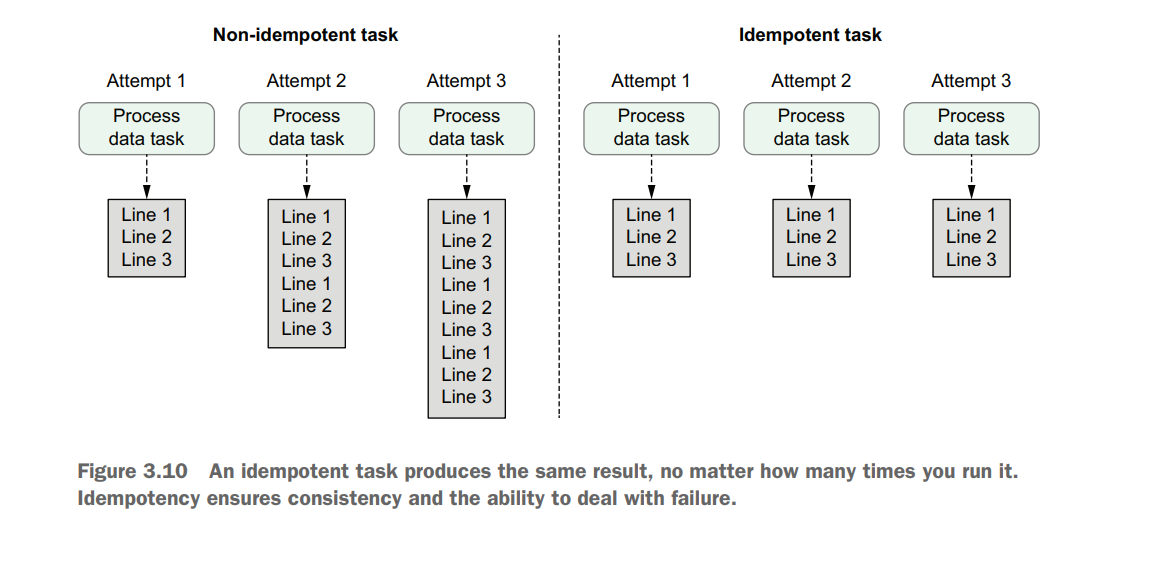
Idempotency
Tasks are said to be idempotent if calling the same task multiple times with the same inputs has no additional effect. This means that rerunning a task without changing the inputs should not change the overall output.
fetch_events = BashOperator( task_id="fetch_events",
							bash_command=( "mkdir -p /data/events && " "curl -o /data/events/{{ds}}.json "
							 "http:/ /localhost:5000/events?" "start_date={{ds}}&" "end_date={{next_ds}}" ), dag=dag, )
Rerunning this task for a given date would result in the task fetching the same set of events as its previous execution (assuming the date is within our 30-day window), and overwriting the existing JSON file in the /data/events folder, producing the same result. As such, this implementation of the fetch events task is clearly idempotent.
DAGs can run at regular intervals by setting the schedule interval. The work for an interval is started at the end of the interval. The schedule interval can be configured with cron and timedelta expressions. Data can be processed incrementally by dynamically setting variables with templating. The execution date refers to the start datetime of the interval, not to the actual time of execution. A DAG can be run back in time with backfilling. Idempotency ensures tasks can be rerun while producing the same output results
Templating tasks using the Airflow context
import airflow.utils.dates

from airflow import DAG

from airflow.operators.python import PythonOperator


dag = DAG(

dag_id="listing_4_08",

start_date=airflow.utils.dates.days_ago(3),

schedule_interval="@daily",

)


def _print_context(**context):

start = context["execution_date"]

end = context["next_execution_date"]

print(f"Start: {start}, end: {end}")


# Prints e.g.:

# Start: 2019-07-13T14:00:00+00:00, end: 2019-07-13T15:00:00+00:00


print_context = PythonOperator(

task_id="print_context", python_callable=_print_context, dag=dag

)
Providing User defined Variables to Python Operators
def _get_data(year, month, day, hour, output_path, **_):

url = (

"https://dumps.wikimedia.org/other/pageviews/"

f"{year}/{year}-{month:0>2}/pageviews-{year}{month:0>2}{day:0>2}-{hour:0>2}0000.gz"

)

request.urlretrieve(url, output_path)


get_data = PythonOperator(

task_id="get_data",

python_callable=_get_data,

op_kwargs={

"year": "{{ execution_date.year }}",

"month": "{{ execution_date.month }}",

"day": "{{ execution_date.day }}",

"hour": "{{ execution_date.hour }}",

"output_path": "/tmp/wikipageviews.gz",

},

dag=dag,

)
In Apache Airflow, op_args and op_kwargs are parameters used in the task definition to pass arguments to operators.
Operators in Airflow are the building blocks of workflows, representing individual tasks that need to be executed. Each operator has a set of arguments that define its behavior. However, in some cases, you may want to pass dynamic or variable values to these arguments when defining the tasks.
That’s where op_args and op_kwargs come in.
op_args is used to pass a list of arguments to an operator. These arguments are positional and must be provided in the correct order expected by the operator. For example:
op_args=['value1', 'value2', 'value3']On the other hand, op_kwargs is used to pass a dictionary of keyword arguments to an operator. This allows you to specify the arguments by their names, regardless of their order. For example:
op_kwargs={'arg1': 'value1', 'arg2': 'value2', 'arg3': 'value3'}Both op_args and op_kwargs can be used together, allowing you to pass a combination of positional and keyword arguments to an operator. For example:
op_args=['value1']
op_kwargs={'arg2': 'value2', 'arg3': 'value3'}
When defining a task in Airflow, you can use these parameters to pass arguments to the operator. Here’s an example of how you can use op_args and op_kwargs while defining a task:
my_task = MyOperator(task_id='my_task_id', op_args=['value1'], op_kwargs={'arg2': 'value2'})In this example, my_task is an instance of the MyOperator class, and it will receive 'value1' as a positional argument and 'value2' as a keyword argument with the name 'arg2'. The operator can then use these values during its execution.
Using op_args and op_kwargs provides flexibility in passing dynamic values to operators, allowing you to customize their behavior based on the specific context or requirements of your workflow.
A useful tool to debug issues with templated arguments is the Airflow UI. You can inspect the templated argument values after running a task by selecting it in either the graph or tree view and clicking the Rendered Template button
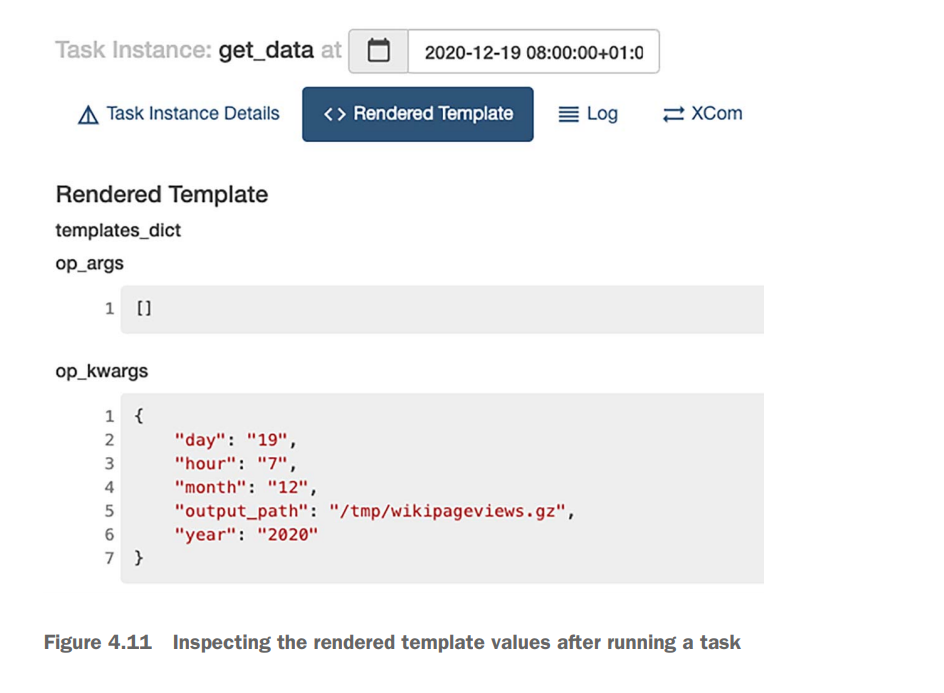
The CLI provides us with exactly the same information as shown in the Airflow UI, without having to run a task, which makes it easier to inspect the result. The command to render templates using the CLI is
airflow tasks render [dag id] [task id] [desired execution date]Hooking up other systems
it’s typically advised to apply XComs only for transferring small pieces of data such as a handful of strings (e.g., a list of names).
What is XCom how it is works?
In Apache Airflow, Xcom (short for cross-communication) is a mechanism that allows tasks to exchange small amounts of data between them. It serves as a communication channel for sharing information or passing values between different tasks within a workflow.
The Xcom system in Airflow works as follows:
-
During the execution of a task, an operator can produce output or results that need to be shared with other tasks. This output could be a value, a small dataset, or any other piece of information.
-
The task can use the
xcom_push()method to push the output to the Xcom system. This method takes akeyand avalueas parameters. Thekeyis used to identify the output data, while thevaluerepresents the actual data to be shared. -
Other tasks in the workflow can retrieve the output of a previous task by using the
xcom_pull()method. This method takes thetask_idsand an optionalkeyparameter. It returns the value associated with the specifiedkeyfrom the specified task. -
The Xcom system stores the output data in its backend database, which can be a relational database like MySQL or PostgreSQL, or a key-value store like Redis, depending on the configuration.
By default, Airflow stores Xcom data in its metadata database, but you can also configure it to use an external database or message broker for scalability and durability.
Here’s an example that demonstrates the usage of Xcom in Airflow:
from airflow import DAG
from airflow.operators.python import PythonOperator

def push_data(**context):
    data = "Hello, Airflow!"
    context['ti'].xcom_push(key='my_key', value=data)

def pull_data(**context):
    data = context['ti'].xcom_pull(key='my_key', task_ids='push_task')
    print(data)

with DAG('xcom_example', start_date=datetime(2023, 6, 11), schedule_interval=None) as dag:
    push_task = PythonOperator(task_id='push_task', python_callable=push_data)
    pull_task = PythonOperator(task_id='pull_task', python_callable=pull_data)

    push_task >> pull_task
In this example, the push_data() function is a Python callable used as an operator. It pushes the string “Hello, Airflow!” to the Xcom system using the xcom_push() method.
The pull_data() function is another Python callable used as an operator. It retrieves the value from the Xcom system using the xcom_pull() method and prints it.
The push_task and pull_task are instances of the PythonOperator class, representing the tasks in the workflow. The output of the push_task is shared with the pull_task using the Xcom system.
When the workflow is executed, the push_task pushes the data to Xcom, and the pull_task pulls the data from Xcom and prints it.
Xcom provides a simple way to share information between tasks, enabling coordination and data sharing within an Airflow workflow.
Some arguments of operators can be templated. Templating happens at runtime. Templating the PythonOperator works different from other operators; variables are passed to the provided callable. The result of templated arguments can be checked with airflow tasks render. Operators can communicate with other systems via hooks. Operators describe what to do; hooks determine how to do work.
Defining dependencies between tasks
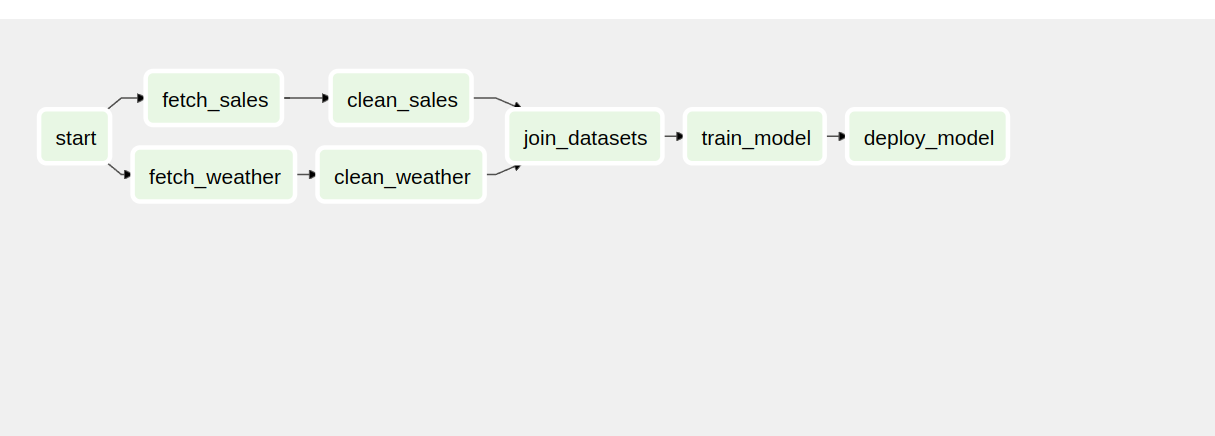
import airflow

from airflow import DAG
from airflow.operators.dummy import DummyOperator

with DAG(
    dag_id="01_start",
    start_date=airflow.utils.dates.days_ago(3),
    schedule_interval="@daily",
) as dag:
    start = DummyOperator(task_id="start")

    fetch_sales = DummyOperator(task_id="fetch_sales")
    clean_sales = DummyOperator(task_id="clean_sales")

    fetch_weather = DummyOperator(task_id="fetch_weather")
    clean_weather = DummyOperator(task_id="clean_weather")

    join_datasets = DummyOperator(task_id="join_datasets")
    train_model = DummyOperator(task_id="train_model")
    deploy_model = DummyOperator(task_id="deploy_model")

    start >> [fetch_sales, fetch_weather]
    fetch_sales >> clean_sales
    fetch_weather >> clean_weather
    [clean_sales, clean_weather] >> join_datasets
    join_datasets >> train_model >> deploy_model
BranchPythonOperator
In Apache Airflow, the BranchPythonOperator is an operator that allows you to create conditional branching within your workflows. It enables you to execute different tasks or branches based on the result of a Python function that you define.
The BranchPythonOperator works as follows:
-
When defining your workflow, you specify a
BranchPythonOperatortask, which includes the following parameters:task_id: A unique identifier for the task.python_callable: A Python function that determines the branching logic. This function should return the task ID of the next task to execute based on the current context.- Other optional parameters, such as
provide_contextto pass the context to the Python function.
-
During task execution, the
BranchPythonOperatorcalls the specifiedpython_callablefunction, passing the context as an argument. The context includes information such as the current execution date, task instance, and other relevant details. -
The
python_callablefunction evaluates the necessary conditions based on the context and returns the task ID of the next task to execute. The returned task ID should match thetask_idof one of the downstream tasks. -
The
BranchPythonOperatoruses the returned task ID to determine the next task to execute in the workflow. It dynamically sets the downstream dependency based on the returned task ID.
Here’s an example to illustrate the usage of BranchPythonOperator:
from airflow import DAG
from airflow.operators.python import BranchPythonOperator
from datetime import datetime

def decide_branch(**context):
    current_hour = datetime.now().hour
    if current_hour < 12:
        return 'morning_task'
    else:
        return 'afternoon_task'

with DAG('branching_example', start_date=datetime(2023, 6, 11), schedule_interval=None) as dag:
    decide_branch_task = BranchPythonOperator(
        task_id='decide_branch_task',
        python_callable=decide_branch
    )

    morning_task = ...
    afternoon_task = ...

    decide_branch_task >> [morning_task, afternoon_task]
In this example, the decide_branch() function is the Python callable that determines the branching logic. It checks the current hour and returns the task ID of either 'morning_task' or 'afternoon_task' based on the result.
The decide_branch_task is an instance of the BranchPythonOperator class, representing the branching task in the workflow. It uses the decide_branch() function to determine the next task to execute dynamically.
The morning_task and afternoon_task are downstream tasks, and the dependency is set based on the result of the decide_branch_task.
By using the BranchPythonOperator, you can create dynamic and conditional workflows in Airflow, allowing different branches of the workflow to be executed based on the outcome of the Python function.
Branching example from book
Take a look at this line carefully
join_datasets = DummyOperator(task_id="join_datasets", trigger_rule="none_failed")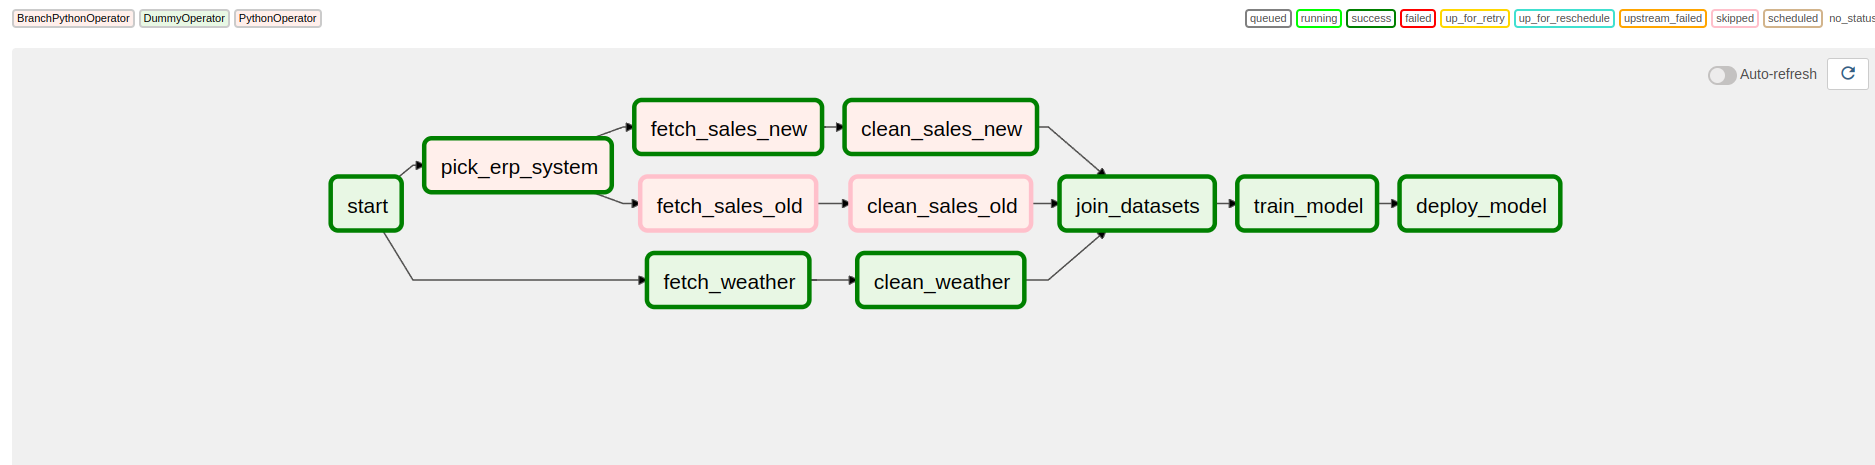
import airflow
from airflow import DAG
from airflow.operators.dummy import DummyOperator
from airflow.operators.python import PythonOperator, BranchPythonOperator
ERP_CHANGE_DATE = airflow.utils.dates.days_ago(1)
def _pick_erp_system(**context):
if context["execution_date"] < ERP_CHANGE_DATE:
return "fetch_sales_old"
else:
return "fetch_sales_new"
def _fetch_sales_old(**context):
print("Fetching sales data (OLD)...")
def _fetch_sales_new(**context):
print("Fetching sales data (NEW)...")
def _clean_sales_old(**context):
print("Preprocessing sales data (OLD)...")
def _clean_sales_new(**context):
print("Preprocessing sales data (NEW)...")
with DAG(
dag_id="03_branch_dag",
start_date=airflow.utils.dates.days_ago(3),
schedule_interval="@daily",
) as dag:
start = DummyOperator(task_id="start")
pick_erp_system = BranchPythonOperator(
task_id="pick_erp_system", python_callable=_pick_erp_system
)
fetch_sales_old = PythonOperator(
task_id="fetch_sales_old", python_callable=_fetch_sales_old
)
clean_sales_old = PythonOperator(
task_id="clean_sales_old", python_callable=_clean_sales_old
)
fetch_sales_new = PythonOperator(
task_id="fetch_sales_new", python_callable=_fetch_sales_new
)
clean_sales_new = PythonOperator(
task_id="clean_sales_new", python_callable=_clean_sales_new
)
fetch_weather = DummyOperator(task_id="fetch_weather")
clean_weather = DummyOperator(task_id="clean_weather")
# Using the wrong trigger rule ("all_success") results in tasks being skipped downstream.
# join_datasets = DummyOperator(task_id="join_datasets")
join_datasets = DummyOperator(task_id="join_datasets", trigger_rule="none_failed")
train_model = DummyOperator(task_id="train_model")
deploy_model = DummyOperator(task_id="deploy_model")
start >> [pick_erp_system, fetch_weather]
pick_erp_system >> [fetch_sales_old, fetch_sales_new]
fetch_sales_old >> clean_sales_old
fetch_sales_new >> clean_sales_new
fetch_weather >> clean_weather
[clean_sales_old, clean_sales_new, clean_weather] >> join_datasets
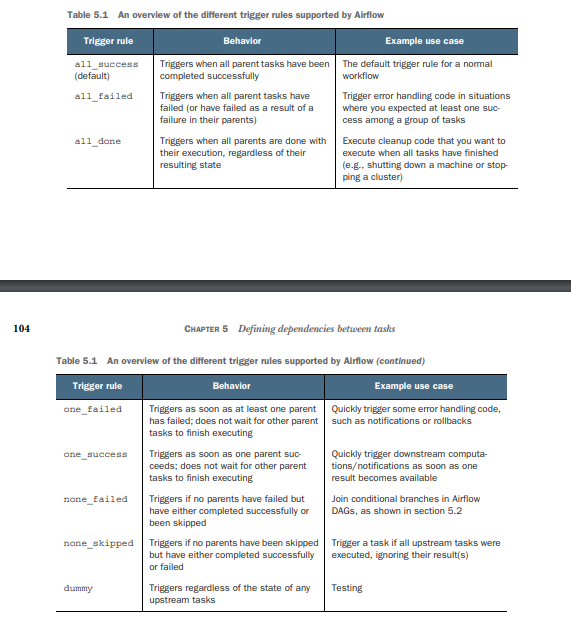
join_datasets >> train_model >> deploy_modelIn Apache Airflow, Trigger Rules are used to define the conditions under which a task should be triggered or skipped during workflow execution. Each task in Airflow can have a trigger rule associated with it, which determines how the task’s execution is affected by the status of its upstream tasks.
Here are the available trigger rules in Airflow:
-
all_success(default): The task will be triggered only if all of its upstream tasks have succeeded. If any upstream task has failed, been skipped, or is in a state other than success, the task will be skipped. -
all_failed: The task will be triggered only if all of its upstream tasks have failed. If any upstream task has succeeded, been skipped, or is in a state other than failure, the task will be skipped. -
all_done: The task will be triggered only if all of its upstream tasks have completed, regardless of their status. If any upstream task is still running or has been skipped, the task will be skipped. -
one_success: The task will be triggered if at least one of its upstream tasks has succeeded. It will be skipped only if all of its upstream tasks have failed or have been skipped. -
one_failed: The task will be triggered if at least one of its upstream tasks has failed. It will be skipped only if all of its upstream tasks have succeeded or have been skipped. -
none_failed: The task will be triggered if none of its upstream tasks have failed. It will be skipped if any of its upstream tasks have failed, even if others have succeeded or been skipped.
To apply a trigger rule to a task in Airflow, you can set the trigger_rule parameter when defining the task. Here’s an example:
from airflow import DAG
from airflow.operators.dummy import DummyOperator
from datetime import datetime

with DAG('trigger_rule_example', start_date=datetime(2023, 6, 11), schedule_interval=None) as dag:
    task1 = DummyOperator(task_id='task1')
    task2 = DummyOperator(task_id='task2', trigger_rule='all_done')
    task3 = DummyOperator(task_id='task3', trigger_rule='one_failed')

    task1 >> task2
    task1 >> task3
In this example, we have three tasks: task1, task2, and task3. task1 is connected to both task2 and task3.
task2has a trigger rule of'all_done', so it will only be triggered if both upstream tasks (task1) have completed, regardless of their status.task3has a trigger rule of'one_failed', so it will be triggered if at least one upstream task (task1) has failed. It will be skipped only if all upstream tasks have succeeded or been skipped.
By setting different trigger rules for tasks, you can define complex dependencies and conditions within your workflows, ensuring that tasks are executed or skipped based on the desired logic and the status of their upstream tasks.
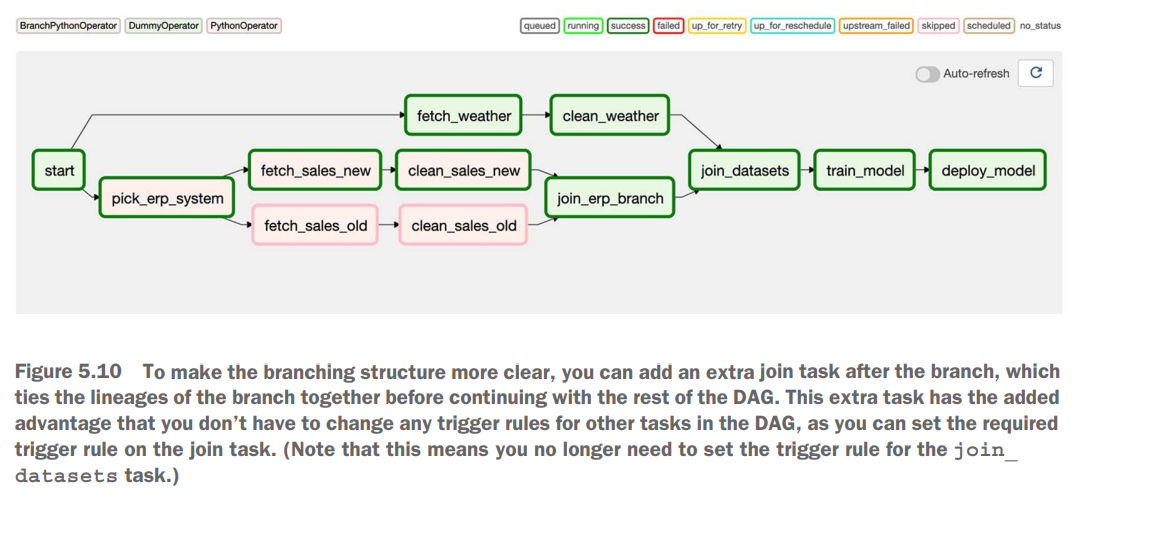
join_erp = DummyOperator(task_id="join_erp_branch", trigger_rule="none_failed")Conditional tasks
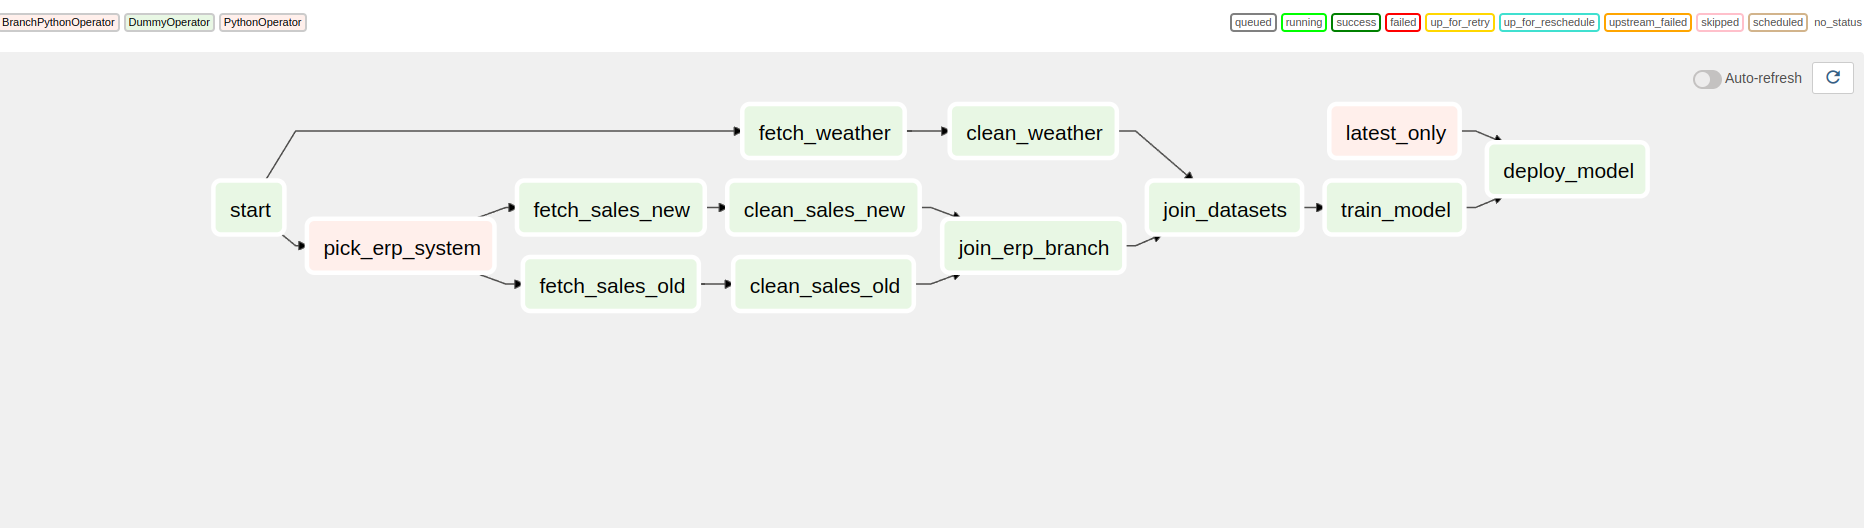
import airflow
import pendulum

from airflow import DAG
from airflow.exceptions import AirflowSkipException
from airflow.operators.dummy import DummyOperator
from airflow.operators.python import PythonOperator, BranchPythonOperator

ERP_CHANGE_DATE = airflow.utils.dates.days_ago(1)

def _pick_erp_system(**context):
    if context["execution_date"] < ERP_CHANGE_DATE:
        return "fetch_sales_old"
    else:
        return "fetch_sales_new"

def _latest_only(**context):
    now = pendulum.now("UTC")
    left_window = context["dag"].following_schedule(context["execution_date"])
    right_window = context["dag"].following_schedule(left_window)

    if not left_window < now <= right_window:
        raise AirflowSkipException()

with DAG(
    dag_id="06_condition_dag",
    start_date=airflow.utils.dates.days_ago(3),
    schedule_interval="@daily",
) as dag:
    start = DummyOperator(task_id="start")

    pick_erp = BranchPythonOperator(
        task_id="pick_erp_system", python_callable=_pick_erp_system
    )

    fetch_sales_old = DummyOperator(task_id="fetch_sales_old")
    clean_sales_old = DummyOperator(task_id="clean_sales_old")

    fetch_sales_new = DummyOperator(task_id="fetch_sales_new")
    clean_sales_new = DummyOperator(task_id="clean_sales_new")

    join_erp = DummyOperator(task_id="join_erp_branch", trigger_rule="none_failed")

    fetch_weather = DummyOperator(task_id="fetch_weather")
    clean_weather = DummyOperator(task_id="clean_weather")

    join_datasets = DummyOperator(task_id="join_datasets")
    train_model = DummyOperator(task_id="train_model")

    latest_only = PythonOperator(task_id="latest_only", python_callable=_latest_only)

    deploy_model = DummyOperator(task_id="deploy_model")

    start >> [pick_erp, fetch_weather]
    pick_erp >> [fetch_sales_old, fetch_sales_new]
    fetch_sales_old >> clean_sales_old
    fetch_sales_new >> clean_sales_new
    [clean_sales_old, clean_sales_new] >> join_erp
    fetch_weather >> clean_weather
    [join_erp, clean_weather] >> join_datasets
    join_datasets >> train_model >> deploy_model
    latest_only >> deploy_model
Shared Data between task
Sharing data using XComs
import uuid
import airflow
from airflow import DAG
from airflow.operators.dummy import DummyOperator
from airflow.operators.python import PythonOperator
def _train_model(**context):
model_id = str(uuid.uuid4())
context["task_instance"].xcom_push(key="model_id", value=model_id)
def _deploy_model(**context):
model_id = context["task_instance"].xcom_pull(
task_ids="train_model", key="model_id"
)
print(f"Deploying model {model_id}")
with DAG(
dag_id="10_xcoms",
start_date=airflow.utils.dates.days_ago(3),
schedule_interval="@daily",
) as dag:
start = DummyOperator(task_id="start")
fetch_sales = DummyOperator(task_id="fetch_sales")
clean_sales = DummyOperator(task_id="clean_sales")
fetch_weather = DummyOperator(task_id="fetch_weather")
clean_weather = DummyOperator(task_id="clean_weather")
join_datasets = DummyOperator(task_id="join_datasets")
train_model = PythonOperator(task_id="train_model", python_callable=_train_model)
deploy_model = PythonOperator(task_id="deploy_model", python_callable=_deploy_model)
start >> [fetch_sales, fetch_weather]
fetch_sales >> clean_sales
fetch_weather >> clean_weather
[clean_sales, clean_weather] >> join_datasets
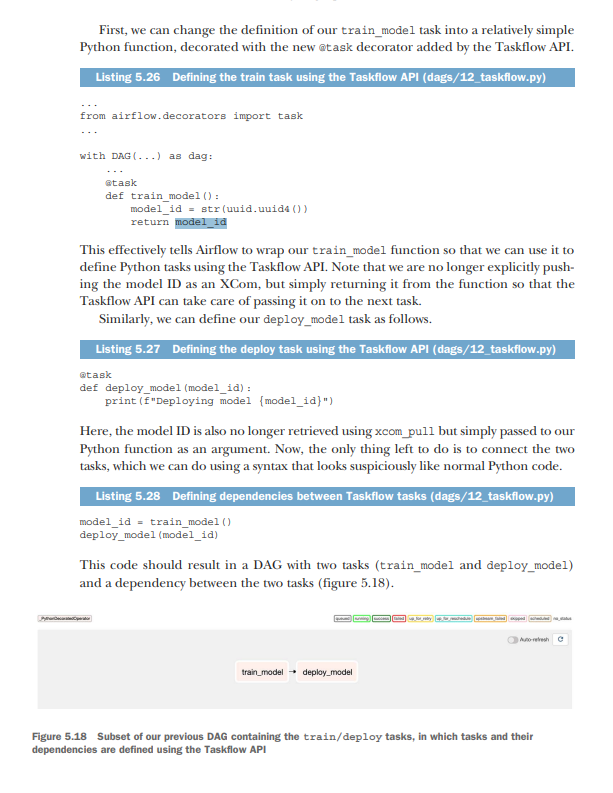
join_datasets >> train_model >> deploy_modelChaining Python tasks with the Taskflow API
dependencies called the Taskflow API. Although not without its flaws, the Taskflow API can considerably simplify your code if you’re primarily using PythonOperators and passing data between them as XComs.
PART 2 Beyond basics
Triggering Workflows
Polling conditions with sensors
import airflow.utils.dates

from airflow import DAG

from airflow.operators.dummy import DummyOperator


dag = DAG(

dag_id="figure_6_01",

start_date=airflow.utils.dates.days_ago(3),

schedule_interval="0 16 * * *",

description="A batch workflow for ingesting supermarket promotions data, demonstrating the FileSensor.",

default_args={"depends_on_past": True},

)


create_metrics = DummyOperator(task_id="create_metrics", dag=dag)


for supermarket_id in [1, 2, 3, 4]:

	copy =      DummyOperator(task_id=f"copy_to_raw_supermarket_{supermarket_id}", dag=dag)

	process = DummyOperator(task_id=f"process_supermarket_{supermarket_id}", dag=dag)

copy >> process >> create_metrics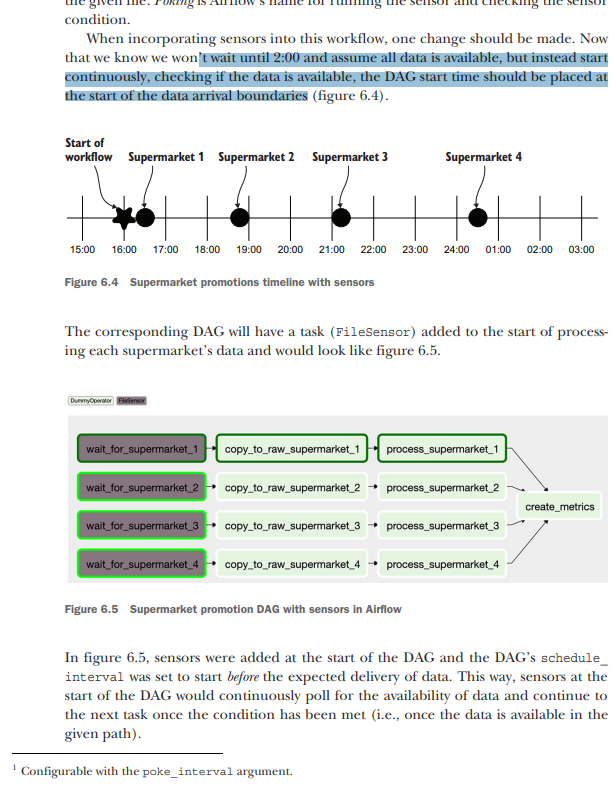
implementing with FileSensor
import airflow.utils.dates

from airflow import DAG

from airflow.operators.dummy import DummyOperator

from airflow.sensors.filesystem import FileSensor


dag = DAG(

dag_id="figure_6_05",

start_date=airflow.utils.dates.days_ago(3),

schedule_interval="0 16 * * *",

description="A batch workflow for ingesting supermarket promotions data, demonstrating the FileSensor.",

default_args={"depends_on_past": True},

)


create_metrics = DummyOperator(task_id="create_metrics", dag=dag)


for supermarket_id in [1, 2, 3, 4]:

wait = FileSensor(

task_id=f"wait_for_supermarket_{supermarket_id}",

filepath=f"/data/supermarket{supermarket_id}/data.csv",

dag=dag,

)

copy = DummyOperator(task_id=f"copy_to_raw_supermarket_{supermarket_id}", dag=dag)

process = DummyOperator(task_id=f"process_supermarket_{supermarket_id}", dag=dag)

wait >> copy >> process >> create_metrics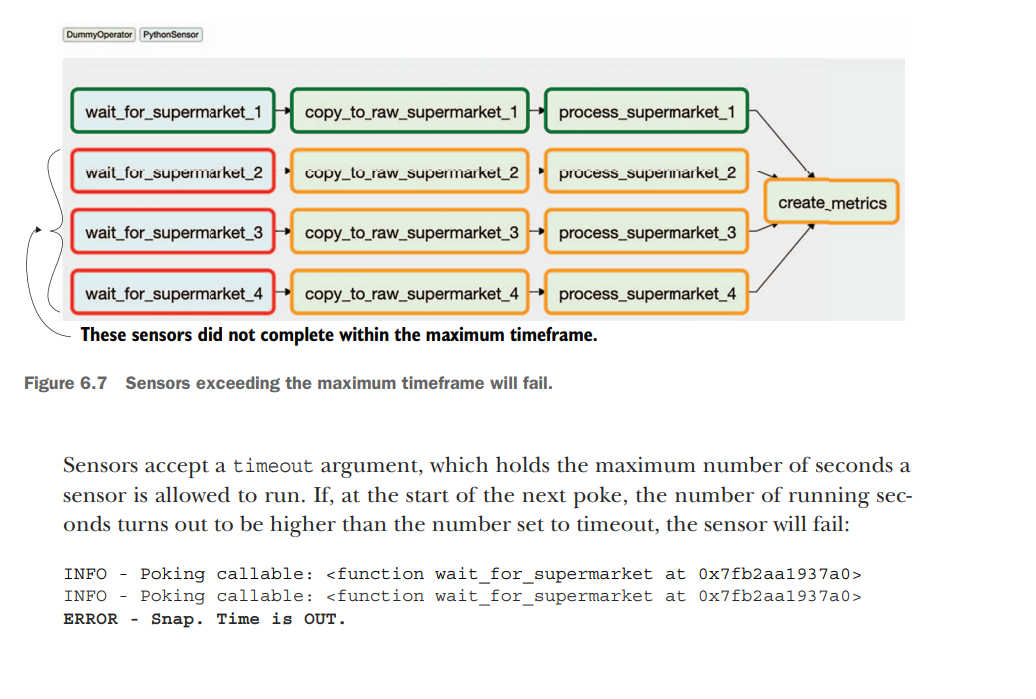
By default, the sensor timeout is set to seven days. If the DAG schedule_interval is set to once a day, this will lead to an undesired snowball effect—which is surprisingly easy to encounter with many DAGs! The DAG runs once a day, and supermarkets 2, 3, and 4 will fail after seven days, as shown in figure 6.7. However, new DAG runs are added every day and the sensors for those respective days are started, and as a result more and more tasks start running. Here’s the catch: there’s a limit to the number of tasks Airflow can handle and will run (on various levels).
Setting the maximum number of concurrent tasks in a DAG
dag = DAG( dag_id="couponing_app", start_date=datetime(2019, 1, 1), schedule_interval="0 0 * * *", concurrency=50, ) Day 1: Supermarket 1 succeeded; supermarkets 2, 3, and 4 are polling, occupying 3 tasks. Day 2: Supermarket 1 succeeded; supermarkets 2, 3, and 4 are polling, occupying 6 tasks. Day 3: Supermarket 1 succeeded; supermarkets 2, 3, and 4 are polling, occupying 9 tasks. Day 4: Supermarket 1 succeeded; supermarkets 2, 3, and 4 are polling, occupying 12 tasks. Day 5: Supermarket 1 succeeded; supermarkets 2, 3, and 4 are polling, occupying 15 tasks. Day 6: Supermarket 1 succeeded; supermarkets 2, 3, and 4 are polling, occupying 16 tasks; two new tasks cannot run, and any other task trying to run is blocked. This behavior is often referred to as sensor deadlock. In this example, the maximum number of running tasks in the supermarket couponing DAG is reached, and thus the impact is limited to that DAG, while other DAGs can still run. However, once the global Airflow limit of maximum tasks is reached, your entire system is stalled, which is obviously undesirable. This issue can be solved in various ways.

TriggerDagOperator
The TriggerDagRunOperator is an operator in Apache Airflow that allows you to trigger the execution of another DAG (Directed Acyclic Graph) from within your workflow. It enables you to programmatically start the execution of a separate DAG, providing flexibility and the ability to orchestrate complex workflows.
Here’s how the TriggerDagRunOperator works:
-
When defining your main DAG, you include a
TriggerDagRunOperatortask, specifying the DAG ID of the target DAG that you want to trigger. -
During task execution, the
TriggerDagRunOperatortriggers the execution of the target DAG by creating a new DagRun for that DAG. A DagRun is an instance of a DAG that represents a specific run or execution of the DAG. -
You can provide additional parameters to the
TriggerDagRunOperatorto customize the triggered DagRun. These parameters can include configuration variables, execution dates, and other context variables that will be passed to the triggered DAG. -
Once the DagRun is created, the scheduler of Airflow takes over and starts executing the tasks within the triggered DAG, following the defined dependencies and scheduling parameters.
Here’s an example to illustrate the usage of TriggerDagRunOperator:
from airflow import DAG
from airflow.operators.trigger_dagrun import TriggerDagRunOperator
from datetime import datetime

with DAG('main_dag', start_date=datetime(2023, 6, 11), schedule_interval=None) as dag:
    trigger_task = TriggerDagRunOperator(
        task_id='trigger_task',
        trigger_dag_id='target_dag',
        execution_date="{{ execution_date }}"
    )
In this example, the main_dag includes a TriggerDagRunOperator task named trigger_task. It is configured to trigger the DAG with the ID 'target_dag'.
The execution_date parameter is set to "{{ execution_date }}", which is a Jinja template variable that passes the current execution date to the triggered DAG. This allows the triggered DAG to use the same execution date as the main DAG.
When the trigger_task is executed, it triggers the execution of 'target_dag', creating a new DagRun for that DAG. The target DAG will start executing its tasks based on its own schedule and dependencies.
By using the TriggerDagRunOperator, you can create complex workflows that orchestrate the execution of multiple DAGs, enabling you to modularize and manage your workflows more effectively.
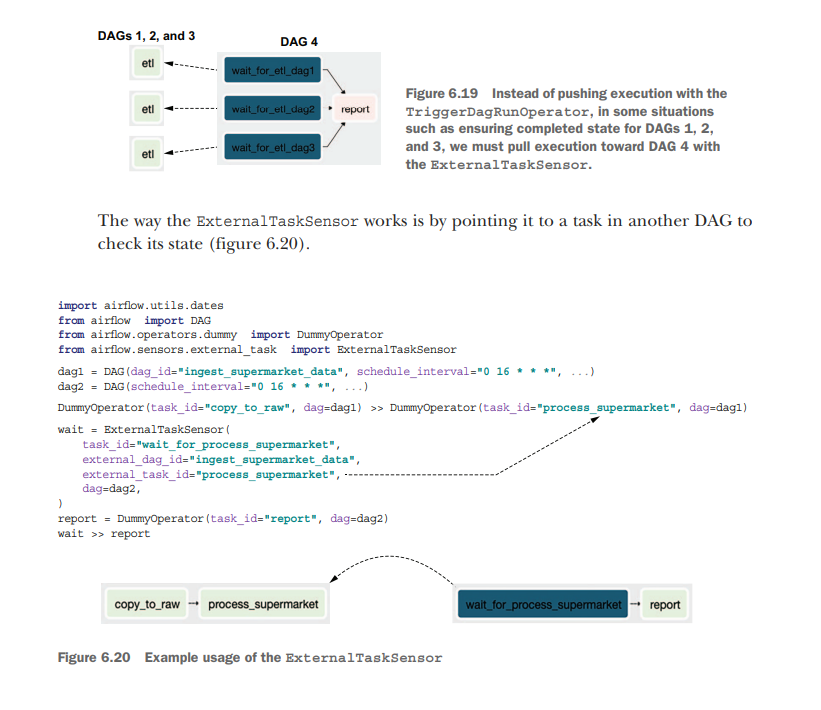
ExternalTaskSensor
Starting workflows with REST/CLI
#!/usr/bin/env bash


# Trigger DAG with Airflow CLI

airflow dags trigger listing_6_8 --conf '{"supermarket": 1}'


# Trigger DAG with Airflow REST API

curl -X POST "http://localhost:8080/api/v1/dags/listing_6_8/dagRuns" -H "Content-Type: application/json" -d '{"conf": {"supermarket": 1}}' --user "admin:admin"
Communicating with external systems
Moving data from between systems
Let’s imagine we have a very large job that would take all resources on the machine Airflow is running on. In this case, it’s better to run the job elsewhere; Airflow will start the job and wait for it to complete. The idea is that there should be a strong separation between orchestration and execution, which we can achieve by Airflow starting the job and waiting for completion and a data-processing framework such as Spark performing the actual work
In Spark, there are various ways to start a job: Using the SparkSubmitOperator—This requires a spark-submit binary and YARN client config on the Airflow machine to find the Spark instance. Using the SSHOperator—This requires SSH access to a Spark instance but does not require Spark client config on the Airflow instance. Using the SimpleHTTPOperator—This requires running Livy, a REST API for Apache Spark, to access Spark.
Building custom components
How to store API keys or connection variables like datas in apache airflow
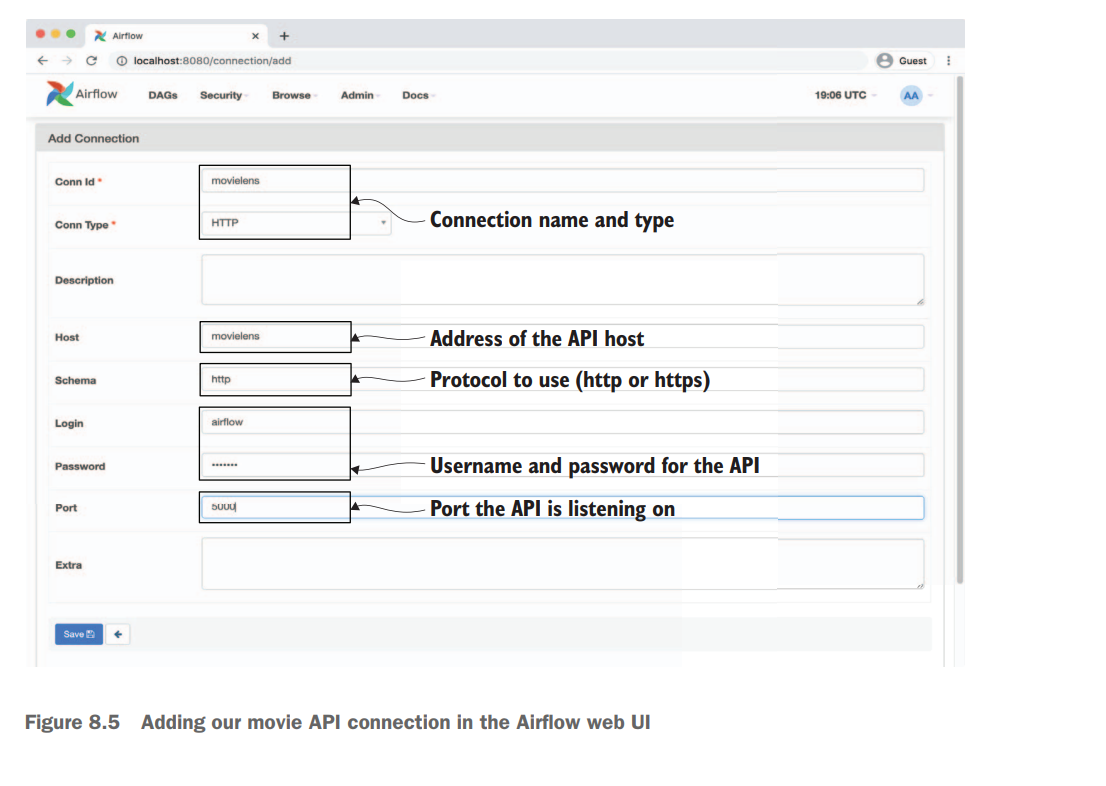
In Apache Airflow, you can store API tokens or any other sensitive information using Airflow’s built-in feature called Connections. Connections allow you to securely store and manage credentials, API tokens, and other connection details used by your Airflow tasks.
Here are the steps to store API tokens using Airflow’s Connections feature:
-
Access the Airflow web UI: Open your web browser and navigate to the Airflow web interface.
-
Go to the Admin section: Click on the “Admin” menu on the top navigation bar. You will need the necessary permissions to access this section.
-
Select “Connections”: In the Admin section, find and click on the “Connections” option. This will open the Connections management page.
-
Add a new connection: On the Connections page, click on the ”+ Add a Connection” button to create a new connection.
-
Enter connection details: In the connection creation form, fill in the necessary details for your API token. You can provide a connection name, connection type, host, login, password, and any other relevant information.
-
Save the connection: Once you have entered the connection details, click on the “Save” button to save the connection.
-
Use the connection in your tasks: In your Airflow DAGs, you can access the stored API token by referencing the connection you created. You can use the connection’s name or provide the connection ID to retrieve the necessary credentials or API token within your task code.
By storing the API token as a connection in Airflow, you can avoid hardcoding sensitive information in your code and manage credentials centrally through the Airflow UI.
Note: It’s important to ensure that only authorized users have access to the Airflow web UI and appropriate permissions to view and manage connections, as they contain sensitive information.
And How can I get back in python code
To retrieve the stored API token or connection information from Apache Airflow within your Python code, you can use the BaseHook class provided by Airflow. The BaseHook class provides methods to retrieve connection details based on the connection name or ID.
Here’s an example of how you can retrieve the API token using BaseHook:
from airflow.hooks.base_hook import BaseHook

# Retrieve the connection by name
connection_name = "my_api_connection"
connection = BaseHook.get_connection(connection_name)

# Retrieve the API token
api_token = connection.password

# Use the API token in your code
print(f"API token: {api_token}")
In the above example, replace "my_api_connection" with the actual name of your connection that holds the API token. The BaseHook.get_connection() method retrieves the connection object based on the connection name provided. Then, you can access the API token using the password attribute of the connection object.
You can also retrieve the connection by ID instead of the name using BaseHook.get_connection_by_id():
from airflow.hooks.base_hook import BaseHook

# Retrieve the connection by ID
connection_id = 123
connection = BaseHook.get_connection_by_id(connection_id)

# Retrieve the API token
api_token = connection.password

# Use the API token in your code
print(f"API token: {api_token}")
In this case, replace 123 with the actual ID of your connection.
By using the BaseHook class and its methods, you can easily retrieve the stored API token or any other connection details within your Python code in Apache Airflow.
Custom hooks
import requests


from airflow.hooks.base_hook import BaseHook


class MovielensHook(BaseHook):

"""

Hook for the MovieLens API.


Abstracts details of the Movielens (REST) API and provides several convenience

methods for fetching data (e.g. ratings, users, movies) from the API. Also

provides support for automatic retries of failed requests, transparent

handling of pagination, authentication, etc.


Parameters

----------

conn_id : str

ID of the connection to use to connect to the Movielens API. Connection

is expected to include authentication details (login/password) and the

host that is serving the API.

"""


DEFAULT_SCHEMA = "http"

DEFAULT_PORT = 5000


def __init__(self, conn_id, retry=3):

super().__init__()

self._conn_id = conn_id

self._retry = retry


self._session = None

self._base_url = None


def __enter__(self):

return self


def __exit__(self, exc_type, exc_val, exc_tb):

self.close()


def get_conn(self):

"""

Returns the connection used by the hook for querying data.

Should in principle not be used directly.

"""


if self._session is None:

# Fetch config for the given connection (host, login, etc).

config = self.get_connection(self._conn_id)


if not config.host:

raise ValueError(f"No host specified in connection {self._conn_id}")


schema = config.schema or self.DEFAULT_SCHEMA

port = config.port or self.DEFAULT_PORT


self._base_url = f"{schema}://{config.host}:{port}"


# Build our session instance, which we will use for any

# requests to the API.

self._session = requests.Session()


if config.login:

self._session.auth = (config.login, config.password)


return self._session, self._base_url


def close(self):

"""Closes any active session."""

if self._session:

self._session.close()

self._session = None

self._base_url = None


# API methods:


def get_movies(self):

"""Fetches a list of movies."""

raise NotImplementedError()


def get_users(self):

"""Fetches a list of users."""

raise NotImplementedError()


def get_ratings(self, start_date=None, end_date=None, batch_size=100):

"""

Fetches ratings between the given start/end date.


Parameters

----------

start_date : str

Start date to start fetching ratings from (inclusive). Expected

format is YYYY-MM-DD (equal to Airflow's ds formats).

end_date : str

End date to fetching ratings up to (exclusive). Expected

format is YYYY-MM-DD (equal to Airflow's ds formats).

batch_size : int

Size of the batches (pages) to fetch from the API. Larger values

mean less requests, but more data transferred per request.

"""


yield from self._get_with_pagination(

endpoint="/ratings",

params={"start_date": start_date, "end_date": end_date},

batch_size=batch_size,

)


def _get_with_pagination(self, endpoint, params, batch_size=100):

"""

Fetches records using a get request with given url/params,

taking pagination into account.

"""


session, base_url = self.get_conn()

url = base_url + endpoint


offset = 0

total = None

while total is None or offset < total:

response = session.get(

url, params={**params, **{"offset": offset, "limit": batch_size}}

)

response.raise_for_status()

response_json = response.json()


yield from response_json["result"]


offset += batch_size

total = response_json["total"]
Building Custom Operator
Although building a MovielensHook has allowed us to move a lot of complexity from our DAG into the hook, we still have to write a considerable amount of boilerplate code for defining start/end dates and writing the ratings to an output file. This means that, if we want to reuse this functionality in multiple DAGs, we will still have some considerable code duplication and extra effort involved. Fortunately, Airflow also allows us to build custom operators, which can be used to perform repetitive tasks with a minimal amount of boilerplate code. In this case, we could, for example, use this functionality to build a MovielensFetchRatingsOperator, which would allow us to fetch movie ratings using a specialized operator class.
import json

import os


from airflow.models import BaseOperator

from airflow.utils.decorators import apply_defaults


from custom.hooks import MovielensHook


class MovielensFetchRatingsOperator(BaseOperator):

"""

Operator that fetches ratings from the Movielens API (introduced in Chapter 8).


Parameters

----------

conn_id : str

ID of the connection to use to connect to the Movielens API. Connection

is expected to include authentication details (login/password) and the

host that is serving the API.

output_path : str

Path to write the fetched ratings to.

start_date : str

(Templated) start date to start fetching ratings from (inclusive).

Expected format is YYYY-MM-DD (equal to Airflow's ds formats).

end_date : str

(Templated) end date to fetching ratings up to (exclusive).

Expected format is YYYY-MM-DD (equal to Airflow's ds formats).

batch_size : int

Size of the batches (pages) to fetch from the API. Larger values

mean less requests, but more data transferred per request.

"""


template_fields = ("_start_date", "_end_date", "_output_path")


@apply_defaults

def __init__(

self,

conn_id,

output_path,

start_date="{{ds}}",

end_date="{{next_ds}}",

batch_size=1000,

**kwargs,

):

super(MovielensFetchRatingsOperator, self).__init__(**kwargs)


self._conn_id = conn_id

self._output_path = output_path

self._start_date = start_date

self._end_date = end_date

self._batch_size = batch_size


# pylint: disable=unused-argument,missing-docstring

def execute(self, context):

hook = MovielensHook(self._conn_id)


try:

self.log.info(

f"Fetching ratings for {self._start_date} to {self._end_date}"

)

ratings = list(

hook.get_ratings(

start_date=self._start_date,

end_date=self._end_date,

batch_size=self._batch_size,

)

)

self.log.info(f"Fetched {len(ratings)} ratings")

finally:

# Make sure we always close our hook's session.

hook.close()


self.log.info(f"Writing ratings to {self._output_path}")


# Make sure output directory exists.

output_dir = os.path.dirname(self._output_path)

os.makedirs(output_dir, exist_ok=True)


# Write output as JSON.

with open(self._output_path, "w") as file_:

json.dump(ratings, fp=file_)
Building custom sensors
"""Module containing file system sensors."""


from airflow.sensors.base import BaseSensorOperator

from airflow.utils.decorators import apply_defaults


from custom.hooks import MovielensHook


class MovielensRatingsSensor(BaseSensorOperator):

"""

Sensor that waits for the Movielens API to have ratings for a time period.


start_date : str

(Templated) start date of the time period to check for (inclusive).

Expected format is YYYY-MM-DD (equal to Airflow's ds formats).

end_date : str

(Templated) end date of the time period to check for (exclusive).

Expected format is YYYY-MM-DD (equal to Airflow's ds formats).

"""


template_fields = ("_start_date", "_end_date")


@apply_defaults

def __init__(self, conn_id, start_date="{{ds}}", end_date="{{next_ds}}", **kwargs):

super().__init__(**kwargs)

self._conn_id = conn_id

self._start_date = start_date

self._end_date = end_date


# pylint: disable=unused-argument,missing-docstring

def poke(self, context):

hook = MovielensHook(self._conn_id)


try:

next(

hook.get_ratings(

start_date=self._start_date, end_date=self._end_date, batch_size=1

)

)

# If no StopIteration is raised, the request returned at least one record.

# This means that there are records for the given period, which we indicate

# to Airflow by returning True.

self.log.info(

f"Found ratings for {self._start_date} to {self._end_date}, continuing!"

)

return True

except StopIteration:

self.log.info(

f"Didn't find any ratings for {self._start_date} "

f"to {self._end_date}, waiting..."

)

# If StopIteration is raised, we know that the request did not find

# any records. This means that there a no ratings for the time period,

# so we should return False.

return False

finally:

# Make sure we always close our hook's session.

hook.close()
NEED TO READ AND PRACTICE IN TESTING UNIT 9
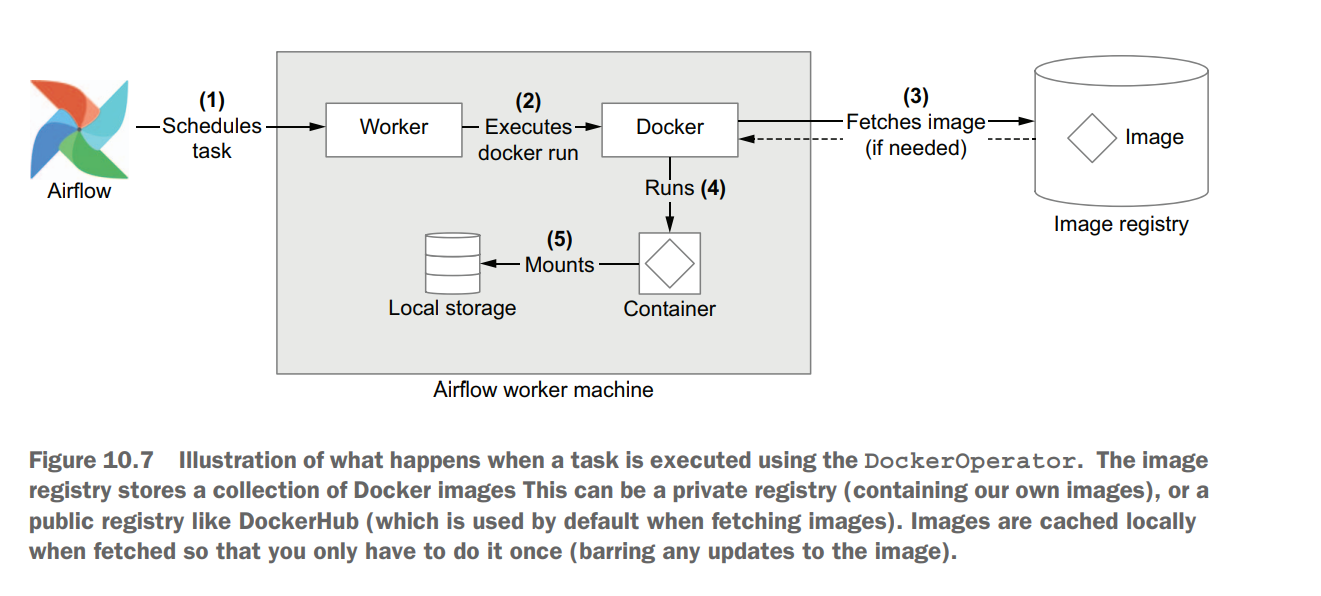
Running tasks in containers Unit 10
import datetime as dt

import os


from airflow import DAG

from airflow.providers.docker.operators.docker import DockerOperator


with DAG(

dag_id="01_docker",

description="Fetches ratings from the Movielens API using Docker.",

start_date=dt.datetime(2019, 1, 1),

end_date=dt.datetime(2019, 1, 3),

schedule_interval="@daily",

) as dag:


fetch_ratings = DockerOperator(

task_id="fetch_ratings",

image="manning-airflow/movielens-fetch",

command=[

"fetch-ratings",

"--start_date",

"{{ds}}",

"--end_date",

"{{next_ds}}",

"--output_path",

"/data/ratings/{{ds}}.json",

"--user",

os.environ["MOVIELENS_USER"],

"--password",

os.environ["MOVIELENS_PASSWORD"],

"--host",

os.environ["MOVIELENS_HOST"],

],

network_mode="airflow",

# Note: this host path is on the HOST, not in the Airflow docker container.

volumes=["/tmp/airflow/data:/data"],

)


rank_movies = DockerOperator(

task_id="rank_movies",

image="manning-airflow/movielens-rank",

command=[

"rank-movies",

"--input_path",

"/data/ratings/{{ds}}.json",

"--output_path",

"/data/rankings/{{ds}}.csv",

],

volumes=["/tmp/airflow/data:/data"],

)


fetch_ratings >> rank_movies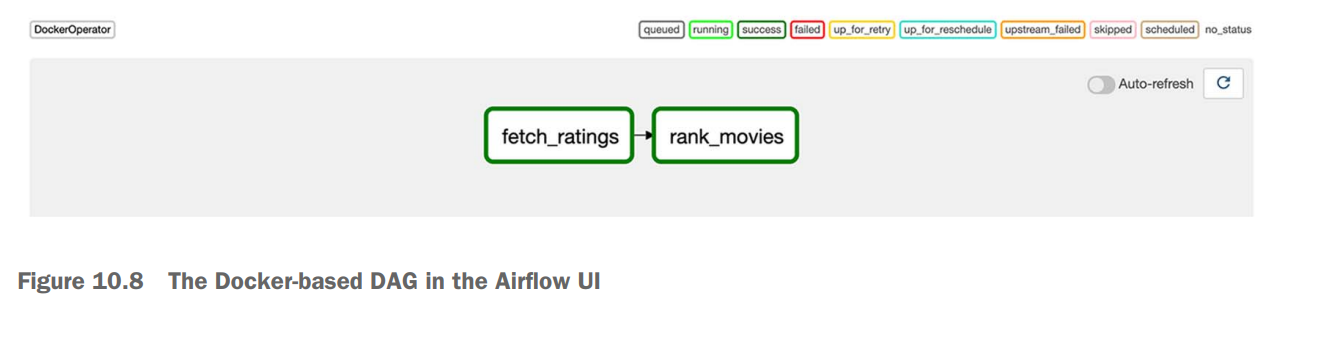
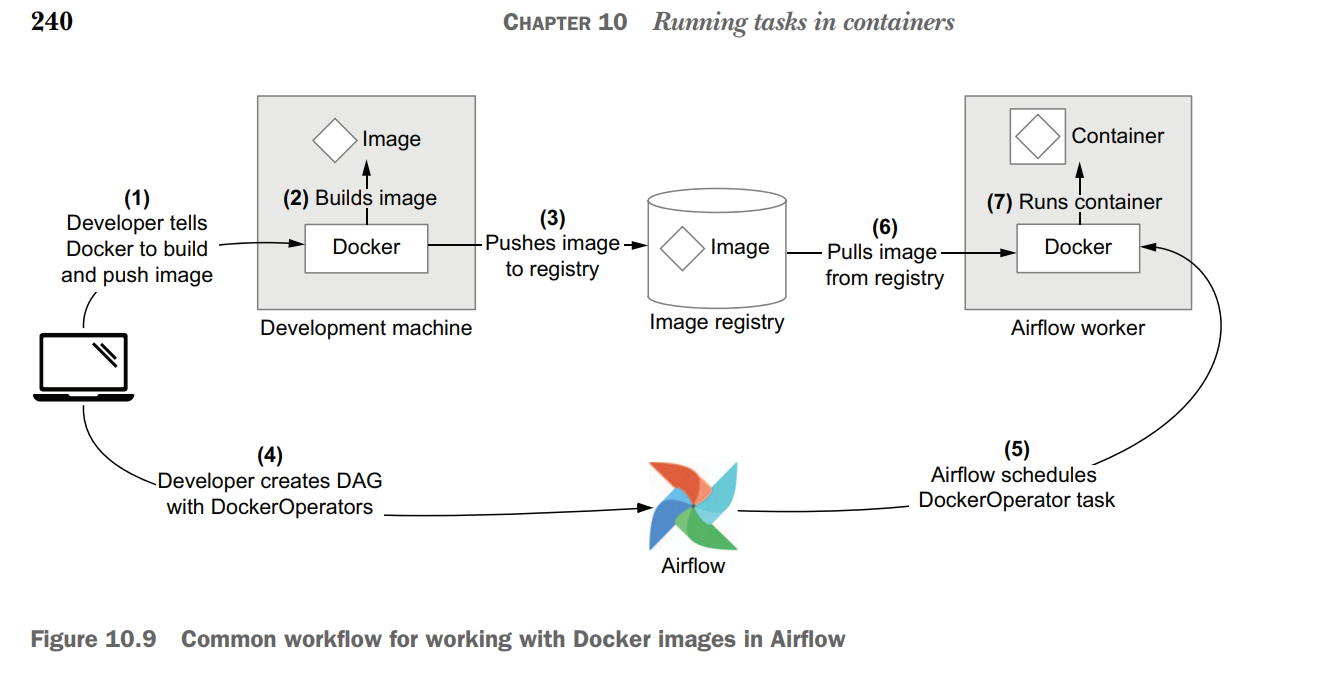
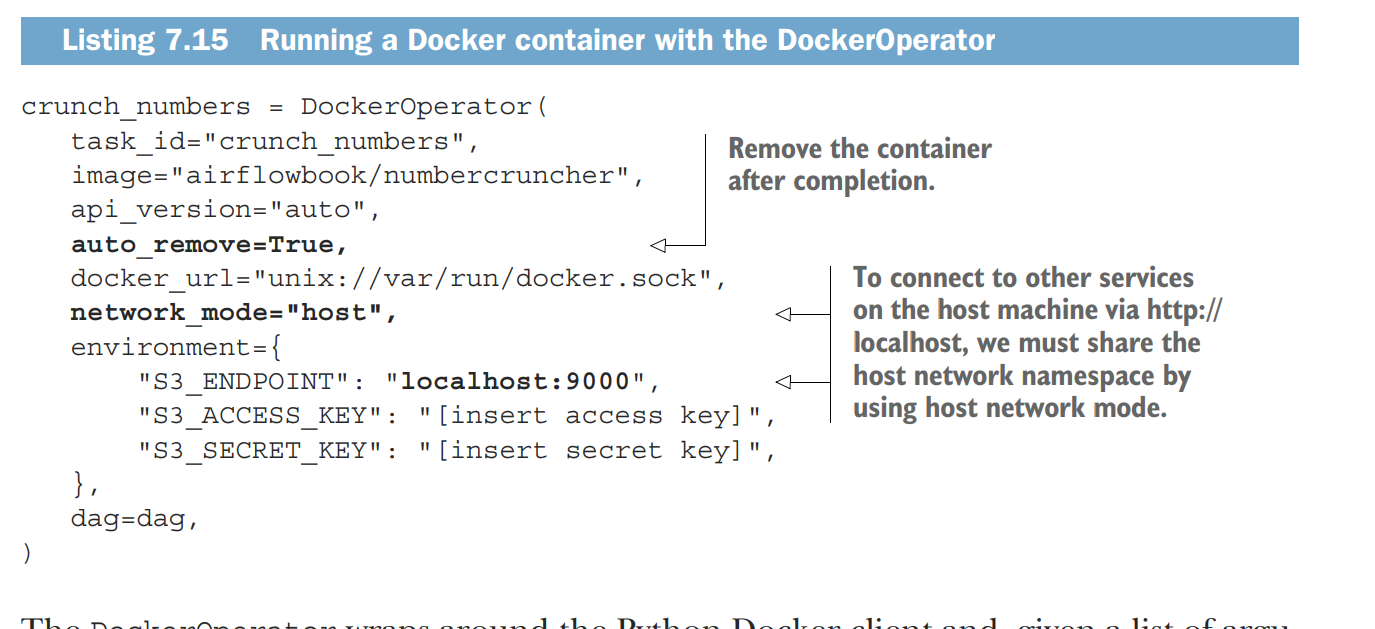
Airflow deployments can be difficult to manage if they involve many different operators, as this requires knowledge of the different APIs and complicates debugging and dependency management. One way of tackling this issue is to use container technologies such as Docker to encapsulate your tasks inside container images and run these images from within Airflow. This containerized approach has several advantages, including easier dependency management, a more uniform interface for running tasks, and improved testability of tasks. Using the DockerOperator, you can run tasks in container images directly using Docker, similar to the docker run CLI command. You can use the KubernetesPodOperator to run containerized tasks in pods on a Kubernetes cluster. Kubernetes allows you to scale your containerized tasks across a compute cluster, which provides (among other things) greater scalability and more flexibility in terms of computing resources.