conda create -n django python=3.10
conda activate django
pip install Django
ASGI
Asynchronous Server Gateway Interface (ASGI) is a specification for Python web servers and applications. It serves as an evolution of the traditional WSGI (Web Server Gateway Interface), which has been the standard for Python web applications. The key features and purpose of ASGI are:
-
Asynchronous Support: ASGI provides a standard for handling asynchronous requests in Python. This is particularly important for enabling web applications to handle long-lived connections, such as those needed for WebSockets, HTTP/2, and other protocols.
-
Compatibility with WSGI: ASGI is designed to be backward compatible with WSGI. This means that applications and frameworks written for WSGI can be adapted to use ASGI with minimal changes.
-
Scalability: By supporting asynchronous programming, ASGI allows for more scalable web applications. Asynchronous applications can handle a larger number of simultaneous connections with fewer resources, as they don’t block the server while waiting for I/O operations.
-
Flexibility: ASGI separates the concerns of web application and server, allowing for more flexibility in choosing or developing both. Different ASGI servers can be used with different ASGI applications.
-
Layered Architecture: ASGI defines a layered architecture with different components handling specific types of events (HTTP, WebSocket, lifespan). This modularity allows for more maintainable and extensible applications.
-
Community Adoption: ASGI has gained significant traction within the Python community, with web frameworks like Django and Starlette providing support for ASGI.
Overall, ASGI represents a modern approach to building Python web applications, enabling more efficient handling of asynchronous operations and better scalability. It’s particularly useful for applications that require handling real-time data or maintaining persistent connections with clients.
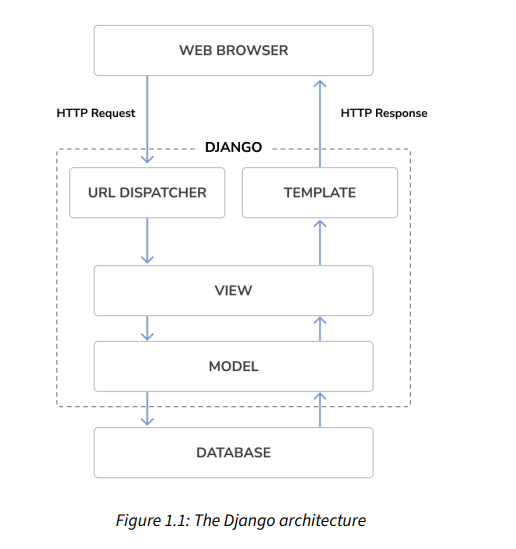
Django components are loosely coupled, which means they can be managed independently. This helps separate the responsibilities of the different layers of the framework; the database layer knows nothing about how the data is displayed, the template system knows nothing about web requests, and so on.
Main framework components
Django follows the MTV (Model-Template-View) pattern. It is a slightly similar pattern to the wellknown MVC (Model-View-Controller) pattern, where the Template acts as View and the framework itself acts as the Controller. The responsibilities in the Django MTV pattern are divided as follows:
• Model – Defines the logical data structure and is the data handler between the database and the View.
• Template – Is the presentation layer. Django uses a plain-text template system that keeps everything that the browser renders.
• View – Communicates with the database via the Model and transfers the data to the Template for viewing.
The framework itself acts as the Controller. It sends a request to the appropriate view, according to the Django URL configuration.
python manage.py migrate
The python manage.py migrate command is a crucial part of managing database schemas in Django, a popular Python web framework. This command is used to apply migrations to your database. Migrations are Django’s way of propagating changes you make to your models (adding a field, deleting a model, etc.) into the database schema.
Here’s a breakdown of what migrate does and its importance:
-
Applying Migrations: Migrations are Django’s way of keeping track of changes to the database schema. Each time you modify a model (e.g., add a field, delete a model, change a field type), Django generates a migration file – a Python script – to reflect those changes. The
migratecommand applies these migrations to your database, updating the database schema. -
Database Schema Management: Migrations are essential for managing the database schema over time. They allow for a database to be updated in a controlled and consistent manner, avoiding the need for manual schema alterations.
-
Synchronization: The
migratecommand ensures that the current state of the database matches the state expected by the models. It applies all migrations that have been generated but not yet applied to the database. -
Initial Setup: When you first set up a Django project,
migrateis used to create the necessary database tables for all the apps listed inINSTALLED_APPSthat Django provides, like the authentication system, sessions, admin, etc. -
Dependencies Handling: Django keeps track of dependencies between migrations. For example, if one migration depends on another,
migrateensures they are applied in the correct order. -
Idempotency: Running
migratemultiple times doesn’t have adverse effects. If there are no new migrations to apply, Django will simply report that no changes were made. -
Database Agnostic: Django’s migration system is designed to be database agnostic. The same migration files can be applied across different types of databases (like MySQL, PostgreSQL, SQLite) without modification.
To use migrate, you typically follow these steps:
- Make changes to your models.
- Create migrations for those changes with
python manage.py makemigrations. - Apply those migrations to the database with
python manage.py migrate.
It’s important to regularly run python manage.py migrate in your development process to keep your database schema synchronized with your models. In production, this should be done as part of your deployment process.
python manage.py runserver ⇒ see for results
python manage.py runserver 127.0.0.1:8001 —settings=mysite.settings ⇒ Runs with custom settings
When you have to deal with multiple environments that require different configurations, you can create a different settings file for each environment.
Creating an application
python manage.py startapp APPNAME
• init.py: An empty file that tells Python to treat the blog directory as a Python module.
• admin.py: This is where you register models to include them in the Django administration site—using this site is optional.
• apps.py: This includes the main configuration of the blog application.
• migrations: This directory will contain database migrations of the application. Migrations allow Django to track your model changes and synchronize the database accordingly. This directory contains an empty init.py file.
• models.py: This includes the data models of your application; all Django applications need to have a models.py file but it can be left empty.
• tests.py: This is where you can add tests for your application.
• views.py: The logic of your application goes here; each view receives an HTTP request, processes it, and returns a response.
Django Meta Class
In Django models, the Meta class is a special inner class that you define within a model class to provide metadata about the model. This metadata can affect how the model behaves, how it’s interpreted by Django’s ORM (Object-Relational Mapping), and how it interacts with the database.
The Meta class is completely optional in a Django model. If you don’t define one, Django will use default values for all the relevant settings. However, defining a Meta class gives you a lot of control over model-specific options. Some of the most commonly used options include:
-
ordering: This specifies the default order in which the objects returned by QuerySets should be sorted. For example,ordering = ['-publish']would order objects by thepublishfield in descending order. -
db_table: This allows you to set a custom name for the database table. If this isn’t provided, Django generates a default table name. -
verbose_nameandverbose_name_plural: These provide human-readable names for the model. This is especially useful in Django’s admin interface. -
unique_together: This can be used to define a composite unique constraint. For example,unique_together = ('field1', 'field2')ensures that each combination offield1andfield2is unique across the database table. -
index_together: Similar tounique_together, but for creating indexes in the database. -
abstract: If set toTrue, the model is an abstract base class. Abstract base models are not used to create any database table. Instead, other models inherit from them and create database tables. -
managed: If set toFalse, Django won’t perform any database operations for the model (like creating the table, migrations, etc.). It’s useful when the database table is managed outside of Django. -
permissions: Custom permissions for the model, used in Django’s authentication system. -
constraints: Allows defining database constraints for the model. -
get_latest_by: Field name to use with the model’sget_latest_by()method andlatest()manager method. -
default_related_name: The default reverse name to use for relationships pointing to this model. -
indexes: Allows defining database indexes for the model. -
app_label: Defines the name of the Django app that the model belongs to. This is useful if the model is defined outside of any application inINSTALLED_APPS.
These are just a few examples of what you can define in a Meta class. The options provide a powerful way to influence the SQL code generated by Django and how the ORM interacts with your models. Remember, any settings you define in a Meta class apply to the entire model class and all instances of that model.
How to design model in Django
Designing models in Django, which is a high-level Python web framework, involves creating Python classes that define the structure of your database. Models in Django are a source of truth for your data. They contain the essential fields and behaviors of the data you’re storing. Here’s a guide to help you design models effectively in Django:
1. Understand Your Data
Before writing any code, understand the data you want to store and how different pieces of data are related to each other. Identify the entities (like User, Post, Product, etc.) and their attributes.
2. Creating a Model
Each model in Django is a Python class that subclasses django.db.models.Model. The attributes of the class represent database fields.
from django.db import models

class MyModel(models.Model):
    my_field = models.CharField(max_length=100)
3. Choose Field Types
Django provides various field types like CharField, IntegerField, DateField, ForeignKey, etc. Choose the appropriate field type based on the nature of the data.
4. Define Relationships
Understand the relationships between different entities. Django supports three primary types of relationships:
- ForeignKey: A many-to-one relationship. Use this if many instances of a model can be associated with one instance of another model.
- ManyToManyField: A many-to-many relationship. Use it when instances of a model can be associated with many instances of another model.
- OneToOneField: A one-to-one relationship. Use it when one instance of a model is associated with one instance of another model.
5. Use Meta Options
The Meta class inside a model is where you define the model-specific options like ordering, database table name (db_table), verbose names (verbose_name and verbose_name_plural), etc.
6. Implement Methods
You can define methods in the model class. Common methods include:
__str__: Returns a human-readable representation of the object.- Custom methods to perform operations specific to the model.
7. Indexing and Constraints
Add indexes using Meta class options to improve query performance. Define constraints like unique_together for data integrity.
8. Consider Model Inheritance
Django offers three types of model inheritance: abstract base classes, multi-table inheritance, and proxy models. Choose based on your design needs.
9. Validation
Define clean methods or validators to enforce specific rules on your fields for data integrity.
10. Create and Run Migrations
Once your models are defined, create migrations and run them to update the database schema.
python manage.py makemigrations
python manage.py migrate
Best Practices
- Keep models simple and focused on the data and behavior they represent.
- Use verbose field names to improve code readability.
- Add docstrings to models and their methods for documentation.
- Keep business logic in models or managers rather than views or other layers.
Example
Here’s a simple example of a blog application with two models:
from django.db import models
from django.utils import timezone

class Author(models.Model):
    name = models.CharField(max_length=100)
    bio = models.TextField()

    def __str__(self):
        return self.name

class Post(models.Model):
    author = models.ForeignKey(Author, on_delete=models.CASCADE)
    title = models.CharField(max_length=200)
    content = models.TextField()
    published_date = models.DateTimeField(default=timezone.now)

    class Meta:
        ordering = ['-published_date']

    def __str__(self):
        return self.title
In this example, we have two models Author and Post with a ForeignKey relationship. This is a simplified representation to get you started with Django models.
Add Index in models
Important Point:
-
To improve query performance, especially for queries that filter or order by the
publishfield, a database index is added to this field in thePostmodel of a Django application. This is particularly beneficial since thepublishfield is used for default ordering of query results. -
The index is added to the
Metaclass of thePostmodel using theindexesoption, which allows defining database indexes. These indexes can be on single or multiple fields and can specify order (ascending or descending) or use functional expressions and database functions. -
Note that on MySQL databases, index ordering is not supported, so a descending index will be created as a regular index.
-
The addition of this index will be reflected in future database migrations for the blog models.
Code Example:
from django.db import models
from django.utils import timezone
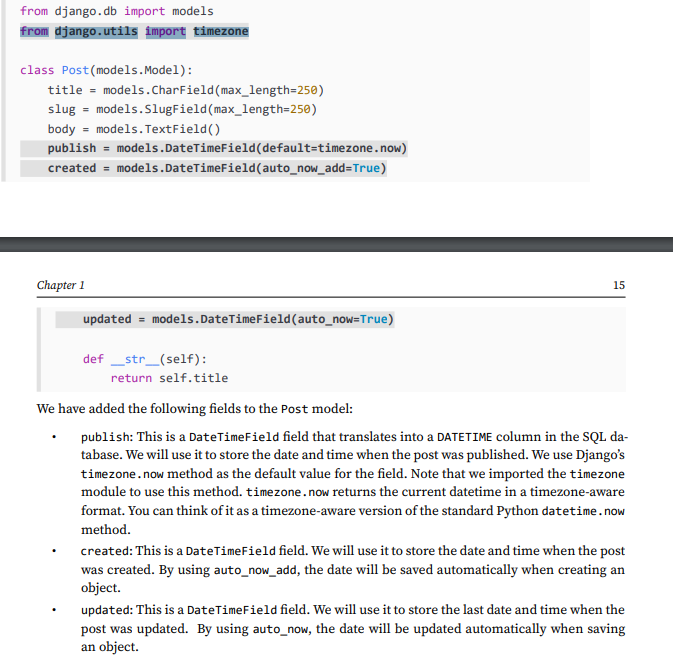
class Post(models.Model):
title = models.CharField(max_length=250)
slug = models.SlugField(max_length=250)
body = models.TextField()
publish = models.DateTimeField(default=timezone.now)
created = models.DateTimeField(auto_now_add=True)
updated = models.DateTimeField(auto_now=True)
class Meta:
ordering = ['-publish']
indexes = [
models.Index(fields=['-publish']),
]
def __str__(self):
return self.titleIn this code, an index is added to the publish field of the Post model to optimize query performance. The index is specified in the Meta class under the indexes option, indicating a descending order for the publish field.
Django By Example 4 Book Summary
pip install Django~=4.1.0 python 3.10 used for book
python -m django —version ⇒ check django version
MVC
The Model-View-Controller (MVC) is a software architectural pattern commonly used for developing user interfaces. It divides an application into three interconnected components to separate internal representations of information from the ways that information is presented to and accepted from the user. This separation helps manage complexity and facilitates efficient code reuse and parallel development. Here’s a breakdown of each component:
-
Model: The Model represents the data or the business logic of the application. It manages the data, logic, and rules of the application. For example, if your application is a book library, the Model will manage book data, keeping track of which books are in the library, whether they are loaned out, etc.
-
View: The View is the visual representation of the Model. It presents the data to the user. The View is responsible for displaying the data (the books and their status) from the Model to the user and also for sending user commands to the Controller. The View is typically what the user interacts with, like the graphical user interface.
-
Controller: The Controller acts as an interface between Model and View components to process all the business logic and incoming requests, manipulate data using the Model component, and interact with the Views to render the final output. For example, when a user wants to borrow a book, the Controller will handle this request, checking with the Model to see if the book is available and then updating the View.
The key idea behind MVC is that each of these components can be developed and tested independently. This makes the development process more efficient and allows for easier maintenance and scaling of the application. The MVC pattern is widely used in web applications, where the View is the HTML or web page, the Controller is the server-side scripting or backend technology, and the Model is the database or server-side logic.
MVC vs MVT
Model-View-Template (MVT) is another architectural pattern similar to Model-View-Controller (MVC), but with some differences in how it handles the presentation layer. MVT is notably used in the Django framework for web development.
Model-View-Template (MVT):
-
Model: Similar to MVC, the Model in MVT represents the data structure of the application. It is concerned with what the data is, how it is stored, retrieved, and changed. Essentially, it represents the database structure and handles data-related logic.
-
View: In MVT, the View is more closely related to what is called the Controller in MVC. It is responsible for processing a user’s request and returning the appropriate response. The View in MVT takes user input, processes it (possibly involving interactions with the Model), and returns the output.
-
Template: The Template in MVT is similar to the View in MVC. It is concerned with how to present the data. It is responsible for generating the HTML (or other markup) that is displayed in the user’s browser. Essentially, it’s the layout and design of what the user sees and interacts with.
Comparison of MVT and MVC:
-
Role of View/Controller/Template: The primary difference lies in the View component. In MVC, the View is about presenting data, while in MVT, the View is more about the business logic or control logic. The presentation logic in MVT is handled by the Template.
-
Flow of Control:
- In MVC, a user interacts with the View, which then updates the Controller. The Controller interacts with the Model, updates it if necessary, and then a View is rendered.
- In MVT, a user interacts with the Template (equivalent to MVC’s View), which passes the request to the View (equivalent to MVC’s Controller). The View, after interacting with the Model if needed, renders the Template.
-
Usage:
- MVC is a more general pattern and is used in various types of applications, from small to large enterprise applications. It’s not limited to web applications.
- MVT is specifically tailored for web applications and is closely associated with Django, a high-level Python web framework.
-
Separation of Concerns:
- Both MVC and MVT aim to separate concerns, but they do it slightly differently. MVC separates the data (Model), the user interface (View), and the control logic (Controller), while MVT separates the data (Model), the control logic (View), and the presentation logic (Template).
In summary, while both MVC and MVT patterns aim to separate concerns and streamline development, their approach to handling the user interface and control logic differs. MVC is a more traditional and widely used pattern, while MVT is a variation more specific to web development, particularly in the Django framework.
django-admin startproject mysite
cd mysite && python manage.py migrate
python manage.py runserver
# python manage.py runserver 127.0.0.1:8001 --settings=mysite.settings
Project settings
settings.py is a central configuration file in a Django project. It contains various settings and options that determine how your Django application behaves. Understanding settings.py is crucial for effective Django development, as it controls fundamental aspects of your project, such as database configurations, installed apps, middleware, templates, and more. Here’s an overview of some key components typically found in a settings.py file:
-
DEBUG: A boolean that turns on/off debug mode. WhenTrue, Django provides detailed error pages when an exception occurs. This should be set toFalsein production for security reasons. -
INSTALLED_APPS: A list of strings designating all Django applications that are activated in this Django instance. It includes both your own apps and Django’s built-in apps. -
MIDDLEWARE: A list of middleware classes used by the project. Middleware is a framework of hooks into Django’s request/response processing. It’s a way to process requests and responses globally. -
ROOT_URLCONF: A string representing the full Python import path to your root URLconf. This tells Django where to find the URL patterns for the project. -
TEMPLATES: A list containing the settings for all template engines to be used with Django. It includes where the templates are stored, which engines to use, and other options. -
DATABASES: A dictionary that contains the settings for all databases to be used with the application. It includes database engine (like PostgreSQL, MySQL, SQLite), name, user, password, host, etc. -
AUTH_PASSWORD_VALIDATORS: A list of password validation rules for user passwords. -
STATIC_URLandSTATICFILES_DIRS: These settings define how Django handles static files (CSS, JavaScript, images).STATIC_URLis the URL to use when referring to static files, andSTATICFILES_DIRSis a list of filesystem directories to check when loading static files. -
LANGUAGE_CODEandTIME_ZONE: These settings specify the default language and timezone for the project. -
SECRET_KEY: A large random value used for cryptographic signing. This key is crucial for security and should be kept secret. -
ALLOWED_HOSTS: A list of strings representing the host/domain names that this Django site can serve.
In addition to these standard settings, settings.py can include custom settings specific to your project. When creating a new Django project, a settings.py file is automatically generated with default values, which you can then modify to suit your project’s needs.
Remember that settings.py contains sensitive information, such as database credentials and the secret key, so it should be protected and not exposed publicly. For production environments, it’s a good practice to separate sensitive information into environment variables or use a configuration management tool.

In Django, a project is considered a Django installation with some settings. An application is a group of models, views, templates, and URLs. Applications interact with the framework to provide specific functionalities and may be reused in various projects. You can think of a project as your website, which contains several applications, such as a blog, wiki, or forum, that can also be used by other Django projects.
How to create Models in Django ?
Creating models in Django involves defining the structure of your database tables in terms of Python classes. Django’s Object-Relational Mapping (ORM) layer then translates these Python classes into database tables. Here’s a step-by-step guide to creating Django models:
1. Set Up Your Django Project and Application
Before creating models, you need to have a Django project and at least one application within it.
- Start a Project: If you haven’t already, start a Django project by running:
django-admin startproject myproject - Create an Application: Create an application within your project:
python manage.py startapp myapp - Register the Application: Add your app to the
INSTALLED_APPSlist in your project’ssettings.pyfile:INSTALLED_APPS = [ # ... 'myapp', ]
2. Define Your Models
In the models.py file of your application, define your models.
-
Import the models module:
from django.db import models -
Create a class for each model:
class MyModel(models.Model): # Define fields here field_name = models.FieldType(options)- Each model is represented by a class that subclasses
models.Model. - Each field of the model is represented by an instance of a
models.Fieldsubclass (e.g.,CharField,IntegerField).
- Each model is represented by a class that subclasses
-
Example:
class Book(models.Model):
    title = models.CharField(max_length=100)
    author = models.CharField(max_length=100)
    published_date = models.DateField()
3. Run Migrations
After defining your models, you need to create migrations and apply them to your database.
- Create Migrations: Run the following command to create migration files for your models:
python manage.py makemigrations myapp - Apply Migrations: Execute the migrations to create database tables:
python manage.py migrate
4. Use Models in Django
Now, your models are ready to be used in views, forms, and templates.
- You can create, retrieve, update, and delete instances of your models using Django’s ORM methods.
- For example, to create a new
Bookobject:new_book = Book(title="Sample Book", author="Author Name", published_date=date.today()) new_book.save()
5. Admin Interface (Optional)
To manage your models easily, you can register them with Django’s admin interface.
- In
admin.pyof your app, import your model and register it:from django.contrib import admin from .models import Book admin.site.register(Book)
Additional Tips
- Model Fields: Familiarize yourself with the various field types available in Django (
CharField,IntegerField,ForeignKey, etc.), as well as their options (likemax_length,null,blank,choices, etc.). - Relationships: Learn about defining relationships (one-to-one, many-to-one, many-to-many) using
ForeignKey,OneToOneField, andManyToManyField. - Meta Options: Use the inner
Metaclass in your model to provide metadata to your model like ordering options, verbose names, etc. - Querying: Understand how to query your models using Django’s ORM to retrieve, filter, and order data efficiently.
By following these steps, you can successfully create and use models in your Django application to interact with the database in a Pythonic way.
What is Slug field ?
A “slug” in Django and web development is a short label typically used in URLs to identify a particular resource in a human-readable way. A slug is a part of a URL that is usually a cleaned-up version of a title or name, containing only letters, numbers, underscores, or hyphens. They are generally used in URLs because they are easier to type, read, and remember than a numerical ID or a chunk of query parameters. They also help with Search Engine Optimization (SEO) since they clearly describe the content of the page.
Django’s SlugField
In Django, a SlugField is a field in a model used to store and generate these slugs. It’s a part of Django’s model fields and is used to store a slug for a particular record. Here’s how it works and its characteristics:
-
Syntax:
slug = models.SlugField(max_length=50) -
Characteristics:
- The
SlugFieldin Django is similar to aCharFieldbut with some constraints: it can only contain letters, numbers, underscores, or hyphens. - It’s commonly used in URLs for individual records, making the URLs more user-friendly and SEO-friendly.
- You can set a
max_lengthparameter to specify the maximum length of the slug. - Often, the slug is derived from another field in the model, like the title of a blog post. Django can automatically populate a slug field using the
slugifyfunction, which converts a given string into a slug format.
- The
-
Auto-populating Slugs:
- In practice, slugs are often generated automatically from another field, like the title of an article. For example, the title “My First Blog Post!” might be automatically turned into the slug “my-first-blog-post”.
- You can override the
savemethod of your model or use Django’spre_savesignal to auto-populate the slug field based on another field.
-
Usage in URLs:
- Slugs are used in URL patterns to provide a unique identifier for an object that is also readable and SEO-friendly. For instance, a blog post might be accessible at a URL like
/blog/my-first-blog-post.
- Slugs are used in URL patterns to provide a unique identifier for an object that is also readable and SEO-friendly. For instance, a blog post might be accessible at a URL like
-
Example:
from django.db import models
from django.utils.text import slugify

class BlogPost(models.Model):
    title = models.CharField(max_length=100)
    slug = models.SlugField(max_length=100, unique=True)

    def save(self, *args, **kwargs):
        if not self.slug:
            self.slug = slugify(self.title)
        super(BlogPost, self).save(*args, **kwargs)
In this example, a
BlogPostmodel is defined with atitleand aslug. Thesavemethod is overridden to automatically generate a slug from thetitleif the slug is not provided.
In summary, a SlugField in Django is used to store the slug of a model instance, which is a URL-friendly string derived from another field, like a title. It enhances the readability and SEO of URLs in web applications.
from django.db import models


# Create your models here.

from django.db import models

class Post(models.Model):

	title = models.CharField(max_length=250)

	slug = models.SlugField(max_length=250)

	body = models.TextField()

	def __str__(self):

		return self.title
We have also added a str() method to the model class. This is the default Python method to return a string with the human-readable representation of the object. Django will use this method to display the name of the object in many places, such as the Django administration site.
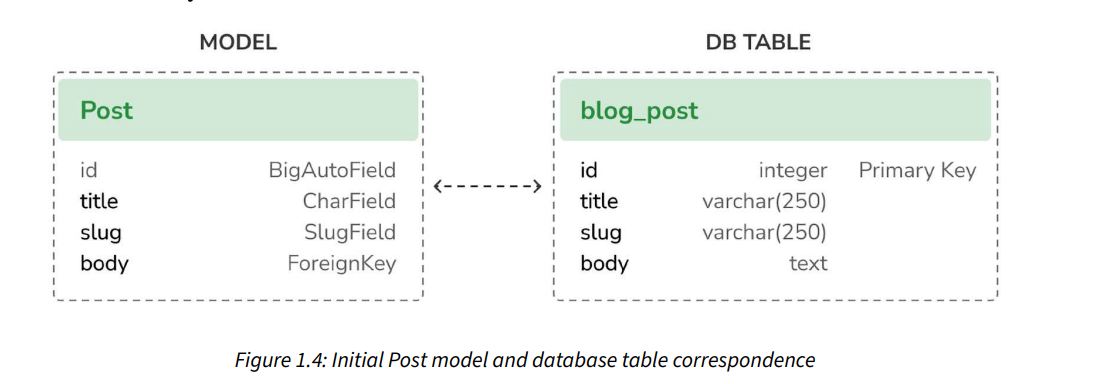
By default, Django adds an auto-incrementing primary key field to each model. The field type for this field is specified in each application configuration or globally in the DEFAULT_AUTO_FIELD setting. When creating an application with the startapp command, the default value for DEFAULT_AUTO_FIELD is BigAutoField. This is a 64-bit integer that automatically increments according to available IDs. If you don’t specify a primary key for your model, Django adds this field automatically. You can also define one of the model fields to be the primary key by setting primary_key=True on it.
Add time in models
What is class Meta in django ?
In Django, a class Meta inside a model class is a special inner class that holds configuration metadata for the model. It’s a way to tell Django about various options and preferences for how the model should behave. Here’s what you can do with class Meta:
Options for class Meta:
-
Naming and Ordering:
db_table: Specify the name of the database table to use for the model. If not given, Django will use a default name based on the app and model names.ordering: Define the default ordering for query results from the model. It’s a list or tuple of field names; prefixing a field name with-indicates descending order.
-
Permissions:
permissions: A list of permission tuples that define custom permissions for the model. Useful for extending Django’s built-in permissions system.default_permissions: Define which default permissions (add, change, delete, view) Django should create for the model.
-
Abstract Base Classes:
abstract: IfTrue, the model is an abstract base class. Django won’t create a database table for abstract models. They’re a way to put common information into a number of other models.
-
Field Options:
verbose_nameandverbose_name_plural: Define human-readable singular and plural names for the model. If not specified, Django will generate default verbose names.
-
Field Restrictions:
unique_together: This is a list of lists of fields that must be unique when considered together.index_together: Similar tounique_together, but specifies columns that should be indexed together.
-
Relationships:
get_latest_by: Specify the default field to use in thelatest()method of the model’s manager.constraints: A list of database constraints to apply to the model’s table.
-
Model Inheritance:
proxy: IfTrue, the model is a proxy model. It will not create a new database table but will create a new proxy interface to the original model.
-
Managed Option:
managed: Determines whether Django will handle the creation, migration, and deletion of the database table. Defaults toTrue. IfFalse, Django won’t manage the database table’s lifecycle.
-
App Label:
app_label: Define the app label for models not in an application listed inINSTALLED_APPS.
-
Other Options:
default_related_name: Provide a default reverse name for related objects.
Here’s an example of using class Meta in a Django model:
from django.db import models

class Author(models.Model):
    name = models.CharField(max_length=100)
    email = models.EmailField()

    class Meta:
        db_table = 'author_details'
        ordering = ['name']
        verbose_name = 'Author'
        verbose_name_plural = 'Authors'
        permissions = (
            ('can_email_author', 'Can Email Authors'),
        )
In this example, class Meta is used to set a custom table name, define a default ordering by name, set a verbose name for the admin interface, and define a custom permission.
The use of class Meta is a powerful feature that lets you control various aspects of your Django model’s behavior in a declarative and centralized way.
Adding a database index
`
class Meta:
	ordering = ['-publish']
	indexes = [ models.Index(fields=['-publish']), ]
Activating the application
INSTALLED_APPS = [

'django.contrib.admin',

'django.contrib.auth',

'django.contrib.contenttypes',

'django.contrib.sessions',

'django.contrib.messages',

'django.contrib.staticfiles',

'blog.apps.BlogConfig' # blog app see apps.py

]
class Status(models.TextChoices):
DRAFT = 'DF', 'Draft'
PUBLISHED = 'PB', 'Published'
# later you can use with this
status = models.CharField(max_length=2,
choices=Status.choices,
default=Status.DRAFT)
# in class
Here, a subclass named Status is defined within the Post class, using models.TextChoices to create a set of choices that can be used for a field later. DRAFT and PUBLISHED are two possible states for a blog post, with corresponding database values of ‘DF’ and ‘PB’, and human-readable names ‘Draft’ and ‘Published’.

Add user
from django.db import models

from django.utils import timezone

from django.contrib.auth.models import User


class PublishedManager(models.Manager):

def get_queryset(self):

return super().get_queryset()\

.filter(status=Post.Status.PUBLISHED)


class Post(models.Model):


class Status(models.TextChoices):

DRAFT = 'DF', 'Draft'

PUBLISHED = 'PB', 'Published'


title = models.CharField(max_length=250)

slug = models.SlugField(max_length=250)

author = models.ForeignKey(User, # from django.contrib.auth.models import User

		on_delete=models.CASCADE,

		related_name='blog_posts')

body = models.TextField()

publish = models.DateTimeField(default=timezone.now)

created = models.DateTimeField(auto_now_add=True)

updated = models.DateTimeField(auto_now=True)

status = models.CharField(max_length=2,

	choices=Status.choices,

	default=Status.DRAFT)


objects = models.Manager() # The default manager.

published = PublishedManager() # Our custom manager.


class Meta:

ordering = ['-publish']

indexes = [

models.Index(fields=['-publish']),

]


def __str__(self):

return self.title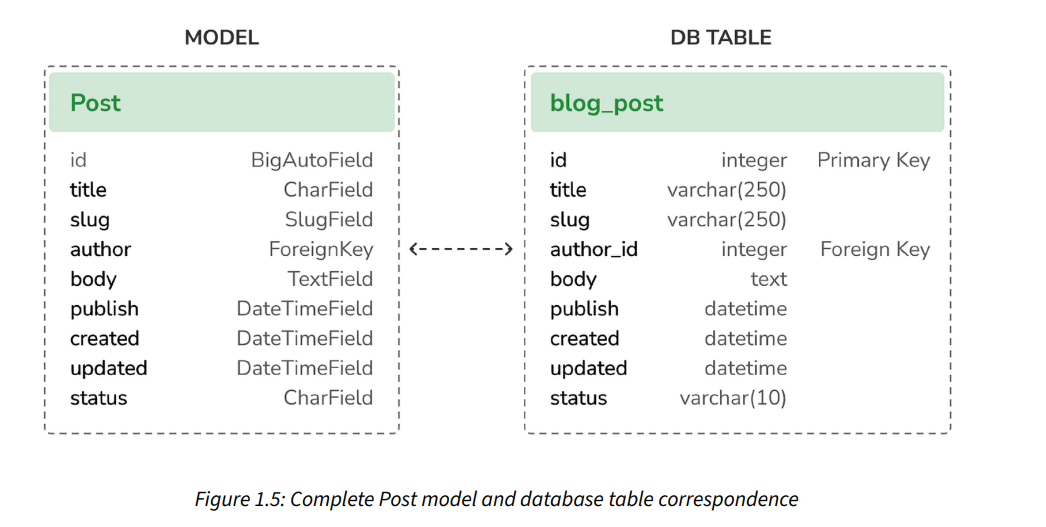
Create admin for site
python manage.py createsuperuser
Adding models to the administration site Let’s add your blog models to the administration site. Edit the admin.py file of the blog application and make it look like this. The new lines are highlighted in bold: ''' from django.contrib import admin from .models import Post admin.site.register(Post) ''' Now reload the administration site in your browser. You should see your Post model on the site.
Customizing how models are displayed
in admin.py
from django.contrib import admin
from .models import Post @admin.register(Post)
class PostAdmin(admin.ModelAdmin):
	list_display = ['title', 'slug', 'author', 'publish', 'status']
Django ORM Cheatsheet
https://djangocentral.com/django-orm-cheatsheet/
Creating model managers
The default manager for every model is the objects manager. This manager retrieves all the objects in the database. However, we can define custom managers for models.
Edit the models.py file of your blog application to add the custom manager as follows. The new lines are highlighted in bold:
class PublishedManager(models.Manager): def get_queryset(self): return super().get_queryset()\ .filter(status=Post.Status.PUBLISHED)
class Post(models.Model): # model fields # … objects = models.Manager() # The default manager. published = PublishedManager() # Our custom manager.
from blog.models import Post Post.published.filter(title__startswith=‘Who’)

in views.py
from django.shortcuts import render, get_object_or_404
from .models import Post


def post_list(request):
    posts = Post.published.all()
    return render(request,
                 'blog/post/list.html',
                 {'posts': posts})


def post_detail(request, id):
    post = get_object_or_404(Post,
                             id=id,
                             status=Post.Status.PUBLISHED)
    return render(request,
                  'blog/post/detail.html',
                  {'post': post})
see code in here
in urls.py
from django.urls import path
from . import views

app_name = 'blog'

urlpatterns = [
    # post views
    path('', views.post_list, name='post_list'),
    path('<int:id>/', views.post_detail, name='post_detail'),
]
Also add in main application
from django.contrib import admin
from django.urls import path, include

urlpatterns = [
    path('admin/', admin.site.urls),
    path('blog/', include('blog.urls', namespace='blog')),
]
Creating templates for your views
Inside template folder
.
└── blog
    ├── base.html
    └── post
        ├── detail.html
        └── list.html

2 directories, 3 files
• Template tags control the rendering of the template and look like {% tag %} • Template variables get replaced with values when the template is rendered and look like {{ variable }} • Template filters allow you to modify variables for display and look like {{ variable|filter }}
The provided code is a Jinja2 template, which is very similar to Django’s templating language. Jinja2 is a popular template engine for Python web frameworks. This specific template appears to be for a blog application, and it’s using several common Jinja2 features:
-
Template Inheritance (
{% extends %}):{% extends "blog/base.html" %}This tells Jinja that the current template should extend
blog/base.html, which means it will inherit the structure frombase.htmland can override specific blocks defined in it. -
Blocks (
{% block %}and{% endblock %}):{% block title %}My Blog{% endblock %}This defines a block named
title. Blocks are placeholders in the base template that can be overridden by child templates. Here, thetitleblock is set to display “My Blog”.{% block content %} ... {% endblock %}This defines a larger block named
content, where the main body of the page will be inserted. -
Loops (
{% for %}and{% endfor %}):{% for post in posts %} ... {% endfor %}This loop iterates over a collection named
posts, which is presumably passed to the template from the view. For each item in the collection, it repeats the enclosed HTML and template code. -
Variables (
{{ }}):{{ post.title }}This outputs the
titleproperty of the currentpostobject within the loop. -
URLs (
{% url %}):<a href="{% url 'blog:post_detail' post.id %}">This generates a URL to the
post_detailview, passingpost.idas an argument. In Django, theurltemplate tag is used to avoid hard-coding URLs in templates. -
Filters (
|):{{ post.body|truncatewords:30|linebreaks }}Here, the
bodytext of the post is being passed through two filters:truncatewords:30cuts off the text after 30 words and appends an ellipsis.linebreaksconverts line breaks in plain text into<p>and<br>tags for HTML.
The whole template, when rendered, would show the title “My Blog” in the title block and a list of blog posts in the content block. Each post would be displayed with a linked title, publication date, author, and a truncated version of the body text.
Here’s a complete example of how the rendered HTML might look for one post:
<!DOCTYPE html>
<html>
<head>
    <title>My Blog</title>
    <!-- Additional head content inherited from base.html -->
</head>
<body>
    <!-- Additional body content inherited from base.html -->
    <h1>My Blog</h1>
    <h2>
    <a href="/blog/post-detail/1">
        Sample Post Title
    </a>
    </h2>
    <p class="date">
    Published January 1, 2023 by John Doe
    </p>
    <p>This is the beginning of a blog post body text...</p>
    <!-- More posts ... -->
    <!-- Additional body content inherited from base.html -->
</body>
</html>
In this example, the post_detail view corresponding to the post with id 1 would be at the URL /blog/post-detail/1, the title of the post is “Sample Post Title”, and it was published by “John Doe” on “January 1, 2023”. Only the first 30 words of the post body are shown, followed by an ellipsis.
Using canonical URLs for models
The reverse function in Django is used to reverse-resolve URLs. This means that it allows you to generate URL paths to Django views when you have a URL pattern name and the required parameters that the view function expects. The reverse function is particularly useful because it allows you to avoid hardcoding URLs in your code, making your codebase more maintainable and your URL patterns easier to modify.
Here’s a breakdown of the reverse function and the parameters it takes:
Basic Usage:
reverse(viewname, urlconf=None, args=None, kwargs=None, current_app=None)-
viewname:- It’s the first and a required argument.
- This is the name of the URL pattern that you want to reverse. It can be the Python path to a view function or method, or the unique name given to a URL pattern using the
nameattribute in theurls.py.
-
urlconf(optional):- It’s the URL configuration module that contains the URL pattern. This parameter is usually not provided because by default,
reverseuses the root URLconf defined in yourROOT_URLCONFsetting.
- It’s the URL configuration module that contains the URL pattern. This parameter is usually not provided because by default,
-
args(optional):- A list or tuple of positional arguments that will be used to populate format strings in the URL pattern. If your URL pattern includes parts like
<int:pk>, you would pass the value forpkinargs.
- A list or tuple of positional arguments that will be used to populate format strings in the URL pattern. If your URL pattern includes parts like
-
kwargs(optional):- A dictionary of keyword arguments that will be used to populate named format strings in the URL pattern. Instead of a list of positional arguments, you can use keyword arguments to specify the parts of the URL pattern.
-
current_app(optional):- This can be used to specify which application Django should resolve the name of the view against if you are using multiple instances of the same application, and Django’s namespace resolution isn’t identifying the correct one automatically.
Example Usage:
Assume we have the following URL pattern in urls.py:
# urls.py

from django.urls import path
from .views import post_detail

urlpatterns = [
    path('post/<int:pk>/', post_detail, name='post_detail'),
]
You can use reverse to dynamically create a URL to the post_detail view like this:
from django.urls import reverse

url = reverse('post_detail', args=[10])- Here,
'post_detail'is the name of the URL pattern. args=[10]is providing the value for thepkin the URL pattern.- This will return a string like
'/post/10/'which is the URL path to thepost_detailview for the blog post with a primary key of 10.
If you prefer to use named arguments, you can pass them in kwargs like this:
url = reverse('post_detail', kwargs={'pk': 10})Both examples will produce the same URL string. Using reverse with the appropriate parameters allows you to reference views dynamically and makes your web application more flexible and easier to change.
The unique_for_date parameter in a Django model field is used to specify that the field should be unique with respect to the date field specified. In your Post model, the slug field has the unique_for_date='publish' option, which means:
- Each
slugmust be unique when considered together with the value of thepublishfield. - For example, you can only have one post with the slug ‘my-post’ on the date ‘2023-12-26’. If you try to create another post with the same slug on that date, Django will raise a validation error.
- This is particularly useful for blog posts or articles where you might want to allow the same slug to be used on different dates, but not on the same day. It helps in generating SEO-friendly URLs for posts that can be accessed by a combination of the date and the slug, which is a common pattern in blog applications.
The publish field would be a DateTimeField (or a DateField) in the same model. This is not shown in the snippet you’ve provided, but it’s implied by the use of unique_for_date. Here’s how it might look in your Post model:
class Post(models.Model):
    # Other fields like title, author, body, etc.
    publish = models.DateTimeField()
    slug = models.SlugField(max_length=250, unique_for_date='publish')
    # ...
In this setup, the publish field would typically store the date and time when the post is published. The unique_for_date option would ensure that the combination of publish date and slug is unique across the database, effectively preventing duplicate slugs for posts published on the same day.
Adding pagination
Adding pagination to the post list view
from django.shortcuts import render, get_object_or_404
from .models import Post
from django.core.paginator import Paginator
def post_list(request):
	post_list = Post.published.all()
# Pagination with 3 posts per page

	paginator = Paginator(post_list, 3)
	page_number = request.GET.get('page', 1)
	posts = paginator.page(page_number)

return render(request, 'blog/post/list.html', {'posts': posts})docker run --name docker_postgres -e POSTGRES_PASSWORD=123456 -d -p 5432:5432 -v $HOME/docker/volumes/postgres:/var/lib/postgresql/data postgresdocker-compose.yaml
version: '3.8'

services:
  postgres:
    image: postgres
    container_name: docker_postgres
    environment:
      POSTGRES_PASSWORD: "123456"
    ports:
      - "5432:5432"
    volumes:
      - $HOME/docker/volumes/postgres:/var/lib/postgresql/data
    restart: always
Using the Django authentication framework
When we create a new Django project using the startproject command, the authentication framework is included in the default settings of our project. It consists of the django.contrib.auth application and the following two middleware classes found in the MIDDLEWARE setting of our project: • AuthenticationMiddleware: Associates users with requests using sessions • SessionMiddleware: Handles the current session across requests
The provided text describes the process of creating a basic user login functionality in Django. Here’s a summary highlighting the important points and code:
Key Points:
-
Creation of
LoginForminforms.py:- A
LoginFormclass is defined, inheriting fromforms.Form. - It has two fields:
username(aCharField) andpassword(aCharFieldwithPasswordInputwidget). PasswordInputwidget renders the field as a password input in HTML, hiding the entered characters.
Code:
from django import forms class LoginForm(forms.Form): username = forms.CharField() password = forms.CharField(widget=forms.PasswordInput) - A
-
User Login View in
views.py:- The view
user_loginhandles both GET and POST requests. - On a GET request, it instantiates a new
LoginFormand passes it to the template. - On a POST request, the form is instantiated with submitted data.
- The form is validated; if invalid, form errors will be shown.
- If valid, it attempts to authenticate the user using
authenticate(). - If authentication succeeds, it checks if the user is active.
- If the user is active, they are logged in using
login(), and a success message is displayed.
Code:
from django.http import HttpResponse from django.shortcuts import render from django.contrib.auth import authenticate, login from .forms import LoginForm def user_login(request): if request.method == 'POST': form = LoginForm(request.POST) if form.is_valid(): cd = form.cleaned_data user = authenticate(request, username=cd['username'], password=cd['password']) if user is not None: if user.is_active: login(request, user) return HttpResponse('Authenticated successfully') else: return HttpResponse('Disabled account') else: return HttpResponse('Invalid login') else: form = LoginForm() return render(request, 'account/login.html', {'form': form}) - The view
Additional Notes:
- Difference between
authenticate()andlogin():authenticate(): Checks user credentials and returns aUserobject if they are correct.login(): Sets the authenticated user in the current session.
This setup is a basic implementation of a login system in Django, using Django’s built-in authentication system and forms. The authenticate() method is used for verifying the username and password, while the login() method manages the user’s session.
csrf_token in Django is used for protection against Cross-Site Request Forgery (CSRF) attacks. CSRF is a type of security vulnerability that occurs when a malicious website causes a user’s browser to perform an unwanted action on a trusted site where the user is authenticated.
How CSRF Works:
In a CSRF attack, a malicious site can send a request to a more trusted site where the user is already authenticated. Without proper safeguards, the trusted site might execute actions as if the request was legitimate, potentially leading to unauthorized actions being performed on behalf of the authenticated user.
Django’s CSRF Protection:
-
CSRF Token:
- Django’s built-in CSRF protection mechanism uses a unique token to prevent CSRF attacks. This token is a random value that is unique to each user session.
- The token is generated by Django and sent to the client as part of the rendering process for forms.
-
Using csrf_token in Templates:
- When rendering forms in your HTML templates, you include the
{% csrf_token %}template tag within the<form>tag. - Django then populates this with a hidden input field containing the token value.
- Example:
<form method="post">
    {% csrf_token %}
    <!-- Your form fields here -->
</form>
- When rendering forms in your HTML templates, you include the
-
Token Validation:
- When a form is submitted, Django checks for the CSRF token in the POST data. It compares the token in the form data against the one stored in the user’s session.
- If the tokens match, Django processes the form submission as normal.
- If the token is missing or incorrect, Django rejects the request, thereby preventing potential CSRF attacks.
-
Ajax Requests:
- For Ajax requests, you need to ensure the CSRF token is included in the request headers. Django provides a way to get the CSRF token from the cookie and include it in the headers of the Ajax request.
Importance:
CSRF tokens are crucial for web application security. By ensuring that each post request comes with a unique token that matches the user’s session, Django effectively blocks external sites from being able to submit requests on behalf of a user without their knowledge. This is an essential defense against a common and potentially harmful web attack vector.
Django includes a set of class-based views in django.contrib.auth.views to handle user authentication, password changes, and password resets. These views provide a standard way to implement common authentication-related functionalities. Here’s a summary of these views:
Authentication Views:
-
LoginView:
- Manages a login form and logs in a user.
-
LogoutView:
- Logs out a user.
Password Change Views:
-
PasswordChangeView:
- Handles a form to change the user’s password.
-
PasswordChangeDoneView:
- A success view that users are redirected to after successfully changing their password.
Password Reset Views:
-
PasswordResetView:
- Allows users to initiate a password reset. It generates a one-time-use link with a token and sends it to the user’s email.
-
PasswordResetDoneView:
- Informs users that an email with a password reset link has been sent.
-
PasswordResetConfirmView:
- Enables users to set a new password using the token provided in the email.
-
PasswordResetCompleteView:
- A success view that users are redirected to after successfully resetting their password.
These views simplify the implementation of common authentication tasks, like logging in and out, changing passwords, and resetting forgotten passwords. They can be easily integrated into Django applications and customized as needed.