codereview https://go.dev/wiki/CodeReviewComments
Why does the golang place the type specifier “after” the variable name?
Go programming language follows these principles:
- declarations start with a keyword, so that the parser can be implemented with a single token look-ahead (like in Pascal)
- the rest of the declaration follows the English grammar, with every redundant word left out (also like in Pascal, but with fewer keywords)
Examples:
- The type
Frequencyis amapindexed bystring, mapping toint
type Frequency map[string]int - The type
Pointis astructwith two fields,xandyof typeint
type Point struct { x, y int }
The above sentences focus more on the names than on the types, which makes sense since the names convey more meaning.
If I had to explain to novice programmers how to write declarations in Go, I would let them first describe it in plain English and then remove every word that might even seem redundant.
Up to now, I didn’t find any contradictions to these rules.
In Go (Golang), the = and := operators are used for assignment, but they serve different purposes and are used in different contexts.
-
=: This is the standard assignment operator used in Go. You use=when you want to assign a value to an already declared variable. Before you can use=, you must declare the variable’s type. For example:var a int a = 5 // Assigning 5 to the previously declared variable a -
:=: This is the short variable declaration operator. It is a shorthand for declaring and initializing a variable in the same line. When you use:=, Go automatically infers the type of the variable based on the value you assign to it. This operator is used when you are declaring a new variable, or at least one of the variables on the left side of:=is new. For example:b := 10 // Declares b and assigns 10 to it. Type of b is inferred as int.
It’s important to note that := can only be used inside functions. For package-level variables, you must use the var keyword and the = operator.
Here’s a quick summary:
- Use
=for assigning a value to an already declared variable. - Use
:=for declaring a new variable and assigning a value to it in the same statement, with type inference.
Keep in mind that if you try to use := with a variable that’s already been declared in the same scope, you’ll get a compilation error, unless there’s at least one new variable on the left side of :=.
Golang How slice works in internally ?
https://go.dev/blog/slices-intro
Go Slices: usage and internals
Andrew Gerrand
5 January 2011
Introduction
Go’s slice type provides a convenient and efficient means of working with sequences of typed data. Slices are analogous to arrays in other languages, but have some unusual properties. This article will look at what slices are and how they are used.
Arrays
The slice type is an abstraction built on top of Go’s array type, and so to understand slices we must first understand arrays.
An array type definition specifies a length and an element type. For example, the type [4]int represents an array of four integers. An array’s size is fixed; its length is part of its type ([4]int and [5]int are distinct, incompatible types). Arrays can be indexed in the usual way, so the expression s[n] accesses the nth element, starting from zero.
var a [4]int
a[0] = 1
i := a[0]
// i == 1
Arrays do not need to be initialized explicitly; the zero value of an array is a ready-to-use array whose elements are themselves zeroed:
// a[2] == 0, the zero value of the int type
The in-memory representation of [4]int is just four integer values laid out sequentially:

Go’s arrays are values. An array variable denotes the entire array; it is not a pointer to the first array element (as would be the case in C). This means that when you assign or pass around an array value you will make a copy of its contents. (To avoid the copy you could pass a pointer to the array, but then that’s a pointer to an array, not an array.) One way to think about arrays is as a sort of struct but with indexed rather than named fields: a fixed-size composite value.
An array literal can be specified like so:
b := [2]string{"Penn", "Teller"}
Or, you can have the compiler count the array elements for you:
b := [...]string{"Penn", "Teller"}
In both cases, the type of b is [2]string.
Slices
Arrays have their place, but they’re a bit inflexible, so you don’t see them too often in Go code. Slices, though, are everywhere. They build on arrays to provide great power and convenience.
The type specification for a slice is []T, where T is the type of the elements of the slice. Unlike an array type, a slice type has no specified length.
A slice literal is declared just like an array literal, except you leave out the element count:
letters := []string{"a", "b", "c", "d"}
A slice can be created with the built-in function called make, which has the signature,
func make([]T, len, cap) []T
where T stands for the element type of the slice to be created. The make function takes a type, a length, and an optional capacity. When called, make allocates an array and returns a slice that refers to that array.
var s []byte
s = make([]byte, 5, 5)
// s == []byte{0, 0, 0, 0, 0}
When the capacity argument is omitted, it defaults to the specified length. Here’s a more succinct version of the same code:
s := make([]byte, 5)
The length and capacity of a slice can be inspected using the built-in len and cap functions.
len(s) == 5
cap(s) == 5
The next two sections discuss the relationship between length and capacity.
The zero value of a slice is nil. The len and cap functions will both return 0 for a nil slice.
A slice can also be formed by “slicing” an existing slice or array. Slicing is done by specifying a half-open range with two indices separated by a colon. For example, the expression b[1:4] creates a slice including elements 1 through 3 of b (the indices of the resulting slice will be 0 through 2).
b := []byte{'g', 'o', 'l', 'a', 'n', 'g'}
// b[1:4] == []byte{'o', 'l', 'a'}, sharing the same storage as b
The start and end indices of a slice expression are optional; they default to zero and the slice’s length respectively:
// b[:2] == []byte{'g', 'o'}
// b[2:] == []byte{'l', 'a', 'n', 'g'}
// b[:] == b
This is also the syntax to create a slice given an array:
x := [3]string{"Лайка", "Белка", "Стрелка"}
s := x[:] // a slice referencing the storage of x
Slice internals
A slice is a descriptor of an array segment. It consists of a pointer to the array, the length of the segment, and its capacity (the maximum length of the segment).
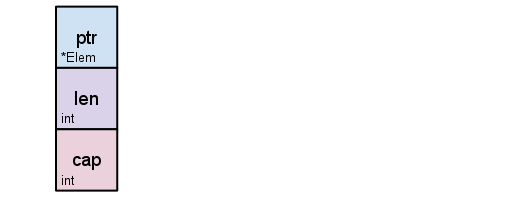
Our variable s, created earlier by make([]byte, 5), is structured like this:
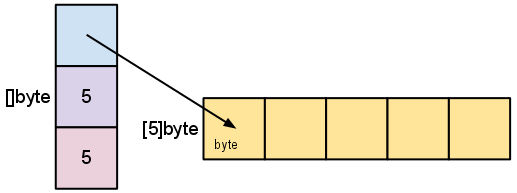
The length is the number of elements referred to by the slice. The capacity is the number of elements in the underlying array (beginning at the element referred to by the slice pointer). The distinction between length and capacity will be made clear as we walk through the next few examples.
As we slice s, observe the changes in the slice data structure and their relation to the underlying array:
s = s[2:4]
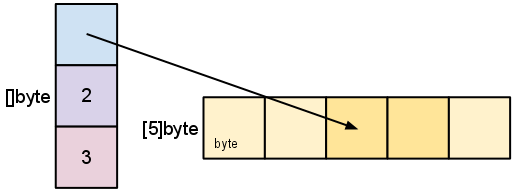
Slicing does not copy the slice’s data. It creates a new slice value that points to the original array. This makes slice operations as efficient as manipulating array indices. Therefore, modifying the elements (not the slice itself) of a re-slice modifies the elements of the original slice:
d := []byte{'r', 'o', 'a', 'd'}
e := d[2:]
// e == []byte{'a', 'd'}
e[1] = 'm'
// e == []byte{'a', 'm'}
// d == []byte{'r', 'o', 'a', 'm'}
Earlier we sliced s to a length shorter than its capacity. We can grow s to its capacity by slicing it again:
s = s[:cap(s)]
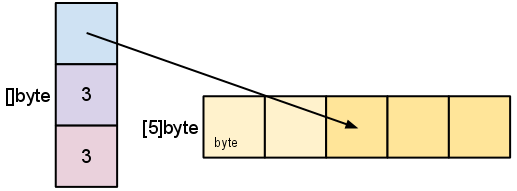
A slice cannot be grown beyond its capacity. Attempting to do so will cause a runtime panic, just as when indexing outside the bounds of a slice or array. Similarly, slices cannot be re-sliced below zero to access earlier elements in the array.
Growing slices (the copy and append functions)
To increase the capacity of a slice one must create a new, larger slice and copy the contents of the original slice into it. This technique is how dynamic array implementations from other languages work behind the scenes. The next example doubles the capacity of s by making a new slice, t, copying the contents of s into t, and then assigning the slice value t to s:
t := make([]byte, len(s), (cap(s)+1)*2) // +1 in case cap(s) == 0
for i := range s {
        t[i] = s[i]
}
s = t
The looping piece of this common operation is made easier by the built-in copy function. As the name suggests, copy copies data from a source slice to a destination slice. It returns the number of elements copied.
func copy(dst, src []T) int
The copy function supports copying between slices of different lengths (it will copy only up to the smaller number of elements). In addition, copy can handle source and destination slices that share the same underlying array, handling overlapping slices correctly.
Using copy, we can simplify the code snippet above:
t := make([]byte, len(s), (cap(s)+1)*2)
copy(t, s)
s = t
A common operation is to append data to the end of a slice. This function appends byte elements to a slice of bytes, growing the slice if necessary, and returns the updated slice value:
func AppendByte(slice []byte, data ...byte) []byte {
    m := len(slice)
    n := m + len(data)
    if n > cap(slice) { // if necessary, reallocate
        // allocate double what's needed, for future growth.
        newSlice := make([]byte, (n+1)*2)
        copy(newSlice, slice)
        slice = newSlice
    }
    slice = slice[0:n]
    copy(slice[m:n], data)
    return slice
}
One could use AppendByte like this:
p := []byte{2, 3, 5}
p = AppendByte(p, 7, 11, 13)
// p == []byte{2, 3, 5, 7, 11, 13}
Functions like AppendByte are useful because they offer complete control over the way the slice is grown. Depending on the characteristics of the program, it may be desirable to allocate in smaller or larger chunks, or to put a ceiling on the size of a reallocation.
But most programs don’t need complete control, so Go provides a built-in append function that’s good for most purposes; it has the signature
func append(s []T, x ...T) []T
The append function appends the elements x to the end of the slice s, and grows the slice if a greater capacity is needed.
a := make([]int, 1)
// a == []int{0}
a = append(a, 1, 2, 3)
// a == []int{0, 1, 2, 3}
To append one slice to another, use ... to expand the second argument to a list of arguments.
a := []string{"John", "Paul"}
b := []string{"George", "Ringo", "Pete"}
a = append(a, b...) // equivalent to "append(a, b[0], b[1], b[2])"
// a == []string{"John", "Paul", "George", "Ringo", "Pete"}
Since the zero value of a slice (nil) acts like a zero-length slice, you can declare a slice variable and then append to it in a loop:
// Filter returns a new slice holding only
// the elements of s that satisfy fn()
func Filter(s []int, fn func(int) bool) []int {
    var p []int // == nil
    for _, v := range s {
        if fn(v) {
            p = append(p, v)
        }
    }
    return p
}
A possible “gotcha”
As mentioned earlier, re-slicing a slice doesn’t make a copy of the underlying array. The full array will be kept in memory until it is no longer referenced. Occasionally this can cause the program to hold all the data in memory when only a small piece of it is needed.
For example, this FindDigits function loads a file into memory and searches it for the first group of consecutive numeric digits, returning them as a new slice.
var digitRegexp = regexp.MustCompile("[0-9]+")

func FindDigits(filename string) []byte {
    b, _ := ioutil.ReadFile(filename)
    return digitRegexp.Find(b)
}
This code behaves as advertised, but the returned []byte points into an array containing the entire file. Since the slice references the original array, as long as the slice is kept around the garbage collector can’t release the array; the few useful bytes of the file keep the entire contents in memory.
To fix this problem one can copy the interesting data to a new slice before returning it:
func CopyDigits(filename string) []byte {
    b, _ := ioutil.ReadFile(filename)
    b = digitRegexp.Find(b)
    c := make([]byte, len(b))
    copy(c, b)
    return c
}
A more concise version of this function could be constructed by using append. This is left as an exercise for the reader.
Variadic Functions
package main


import "fmt"


func sum(nums ...int) {

fmt.Print(nums, " ")

total := 0


for _, num := range nums {

total += num

}


for i := 0; i < len(nums); i++ {

println(nums[i])

//total += nums[i]

}

fmt.Println(total)

}


func main() {


sum(1, 2)

sum(1, 2, 3)


nums := []int{1, 2, 3, 4}

sum(nums...)

}Before I started programming Go, I was doing most of my work with Python. As a Python programmer, I found that learning to use interfaces in Go was extremely difficult. That is, the basics were easy, and I knew how to use the interfaces in the standard library, but it took some practice before I knew how to design my own interfaces. In this post, I’ll discuss Go’s type system in an effort to explain how to use interfaces effectively.
Introduction to interfaces
So what is an interface? An interface is two things: it is a set of methods, but it is also a type. Let’s focus on the method set aspect of interfaces first.
Typically, we’re introduced to interfaces with some contrived example. Let’s go with the contrived example of writing some application where you’re defining Animal datatypes, because that’s a totally realistic situation that happens all the time. The Animal type will be an interface, and we’ll define an Animal as being anything that can speak. This is a core concept in Go’s type system; instead of designing our abstractions in terms of what kind of data our types can hold, we design our abstractions in terms of what actions our types can execute.
We start by defining our Animal interface:
type Animal interface { Speak() string }
pretty simple: we define an Animal as being any type that has a method named Speak. The Speak method takes no arguments and returns a string. Any type that defines this method is said to satisfy the Animal interface. There is no implements keyword in Go; whether or not a type satisfies an interface is determined automatically. Let’s create a couple of types that satisfy this interface:
type Dog struct { }
func (d Dog) Speak() string { return “Woof!” }
type Cat struct { }
func (c Cat) Speak() string { return “Meow!” }
type Llama struct { }
func (l Llama) Speak() string { return ”?????” }
type JavaProgrammer struct { }
func (j JavaProgrammer) Speak() string { return “Design patterns!” }
We now have four different types of animals: A dog, a cat, a llama, and a Java programmer. In our main() function, we can create a slice of Animals, and put one of each type into that slice, and see what each animal says. Let’s do that now:
func main() { animals := []Animal{Dog{}, Cat{}, Llama{}, JavaProgrammer{}} for _, animal := range animals { fmt.Println(animal.Speak()) } }
You can view and run this example here:http://play.golang.org/p/yGTd4MtgD5
Great, now you know how to use interfaces, and I don’t need to talk about them any more, right? Well, no, not really. Let’s look at a few things that aren’t very obvious to the budding gopher.
The interface{} type
The interface{} type, the empty interface, is the source of much confusion. The interface{} type is the interface that has no methods. Since there is no implements keyword, all types implement at least zero methods, and satisfying an interface is done automatically, all types satisfy the empty interface. That means that if you write a function that takes an interface{} value as a parameter, you can supply that function with any value. So, this function:
func DoSomething(v interface{}) { // … }
will accept any parameter whatsoever.
Here’s where it gets confusing: inside of the DoSomething function, what is v’s type? Beginner gophers are led to believe that “v is of any type”, but that is wrong. v is not of any type; it is of interface{} type. Wait, what? When passing a value into the DoSomething function, the Go runtime will perform a type conversion (if necessary), and convert the value to an interface{} value. All values have exactly one type at runtime, and v’s one static type is interface{}.
This should leave you wondering: ok, so if a conversion is taking place, what is actually being passed into a function that takes an interface{} value (or, what is actually stored in an []Animal slice)? An interface value is constructed of two words of data; one word is used to point to a method table for the value’s underlying type, and the other word is used to point to the actual data being held by that value. I don’t want to bleat on about this endlessly. If you understand that an interface value is two words wide and it contains a pointer to the underlying data, that’s typically enough to avoid common pitfalls. If you are curious to learn more about the implementation of interfaces, I think Russ Cox’s description of interfaces is very, very helpful.
In our previous example, when we constructed a slice of Animal values, we did not have to say something onerous like Animal(Dog{}) to put a value of type Dog into the slice of Animal values, because the conversion was handled for us automatically. Within the animals slice, each element is of Animal type, but our different values have different underlying types.
So… why does this matter? Well, understanding how interfaces are represented in memory makes some potentially confusing things very obvious. For example, the question “can I convert a []T to an []interface{}” is easy to answer once you understand how interfaces are represented in memory. Here’s an example of some broken code that is representative of a common misunderstanding of the interface{} type:
package main
import ( “fmt” )
func PrintAll(vals []interface{}) { for _, val := range vals { fmt.Println(val) } }
func main() { names := []string{“stanley”, “david”, “oscar”} PrintAll(names) }
Run it here:http://play.golang.org/p/4DuBoi2hJU
By running this, you can see that we encounter the following error: cannot use names (type []string) as type []interface {} in function argument. If we want to actually make that work, we would have to convert the []string to an []interface{}:
package main
import ( “fmt” )
func PrintAll(vals []interface{}) { for _, val := range vals { fmt.Println(val) } }
func main() { names := []string{“stanley”, “david”, “oscar”} vals := make([]interface{}, len(names)) for i, v := range names { vals[i] = v } PrintAll(vals) }
Run it here:http://play.golang.org/p/Dhg1YS6BJS
That’s pretty ugly, but c’est la vie. Not everything is perfect. (in reality, this doesn’t come up very often, because []interface{} turns out to be less useful than you would initially expect)
Pointers and interfaces
Another subtlety of interfaces is that an interface definition does not prescribe whether an implementor should implement the interface using a pointer receiver or a value receiver. When you are given an interface value, there’s no guarantee whether the underlying type is or isn’t a pointer. In our previous example, we defined all of our methods on value receivers, and we put the associated values into the Animal slice. Let’s change this and make the Cat’s Speak() method take a pointer receiver:
func (c *Cat) Speak() string { return “Meow!” }
If you change that one signature, and you try to run the same program exactly as-is (http://play.golang.org/p/TvR758rfre), you will see the following error:
prog.go:40: cannot use Cat literal (type Cat) as type Animal in array element: Cat does not implement Animal (Speak method requires pointer receiver)
This error message is a bit confusing at first, to be honest. What it’s saying is not that the interface Animal demands that you define your method as a pointer receiver, but that you have tried to convert a Cat struct into an Animal interface value, but only *Cat satisfies that interface. You can fix this bug by passing in a *Cat pointer to the Animal slice instead of a Cat value, by using new(Cat) instead of Cat{} (you could also say &Cat{}, I simply prefer the look of new(Cat)):
animals := []Animal{Dog{}, new(Cat), Llama{}, JavaProgrammer{}}
now our program works again:http://play.golang.org/p/x5VwyExxBM
Let’s go in the opposite direction: let’s pass in a *Dog pointer instead of a Dog value, but this time we won’t change the definition of the Dog type’s Speak method:
animals := []Animal{new(Dog), new(Cat), Llama{}, JavaProgrammer{}}
This also works (http://play.golang.org/p/UZ618qbPkj), but recognize a subtle difference: we didn’t need to change the type of the receiver of the Speak method. This works because a pointer type can access the methods of its associated value type, but not vice versa. That is, a *Dog value can utilize the Speak method defined on Dog, but as we saw earlier, a Cat value cannot access the Speak method defined on *Cat.
That may sound cryptic, but it makes sense when you remember the following: everything in Go is passed by value. Every time you call a function, the data you’re passing into it is copied. In the case of a method with a value receiver, the value is copied when calling the method. This is slightly more obvious when you understand that a method of the following signature:
func (t T)MyMethod(s string) { // … }
is a function of type func(T, string); method receivers are passed into the function by value just like any other parameter.
Any changes to the receiver made inside of a method defined on a value type (e.g., func (d Dog) Speak() { ... }) will not be seen by the caller because the caller is scoping a completely separate Dog value. Since everything is passed by value, it should be obvious why a *Cat method is not usable by a Cat value; any one Cat value may have any number of *Cat pointers that point to it. If we try to call a *Cat method by using a Cat value, we never had a *Cat pointer to begin with. Conversely, if we have a method on the Dog type, and we have a *Dog pointer, we know exactly which Dog value to use when calling this method, because the *Dog pointer points to exactly one Dog value; the Go runtime will dereference the pointer to its associated Dog value any time it is necessary. That is, given a *Dog value d and a method Speak on the Dog type, we can just say d.Speak(); we don’t need to say something like d->Speak() as we might do in other languages.
The real world: getting a proper timestamp out of the Twitter API
The Twitter API represents timestamps using a string of the following format:
“Thu May 31 00:00:01 +0000 2012”
of course, timestamps can be represented in any number of ways in a JSON document, because timestamps aren’t a part of the JSON spec. For the sake of brevity, I won’t put in the entire JSON representation of a tweet, but let’s take a look at how the created_at field would be handled by encoding/json:
package main
import ( “encoding/json” “fmt” “reflect” )
// start with a string representation of our JSON data
var input = { "created_at": "Thu May 31 00:00:01 +0000 2012" }
func main() { // our target will be of type map[string]interface{}, which is a // pretty generic type that will give us a hashtable whose keys // are strings, and whose values are of type interface{} var val map[string]interface{}
if err := json.Unmarshal([]byte(input), &val); err != nil {
    panic(err)
}

fmt.Println(val)
for k, v := range val {
    fmt.Println(k, reflect.TypeOf(v))
}
}
run it here:http://play.golang.org/p/VJAyqO3hTF
Running this application, we see that we arrive at the following output:
map[created_at:Thu May 31 00:00:01 +0000 2012] created_at string
We can see that we’ve retrieved the key properly, but having a timestamp in a string format like that isn’t very useful. If we want to compare timestamps to see which is earlier, or see how much time has passed since the given value and the current time, using a plain string won’t be very helpful.
Let’s naively try to unmarshal this to a time.Time value, which is the standard library representation of time, and see what kind of error we get. Make the following change:
var val map[string]time.Time
if err := json.Unmarshal([]byte(input), &val); err != nil {
    panic(err)
}
running this, we will encounter the following error:
parsing time ""Thu May 31 00:00:01 +0000 2012"" as ""2006-01-02T15:04:05Z07:00"":
cannot parse "Thu May 31 00:00:01 +0000 2012"" as "2006"
that somewhat confusing error message comes from the way that Go handles the conversion of time.Time values to and from strings. In a nutshell, what it means is that the string representation we gave it does not match the standard time formatting (because Twitter’s API was originally written in Ruby, and the default format for Ruby is not the same as the default format for Go). We’ll need to define our own type in order to unmarshal this value correctly. The encoding/json package looks to see if values passed to json.Unmarshal satisfy the json.Unmarshaler interface, which looks like this:
type Unmarshaler interface { UnmarshalJSON([]byte) error }
this is referenced in the documentation here:http://golang.org/pkg/encoding/json/#Unmarshaler
So what we need is a time.Time value with an UnmarshalJSON([]byte) error method:
type Timestamp time.Time
func (t *Timestamp) UnmarshalJSON(b []byte) error { // … }
By implementing this method we satisfy the json.Unmarshaler interface, causing json.Unmarshal to call our custom unmarshalling code when seeing a Timestamp value. For this case, we use a pointer method, because we want the caller to the see the changes made to the receiver. In order to set the value that a pointer points to, we dereference the pointer manually using the * operator. Inside of the UnmarshalJSON method, t represents a pointer to a Timestamp value. By saying *t, we dereference the pointer t and we are able to access the value that t points to. Remember: everything is pass-by-value in Go. That means that inside of the UnmarshalJSON method, the pointer t is not the same pointer as the pointer in its calling context; it is a copy. If you were to assign t to another value directly, you would just be reassigning a function-local pointer; the change would not be seen by the caller. However, the pointer inside of the method call points to the same data as the pointer in its calling scope; by dereferencing the pointer, we make our change visible to the caller.
We can make use of the time.Parse method, which has the signature func(layout, value string) (Time, error). That is, it takes two strings: the first string is a layout string that describes how we are formatting our timestamps, and the second is the value we wish to parse. It returns a time.Time value, as well as an error (in case we failed to parse the timestamp for some reason). You can read more about the semantics of the layout strings in the time package documentation, but in this example we won’t need to figure out the layout string manually because this layout string already exists in the standard library as the value time.RubyDate. So in effect, we can resolve the string “Thu May 31 00:00:01 +0000 2012” to a time.Time value by invoking the function time.Parse(time.RubyDate, "Thu May 31 00:00:01 +0000 2012"). The value we will receive is of type time.Time. In our example, we’re interested in values of the type Timestamp. We can convert the time.Time value to a Timestamp value by saying Timestamp(v), where v is our time.Time value. Ultimately, our UnmarshalJSON function winds up looking like this:
func (t *Timestamp) UnmarshalJSON(b []byte) error { v, err := time.Parse(time.RubyDate, string(b[1:len(b)-1])) if err != nil { return err } *t = Timestamp(v) return nil }
we take a subslice of the incoming byte slice because the incoming byte slice is the raw data of the JSON element and contains the quotation marks surrounding the string value; we want to chop those off before passing the string value into time.Parse.
Source for the entire timestamp example can be seen (and executed) here:http://play.golang.org/p/QpiFsJi-nZ
Real-world interfaces: getting an object out of an http request
Let’s wrap up by seeing how we might design an interfaces to solve a common web development problem: we wish to parse the body of an HTTP request into some object data. At first, this is not a very obvious interface to define. We might try to say that we’re going to get a resource from an HTTP request like this:
GetEntity(*http.Request) (interface{}, error)
because an interface{} can have any underlying type, so we can just parse our request and return whatever we want. This turns out to be a pretty bad strategy, the reason being that we wind up sticking too much logic into the GetEntity function, the GetEntity function now needs to be modified for every new type, and we’ll need to use a type assertion to do anything useful with that returned interface{} value. In practice, functions that return interface{} values tend to be quite annoying, and as a rule of thumb you can just remember that it’s typically better to take in an interface{} value as a parameter than it is to return an interface{} value. (Postel’s Law, applied to interfaces)
We might also be tempted to write some type-specific function like this:
GetUser(*http.Request) (User, error)
This also turns out to be pretty inflexible, because now we have different functions for every type, but no sane way to generalize them. Instead, what we really want to do is something more like this:
type Entity interface { UnmarshalHTTP(*http.Request) error }
func GetEntity(r *http.Request, v Entity) error { return v.UnmarshalHTTP(r) }
Where the GetEntity function takes an interface value that is guaranteed to have an UnmarshalHTTP method. To make use of this, we would define on our User object some method that allows the User to describe how it would get itself out of an HTTP request:
func (u *User) UnmarshalHTTP(r *http.Request) error { // … }
in your application code, you would declare a var of User type, and then pass a pointer to this function into GetEntity:
var u User if err := GetEntity(req, &u); err != nil { // … }
That’s very similar to how you would unpack JSON data. This type of thing works consistently and safely because the statement var u User will automatically zero the User struct. Go is not like some other languages in that declaration and initialization occur separately, and that by declaring a value without initializing it you can create a subtle pitfall wherein you might access a section of junk data; when declaring the value, the runtime will zero the appropriate memory space to hold that value. Even if our UnmarshalHTTP method fails to utilize some fields, those fields will contain valid zero data instead of junk.
That should seem weird to you if you’re a Python programmer, because it’s basically inside-out of what we typically do in Python. The reason that this form becomes so handy is that now we can define an arbitrary number of types, each of which is responsible for its own unpacking from an http request. It is now up to the entity definitions to decide how they may be represented. Then, we can build around the Entity type to create things like generic HTTP handlers.
Wrapping up
I hope, after reading this, that you feel more comfortable using interfaces in Go. Remember the following:
- create abstractions by considering the functionality that is common between datatypes, instead of the fields that are common between datatypes
- an
interface{}value is not of any type; it is ofinterface{}type - interfaces are two words wide; schematically they look like
(type, value) - it is better to accept an
interface{}value than it is to return aninterface{}value - a pointer type may call the methods of its associated value type, but not vice versa
- everything is pass by value, even the receiver of a method
- an interface value isn’t strictly a pointer or not a pointer, it’s just an interface
- if you need to completely overwrite a value inside of a method, use the
*operator to manually dereference a pointer
Ok, I think that sums up everything about interfaces that I personally found confusing. Happy coding :)
https://research.swtch.com/interfaces
In Go (Golang), implementing interfaces with receiver functions or methods involves defining an interface and ensuring that a type implements all the methods in the interface. Here’s a step-by-step guide on how to do this:
1. Define an Interface
An interface in Go is a set of method signatures. A type implements an interface by implementing all the methods in the interface.
type Shape interface {
    Area() float64
    Perimeter() float64
}
In this example, any type that has Area() and Perimeter() methods with the correct signatures will implicitly implement the Shape interface.
2. Define a Type
Next, define a type that you want to implement the interface. This can be a struct or any other custom type.
type Rectangle struct {
    Width, Height float64
}
3. Implement the Interface Methods
Implement all the methods declared in the interface for your type. These methods are known as receiver functions.
// Area method for Rectangle
func (r Rectangle) Area() float64 {
    return r.Width * r.Height
}

// Perimeter method for Rectangle
func (r Rectangle) Perimeter() float64 {
    return 2 * (r.Width + r.Height)
}
In these implementations, (r Rectangle) is the receiver of the Area() and Perimeter() methods, making Rectangle an implementer of the Shape interface.
4. Using the Interface
You can now use the Shape interface as a type in functions or as part of other structs. This allows for polymorphic behavior.
func PrintShapeDetails(s Shape) {
    fmt.Printf("Area: %.2f, Perimeter: %.2f\n", s.Area(), s.Perimeter())
}

func main() {
    r := Rectangle{Width: 10, Height: 5}
    PrintShapeDetails(r) // Rectangle implements Shape
}
Best Practices
- Implicit Implementation: Go interfaces are implemented implicitly, meaning you don’t need to explicitly declare that a type implements an interface.
- Small and Focused Interfaces: Go encourages the use of small interfaces, often with only one or two methods.
- Pointer vs. Value Receivers: If your method modifies the receiver or the receiver is a large struct, use pointer receivers. Otherwise, value receivers are fine.
- Interface Naming Convention: By convention, single-method interfaces are named by the method name plus an
-ersuffix, likeReader,Writer,Formatter, etc.
Example with Pointer Receiver
Sometimes you might want to use pointer receivers, especially if you need to modify the receiver or if the struct is large and you want to avoid copying it.
type Circle struct {
    Radius float64
}

func (c *Circle) Area() float64 {
    return math.Pi * c.Radius * c.Radius
}

func (c *Circle) Perimeter() float64 {
    return 2 * math.Pi * c.Radius
}

// main function remains the same
In this example, Circle also implements the Shape interface, but with pointer receivers. When passing a Circle to PrintShapeDetails, you would typically use a pointer: PrintShapeDetails(&circleInstance).
Struct Embedding
package main

import "fmt"

type base struct {
    num int
}

func (b base) describe() string {
    return fmt.Sprintf("base with num=%v", b.num)
}

type container struct {
    base
    str string
}

func main() {

    co := container{
        base: base{
            num: 1,
        },
        str: "some name",
    }

    fmt.Printf("co={num: %v, str: %v}\n", co.num, co.str)

    fmt.Println("also num:", co.base.num)

    fmt.Println("describe:", co.describe())

    type describer interface {
        describe() string
    }

    var d describer = co
    fmt.Println("describer:", d.describe())
}
Generics
Generics in Go, introduced in Go 1.18, allow for the creation of functions and types that are abstracted over the types they operate on. This means you can write code that can work with different types without sacrificing type safety. Here’s a step-by-step guide to understanding and using generics in Go:
Step 1: Understanding the Need for Generics
Before generics, Go developers often resorted to using interfaces and type assertions for functions that needed to handle different types. This approach was not type-safe and required additional runtime checks. Generics solve this by allowing you to write more general and reusable code while maintaining type safety.
Step 2: Introducing Type Parameters
Generics are implemented through type parameters. A type parameter is a placeholder for a type that will be specified when the function or type is used.
Step 3: Writing a Generic Function
Here’s how you can write a generic function:
-
Define the Function with Type Parameters:
package main

import "fmt"

// T is a type parameter, inside square brackets
func Print[T any](s []T) {
    for _, v := range s {
        fmt.Println(v)
    }
}
In this example,
Printis a generic function with a type parameterT. The[T any]syntax declaresTas a type parameter constrained byany, which meansTcan be any type. -
Using the Generic Function:
func main() {
    Print([]int{1, 2, 3})
    Print([]string{"hello", "world"})
}
Here,
Printis called with slices ofintandstring. The type ofTis inferred from the argument.
Step 4: Understanding Type Constraints
Type constraints specify what kind of types can be used as type arguments. In the above example, we used any, which allows any type. You can define more specific constraints:
type Number interface {
    int | float64
}

func Sum[T Number](numbers []T) T {
    var sum T
    for _, num := range numbers {
        sum += num
    }
    return sum
}
In this example, Number is a type constraint that allows only int and float64 types.
Step 5: Generic Types
Generics can also be used in defining types like structs, interfaces, or even other functions. For example:
type Stack[T any] struct {
    elements []T
}

func (s *Stack[T]) Push(v T) {
    s.elements = append(s.elements, v)
}

func (s *Stack[T]) Pop() T {
    n := len(s.elements)
    v := s.elements[n-1]
    s.elements = s.elements[:n-1]
    return v
}
Here, Stack is a generic type that can hold elements of any type.
Best Practices and Tips
- Use Generics When Needed: Don’t overuse generics. They are great for writing reusable libraries but might complicate simple code.
- Clear Naming: Use descriptive names for type parameters (like
T Numberfor numbers). - Test with Different Types: Ensure your generic code is tested with all types you expect it to work with.
- Documentation: Clearly document what your generic code does, especially if you are creating a library.
Generics in Go are a powerful feature that enables writing more versatile and type-safe code. They are particularly useful in library and framework development where you need to handle different types but still want to maintain the strong typing that Go offers.
In Go’s generics, comparable is a predeclared interface type that is satisfied by any type whose values can be compared using the == and != operators. This includes basic types like integers, floats, strings, and booleans, as well as arrays, structs, pointers, channels, and interfaces (under certain conditions).
Understanding comparable
Here’s a breakdown of comparable in the context of generics:
-
Purpose of
comparable:comparableprovides a way to create generic functions or types that need to compare values for equality or inequality.- It ensures type safety by restricting the types to those that can be compared.
-
Using
comparable:- You use
comparableas a type constraint in a generic function or type. - For instance, you might want to write a function that removes duplicates from a slice, which would require comparing elements.
- You use
Example: A Generic Function with comparable
Let’s look at an example that demonstrates the use of comparable in a generic function:
package main

import "fmt"

// RemoveDuplicates removes duplicate values from a slice.
// T must be a comparable type.
func RemoveDuplicates[T comparable](slice []T) []T {
    unique := make(map[T]struct{})
    result := []T{}

    for _, v := range slice {
        if _, exists := unique[v]; !exists {
            unique[v] = struct{}{}
            result = append(result, v)
        }
    }

    return result
}

func main() {
    intSlice := []int{1, 2, 2, 3, 4, 4, 4, 5}
    stringSlice := []string{"apple", "banana", "apple", "orange"}

    fmt.Println(RemoveDuplicates(intSlice))    // Output: [1 2 3 4 5]
    fmt.Println(RemoveDuplicates(stringSlice)) // Output: ["apple" "banana" "orange"]
}
In this example, RemoveDuplicates is a generic function that uses T comparable as a type constraint. It means that the function can be called with any type T as long as values of that type can be compared using == and !=. This function works with slices of integers, strings, or any other comparable types.
Important Points about comparable
- Not All Types are Comparable: Slices, maps, and functions are not comparable, so they cannot be used with
comparable. - Structs and Arrays: Structs and arrays are comparable if all their elements are comparable.
- Pointers and Interfaces: Pointers are comparable, as are interface values (if their dynamic values are comparable).
When to Use comparable
Use comparable when writing generic code that needs to compare values. This could be for functions like sorting, searching, removing duplicates, or any other operation where equality checks are essential.
Remember, comparable is a built-in constraint and is part of the language’s type system, ensuring that generic code remains type safe and clear in its intent.
error handling
https://go.dev/blog/error-handling-and-go
Creating a custom error struct in Go that also sends a log to a server requires a few steps. Here’s a simplified example to demonstrate how you can do this:
-
Define the Custom Error Struct: This struct will hold the error message and any other relevant information.
-
Implement the
Error()Method: This method is necessary to satisfy theerrorinterface. -
Implement a Method to Send Log to the Server: This method will handle the logic to send the error details to a server.
-
Use the Custom Error in Your Code:
Here’s how you might implement this:
package main

import (
    "fmt"
    "net/http"
    "bytes"
    "encoding/json"
)

// CustomError is our custom error type
type CustomError struct {
    Msg string
    // Add more fields if necessary, like timestamp, severity, etc.
}

// Error implements the error interface for CustomError.
func (e *CustomError) Error() string {
    return e.Msg
}

// SendLog sends an error log to the server
func (e *CustomError) SendLog(url string) {
    // Convert the error to JSON. Add more fields if necessary.
    jsonData, err := json.Marshal(e)
    if err != nil {
        fmt.Println("Error encoding JSON:", err)
        return
    }

    // Send the JSON data to the server
    _, err = http.Post(url, "application/json", bytes.NewBuffer(jsonData))
    if err != nil {
        fmt.Println("Error sending log to server:", err)
        return
    }

    fmt.Println("Log sent to server successfully")
}

func doSomething() error {
    // Simulate an error
    return &CustomError{Msg: "Something went wrong"}
}

func main() {
    err := doSomething()
    if err != nil {
        fmt.Println("Error:", err)

        // Type assertion to access SendLog method
        if customErr, ok := err.(*CustomError); ok {
            customErr.SendLog("http://example.com/log")
        }
    }
}
In this code:
- The
CustomErrorstruct implements theerrorinterface by providing theError()method. - The
SendLogmethod sends the error details to a server. This is a simplistic implementation; in a real-world scenario, you might want to handle retries, different HTTP methods, authentication, etc. - When an error occurs, you check if it’s a
CustomErrorusing a type assertion, and if so, you send the log to the server.
Note: This example assumes a simple scenario where the server accepts JSON data via a POST request. The actual implementation of the server-side log receiver can vary based on your specific requirements and infrastructure. Additionally, error handling and logging are critical aspects of software development, and in a production environment, you would likely use more sophisticated methods and tools for these tasks.
Goroutines
Goroutines are a fundamental concept in Go (Golang) for concurrent programming. They allow you to execute functions asynchronously, which can lead to more efficient and scalable programs. Here’s a detailed explanation of goroutines:
What is a Goroutine?
A goroutine is a lightweight thread managed by the Go runtime. It’s a function that can run concurrently with other functions. Goroutines are lighter than threads in traditional threading models because they require less memory overhead and have a more straightforward and efficient context switching mechanism.
Creating a Goroutine
You create a goroutine by prefixing a function call with the go keyword. Here’s an example:
go myFunction()This line of code starts a new goroutine and immediately returns to the next line of code without waiting for myFunction to finish. myFunction executes concurrently.
How Goroutines Work
- Concurrency vs. Parallelism: Concurrency is about dealing with lots of things at once. Parallelism is about doing lots of things at once. Goroutines enable concurrency, and if you have a multi-core processor, they can also run in parallel.
- Goroutine Scheduler: The Go runtime contains a scheduler that maps goroutines onto available OS threads for execution, managing their lifecycle, and handling their scheduling and switching.
- Starting and Exiting: When a goroutine starts execution, it continues to run until it completes its function, reaches a return statement, or the main function (
main()) of the program terminates.
Advantages of Goroutines
- Lightweight: Goroutines are more lightweight than traditional OS threads. They have a smaller stack that can grow and shrink, and their initial stack size is typically a few kilobytes.
- Efficient Communication: Goroutines communicate using channels, which are thread-safe and prevent race conditions when used correctly.
- Scalability: Because of their low cost, you can create thousands or even millions of goroutines on a single machine.
Goroutines and Channels
Channels are a powerful feature in Go used for communication between goroutines. When creating concurrent programs, channels are the preferred way to exchange data between goroutines. They ensure synchronization and provide an elegant way to handle data exchange and avoid race conditions.
Best Practices and Considerations
- Avoid Shared Memory: Use channels to communicate between goroutines instead of sharing memory to avoid race conditions.
- Buffered vs. Unbuffered Channels: Understand when to use buffered channels (non-blocking under certain conditions) and unbuffered channels (synchronous).
- Handle Goroutine Leaks: Be mindful of goroutines that never terminate (goroutine leaks), as they can lead to memory leaks.
- Sync Package: The
syncpackage provides additional features likeWaitGroupandMutexwhich are useful for managing goroutines.
Example: Simple Goroutine with a Channel
package main

import (
    "fmt"
    "time"
)

func printCounts(c chan int) {
    num := 0
    for num >= 0 {
        num = <-c
        fmt.Println(num)
    }
}

func main() {
    c := make(chan int)
    go printCounts(c)

    for i := 0; i < 10; i++ {
        c <- i
    }

    time.Sleep(time.Millisecond * 1)  // Sleep is often used for demonstration purposes
    c <- -1  // Signal the goroutine to finish
    fmt.Println("End of main")
}
In this example, printCounts runs as a separate goroutine and prints numbers sent to it via the channel c. The main function sends numbers to the channel, which are then printed by the goroutine. The use of channels ensures that data is passed safely between the main function and the goroutine.
Goroutines are a powerful tool in Go for creating efficient and concurrent applications. However, they require a good understanding of concurrency and synchronization mechanisms to avoid common pitfalls such as race conditions and deadlocks.
Golang Channels buffered and unbuffered
Golang channels are a powerful feature for handling concurrency in Go programming. They provide a way for goroutines to communicate with each other and synchronize their execution. There are two main types of channels in Go: unbuffered channels and buffered channels. Understanding their differences is key to using them effectively.
Unbuffered Channels
- Synchronous Communication: Unbuffered channels require both the sender and receiver to be ready to communicate. If one side is not ready, the other side will wait (block) until it becomes ready.
- Direct Transfer: The data is transferred directly from the sender to the receiver. There’s no intermediate storage or queue.
- Guaranteed Delivery: When a message is sent through an unbuffered channel, it is guaranteed that it has been received and processed by the receiving goroutine.
- Use Case: Ideal for ensuring maximum synchronization between goroutines, where each send must be immediately matched with a receive.
Buffered Channels
- Asynchronous Communication: Buffered channels have a capacity and allow sending multiple messages into the channel without a corresponding receiver. The sender only blocks when the buffer is full.
- Buffering: Messages are stored in a queue until they can be received. This buffer is of a fixed size, set at the time of channel creation.
- Non-blocking with Buffer Space: Sends and receives to the channel are non-blocking as long as there is space in the buffer.
- Use Case: Useful when you want to allow goroutines to continue executing without waiting for immediate receipt of the message, or when you want to handle bursts of messages.
Key Points
- Blocking Behavior: Unbuffered channels block both sender and receiver until the other side is ready, while buffered channels block only when the buffer is full (for sends) or empty (for receives).
- Capacity Declaration: Buffered channels require you to specify the capacity at the time of creation (e.g.,
ch := make(chan int, 10)), whereas unbuffered channels do not need any capacity specified (e.g.,ch := make(chan int)). - Concurrency Control: Unbuffered channels provide more control over the timing of goroutine interactions, making them suitable for fine-grained synchronization tasks.
- Performance Considerations: Buffered channels can help reduce the time goroutines spend waiting on each other, potentially improving overall performance in scenarios where tasks can be executed independently.
In summary, the choice between unbuffered and buffered channels in Go should be based on the specific needs of your concurrent programming tasks, considering factors like the desired level of synchronization, message buffering requirements, and overall performance objectives.
package main

import (
    "fmt"
    "net/http"
    "time"
)

func hello(w http.ResponseWriter, req *http.Request) {

    ctx := req.Context()
    fmt.Println("server: hello handler started")
    defer fmt.Println("server: hello handler ended")

    select {
    case <-time.After(10 * time.Second):
        fmt.Fprintf(w, "hello\n")
    case <-ctx.Done():

        err := ctx.Err()
        fmt.Println("server:", err)
        internalError := http.StatusInternalServerError
        http.Error(w, err.Error(), internalError)
    }
}

func main() {

    http.HandleFunc("/hello", hello)
    http.ListenAndServe(":8090", nil)
}